kevin - the professor
Well-Known Member
Hello Everyone,
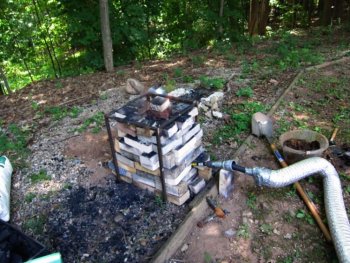
this is my long-anticpated (for me) first smelt. Ricky came up today, and we built a simple but fairly large smelter of our combined stash of fire bricks. It was designed for SIMPLE but repeatable. It was nothing but a chimney of firebricks, no mortar, held together by a metal form salvaged from when I bought my grinder. Uncle Al builds a nice steel cage to ship the grinder in. I took this frame and used it to help support the bricks.
The structure was made from a few different brands and slightly different sizes of brick, as well as a few broken ones. It was a junkyard affair.
Two good things:1. It worked!
2. the stuff we smelted was mostly grinder swarf. I grind into a bucket with a little water or into a duct that leads to a shop vac with a little water. Save the stuff from steel and wrought iron. It turns into a very light, rusted steel wool sort of mess. It is not dense, and breaks into chunks. These chunks smelted!
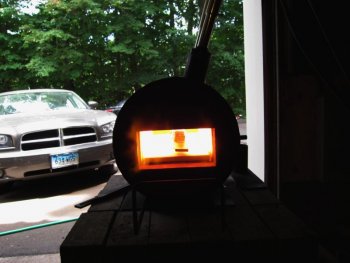
The structure was 3 bricks wide and 10 courses of bricks tall, with a small pit dug under the middle and filled with charcoal fines and ashes. 3/4" tuyere, fed with hair dryer on cool and low. I filled the chimney with a layer of charcoal (all was smashed to smaller size than the original, maybe 1.5" cubes were the largest pieces, maybe more. I was a little lazy with the first filling). I started the first little bit of charcoal in one of the lighting chimneys that you use for grilling. Put that layer in and filled half way and turned on the air. Waited about 20 mins, then filled the rest of the way. I was sure that it was going to go out and I was going to have to find a better way. Then, really suddenly, I began to hear small "whump" sounds, and the thing acted a little like a forge coming up to temp (gas). Over the course of a minute the sputters turned into a nice jet engine rumble that just got louder. I was amazed. Within 40 minutes of pouring the first layer in, there was a foot of flames shooting out the top.
I let that go for about half and hour. Really technically, every time the charcoal burned down to the second course of bricks from the top, I refilled it with a pint container full of new charcoal. This happened every 15 minutes for the first hour after the 40 minute warmup, and every 10 minutes for the next two hours.
Ricky arrived and took over charcoal smashing duty just about when I added the first charge of grinder swarf. We did put some banding and some nails in, too. We did not want to do all of this and get nothing, but it turned out that everything we used worked except some of the nails were too big. We should have waited longer at the end before breaking in, or used smaller nails.
So, we continued this for 3 hours - charge a pint or two or charcoal every 15 mins to keep topped-off, and half a pint of iron-containing material.
Filled the time using MY NEW HABANERO FORGE!. This thing is wonderful - I welded a billet of 15n20 and w2. Never have I used a forge that was this hot, so this was the hottest I have ever welded, and the most even heating. It was just a shock. No more fuel than my former single-burner forge, yet a great deal hotter and better spread of heat.
OK - now we broke into the smelter. Carefully unstacked until the last two courses, the side closes to the tuyer was stuck together and stuck to the BLOOM!.
We did not weigh the amount of material we put in. We know we used 3 bags of hardwood charcoal.
We got, after removing all of the charcoal and the little bitty bit of slag, a 6.2lb bloom!
It sparked variably, with a couple of places just being brick that stuck to it (about 5 bricks were not fire bricks and a little of them melted and ran down the wal1ls). Overall, the majority of it sparked High Carbon! It was between 1075 and w2, and looked much closer to the w2. So, we may have basically made W1 or 1095!
As soon as I get a chance, I am going to try and work the bloom into a bar. Then, I will split what is useful with Ricky, and we will do it again. Next time, we know we need to let the thing run for another hour (instead of half an hour) before we cut the air after the last charge. Also, smaller nails. Finally, since this thing (the smelter) turned out to be larger than I thought I was going to build at first (I got excited and built a larger one that could run longer instead of staying with the mini-furnace approach), we plan to have one hair dryer but split the airflow into two tuyeres. We will keep them each at the same scientific 2 bricks high.
Pics:
Thanks for looking!
Advice is sought of any form (regarding smelting), and especially any info about How to work the Bloom?
good news - save the steel and iron that comes off of your grinder, it can be smelted (I left out anything with much manganese because will want hamons on the orishigane blades. Is that necessary, meaning will the alloyed manganese last through the smelt to remain or is it just overkill?).
Questions - 1. how to work bloom?
2. will things like managnese and vanadium survive the smelt to remain in the orishigane so that careful selection of swarf matters?
3. what things could help us that we don't know enough to even ask about?
take care,
Kevin
ps - thanks to Skip and Jesus for encouraging me to try this last year, and this would never have happened without Ricky providing insights, materials, and motivation. We hope to make this a regular thing.
this is my long-anticpated (for me) first smelt. Ricky came up today, and we built a simple but fairly large smelter of our combined stash of fire bricks. It was designed for SIMPLE but repeatable. It was nothing but a chimney of firebricks, no mortar, held together by a metal form salvaged from when I bought my grinder. Uncle Al builds a nice steel cage to ship the grinder in. I took this frame and used it to help support the bricks.
The structure was made from a few different brands and slightly different sizes of brick, as well as a few broken ones. It was a junkyard affair.
Two good things:1. It worked!
2. the stuff we smelted was mostly grinder swarf. I grind into a bucket with a little water or into a duct that leads to a shop vac with a little water. Save the stuff from steel and wrought iron. It turns into a very light, rusted steel wool sort of mess. It is not dense, and breaks into chunks. These chunks smelted!
The structure was 3 bricks wide and 10 courses of bricks tall, with a small pit dug under the middle and filled with charcoal fines and ashes. 3/4" tuyere, fed with hair dryer on cool and low. I filled the chimney with a layer of charcoal (all was smashed to smaller size than the original, maybe 1.5" cubes were the largest pieces, maybe more. I was a little lazy with the first filling). I started the first little bit of charcoal in one of the lighting chimneys that you use for grilling. Put that layer in and filled half way and turned on the air. Waited about 20 mins, then filled the rest of the way. I was sure that it was going to go out and I was going to have to find a better way. Then, really suddenly, I began to hear small "whump" sounds, and the thing acted a little like a forge coming up to temp (gas). Over the course of a minute the sputters turned into a nice jet engine rumble that just got louder. I was amazed. Within 40 minutes of pouring the first layer in, there was a foot of flames shooting out the top.
I let that go for about half and hour. Really technically, every time the charcoal burned down to the second course of bricks from the top, I refilled it with a pint container full of new charcoal. This happened every 15 minutes for the first hour after the 40 minute warmup, and every 10 minutes for the next two hours.
Ricky arrived and took over charcoal smashing duty just about when I added the first charge of grinder swarf. We did put some banding and some nails in, too. We did not want to do all of this and get nothing, but it turned out that everything we used worked except some of the nails were too big. We should have waited longer at the end before breaking in, or used smaller nails.
So, we continued this for 3 hours - charge a pint or two or charcoal every 15 mins to keep topped-off, and half a pint of iron-containing material.
Filled the time using MY NEW HABANERO FORGE!. This thing is wonderful - I welded a billet of 15n20 and w2. Never have I used a forge that was this hot, so this was the hottest I have ever welded, and the most even heating. It was just a shock. No more fuel than my former single-burner forge, yet a great deal hotter and better spread of heat.
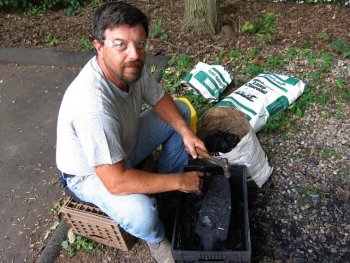
OK - now we broke into the smelter. Carefully unstacked until the last two courses, the side closes to the tuyer was stuck together and stuck to the BLOOM!.
We did not weigh the amount of material we put in. We know we used 3 bags of hardwood charcoal.
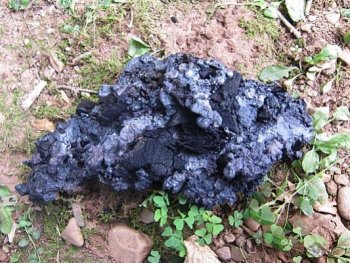
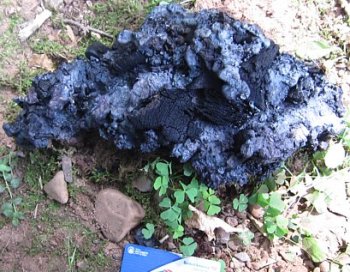
We got, after removing all of the charcoal and the little bitty bit of slag, a 6.2lb bloom!
It sparked variably, with a couple of places just being brick that stuck to it (about 5 bricks were not fire bricks and a little of them melted and ran down the wal1ls). Overall, the majority of it sparked High Carbon! It was between 1075 and w2, and looked much closer to the w2. So, we may have basically made W1 or 1095!
As soon as I get a chance, I am going to try and work the bloom into a bar. Then, I will split what is useful with Ricky, and we will do it again. Next time, we know we need to let the thing run for another hour (instead of half an hour) before we cut the air after the last charge. Also, smaller nails. Finally, since this thing (the smelter) turned out to be larger than I thought I was going to build at first (I got excited and built a larger one that could run longer instead of staying with the mini-furnace approach), we plan to have one hair dryer but split the airflow into two tuyeres. We will keep them each at the same scientific 2 bricks high.
Pics:
Thanks for looking!
Advice is sought of any form (regarding smelting), and especially any info about How to work the Bloom?
good news - save the steel and iron that comes off of your grinder, it can be smelted (I left out anything with much manganese because will want hamons on the orishigane blades. Is that necessary, meaning will the alloyed manganese last through the smelt to remain or is it just overkill?).
Questions - 1. how to work bloom?
2. will things like managnese and vanadium survive the smelt to remain in the orishigane so that careful selection of swarf matters?
3. what things could help us that we don't know enough to even ask about?
take care,
Kevin
ps - thanks to Skip and Jesus for encouraging me to try this last year, and this would never have happened without Ricky providing insights, materials, and motivation. We hope to make this a regular thing.