Making squaring dies?

billyO

Well-Known Member
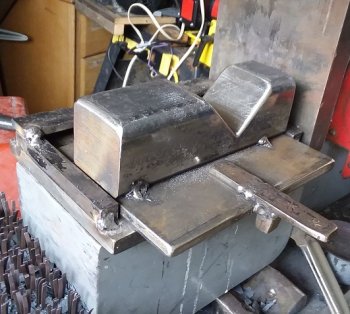
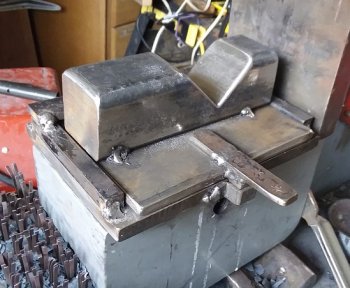
Hello all. I think it's time for me to make some squaring dies for the 25-ton Coal IronWorks press I have access to, and a couple of questions come to mind.
I was planning on making dies 4-6" long thinking I would be able to set more of the weld at once, but a search shows that Ed previously posted in: https://knifedogs.com/threads/questions-about-canister-damascus.51061/
It's FAR better to have squaring dies that are only 2-3" long, and take "bits"........
...so I'm thinking about heading to the local steel yard and look for scraps of 3" square, and making 2-3 diamonds. Any suggestions on starting sizes of the diamonds for cans that will yield nakiri/chef knife sized billets?
Should I forge in the diamonds or cut/grind them?
Or should I use angle iron? Other than speed in fabricating, is there any benefit to using angle iron instead of solid stock? I know to reinforce the angle iron when welding so they don't collapse in use if I go this way.
Finally, when you guys are doing canisters, would it help to have a flattening/drawing spot in the same dies?
Thank you and stay safe.
 
Also, I saw a version in Randy McDaniels book that's got a universal bottom die with different top dies for different sizes.
Untitled.jpg
Is this a good idea/must have/"wish I had done" thing?
 
If I were going to spend money to make the squaring dies I would buy square bar in a type of steel that resists deformation at high temperatures. While making my first few cans I was surprised how quickly A LOT of heat will build up in your dies. I will not suggest one as I do not know enough about those types of steels. If I were trying to make them from scrap, I would go with whatever square bar I could find that is large enough to do the job. If angle iron was all I had around that is what I would make them out of, reinforced as you pointed out above. I have also seen plate steel with the V's cut into them used to make drawing dies. I assumed the maker stacked several plates together to get the size die needed.
For the size of the V's I guess it depends on the size of your starting cans. My cans are normally 2.5x2.5 or maybe 3x3 (depending on what square tube I have laying around) and about 4.5 to 5 inches long. Boss and Ed do far bigger cans than that.
As far as the combo dies go I have never used combo dies but I can tell you I would like the option. It gets a little tiresome (mainly because the dies are really hot) switching dies every couple of heats to keep things even. Boss Dawg and Ed both make a lot more canister than I ever have so hopefully they will chime in soon.
 
Last edited:
I would say that angle iron with "supports (I use either solid round or solid square stock inserted to support the angle iron) would be a cheaper route...just because even if made from solid square stock, they will have to be replaced periodically...... and the angle iron is simply cheaper...and you can reuse the supports. BIG HINT: When you weld the angle or square, or triangle, or whatever to the die plates....just tack weld it. Sooner or later you will have to replace things, and a couple of tack welds are far easier to cut off/through than a solid weld line.

Also remember when building press dies..... it doesn't matter what steel type you choose.....even something like D2 (which I wasted a ton of money on, once upon a time) or other "red hard" steels will get annealed out very quickly, and start deforming.....just use A36, tack weld it, and resign yourself to the fact that you'll have to change it out with time/use.

I tried the "universal" top and/or bottom die......and didn't really care for it. The issue is that if you press just a tad too much, the can get off square, with huge lengthwise "dents", and the can gets "wonky" super quick. It only takes making those big "dents" in a can one time during the process, it deforms whatever pattern/image you're trying for..... and you never get the pattern/image back to where it should be. After wrecking a few cans that way, I just relented and now have top and bottom dies ranging from 4" down to 1 1/4" square. 4" to 1 1/2" in 1/2" increments, and from there down to 1", I have them in 1/4" increments. Yeah, it's a bit overkill, but it saves me from having to "rebuild" dies so often.

Now, you have to realize that Orange Crush (my press) is just over 80 tons...... and the reason I have that much tonnage, is for "cans". You have to start with a large can, to end up with enough usable billet/material to make it worth the effort. Even with that, I have separate dies for each and everything that Orange Crush does.....and more times then not, even with that amount of tonnage Orange Crush produced, I am taking relatively small "bites" of a can. About the only time I do not, it the first time a can is pressed. I have 8" x 6" flat dies, and after it's initial 45mins to 1 hour soak in the forge, the can is compressed about 1/2" at most, then rotated 90 degrees, pressed, and so on and so on..... ALWAYS my first concern is EVEN AND EQUAL compression/draw. You can actually feel the can getting more and more solid as you go...... and then I go to the squaring dies.....taking about 1/4" or less "bites", the rotate and do the same. The whole idea with a can, is to create something you typically cannot with "standard" Damascus making techniques.....so the idea of EVEN compression, each and every time you have a can in the press, should be the primary concern. At least if you want any images, letters, etc. to come out even once you've reached your final billet size.

Speaking of that..... if your intent is to accordion cut open billets, forge the billet to the width of blade you are seeking to make....plus a tad more to make up for the "can"(that will be milled or ground away) For example.....if you want to make a 1 1/2" wide Bowie, camp, etc knife blade.....you'll want to forge you're can down to approx 1 5/8" square, or maybe a tad more. I will often times start with a can that is 5" square (because that's about as big as I can fit into my forge opening), and will forge a portions of the same can/billet down of various square sizes, based on the blade widths I want out of that can/billet.
 
Last edited:
Been there...done that Chris! I can remember thinking..... "Cool! I'll just spend a day building dies....and will never have to do it again!"..... NOT! I had to learn the hard way. :)
 
Been there...done that Chris! I can remember thinking..... "Cool! I'll just spend a day building dies....and will never have to do it again!"..... NOT! I had to learn the hard way. :)
Yeah I just like to weld. I finally got my shielding gas hooked up so I went to town. If boss had not told me to reinforce them I am sure I would be making them over already.
 
Thanks all.
And thanks for the detailed response, Ed. Most helpful. I've got some work ahead of me. I'll definitely show pics of the blade from the first good billet. It might be a little bit, though.
 
Please keep us posted on how things go for you..... I'm always interesting in hearing others' techniques, issues, or whatever concerning working cans.

I always get ideas from others' nuggets! ;)
 
I meant to mention this before but I forgot. When Ed gives advice he is coming from a full time 30 years in the game making knives for a living perspective. When I give advice it is from a hobbyist (part timer for 10 or so years) perspective. SOMETIMES what is good for one will not work for the other for various reasons. I know there are some things I do which would not work for a full time heavy use application but I offer it any way as an alternative for someone who is in my shoes.
 
When Ed gives advice he is coming from a full time 30 years in the game making knives for a living perspective. When I give advice it is from a hobbyist (part timer for 10 or so years) perspective.
That's a good point, Chris. And it is something I was taking into consideration when deciding which way to go.
resign yourself to the fact that you'll have to change it out with time/use.
A great piece of info (I don't expect anyone to have this, however) would be how many billets one could expect from each set up. So for discussion's sake, lets say the angle iron lasts 100 billets and solid stock lasts 150. If one does 200 billets a year, then easily replaceable is of primary importance. If one only does 10 a year, then the dies will last a decade and ease of replacing isn't as important as other things. I'd say that due to the current pandemic, I'm somewhere in the middle here. I want to be part-time, but there are no Physical Therapy positions to be had (nothing quite like feeling like a new graduate, but one with 24+ years of experience :rolleyes:...), so knifemaking has been my (albeit meager) income for a while now, and the foreseeable future.
So what I decided to do, after a trip to the local steel yard, is make some solid dies out of 2" square. Mainly because I already have about 10 feet of it, and the steel yard didn't have any suitable angle iron cut-offs as I only need four 3" pieces for each die.
Today I need to decide whether to forge the V's or cut/grind them. Forging will be more fun, but I'd have to make a couple of tools to make this tool. And even after forging, there will still be clean-up work with the angle grinder....hmmm....
 
I say do whatever your instincts tell you is the best way to go FOR YOU. Chris summed it up pretty well, and there is certainly no "one size fits all" when it comes to Bladesmithing/Knifemaking.
 
Hey Chris How is that little 12 ton press working out for you? I’m simply not gonna have the money to build the big one I wanted this year and thinking I might build a small 12 ton.
 
Hey Chris How is that little 12 ton press working out for you? I’m simply not gonna have the money to build the big one I wanted this year and thinking I might build a small 12 ton.
I love it. Zero problems. Makes working bigger billets sooooo much easier. The dies are easy and cheap to make too. One of the first things I did was make a straight peen hammer and I was amazed how quickly it squished 2x2 square bar in 1045. I had the peen made in one heat easy. My last San-Mai billet was 3/4 of an inch thick two inches wide and about six inches long. The press did not even blink while drawing it out. Small by Ed I would not think it would work great for a full time production shop but in my little corner of the world, it rocks. I set it up on a rollie table and it rolls into a corner of the shop when I am not using it.
 
Well here's what I came up with for my quick change die plates:
20201018_163421.jpg20201018_163441.jpg

and here are the squaring dies with a place for drawing out a little:
20201018_163407.jpg

on the press:
20201018_164115.jpg

and with what I'm going to try for smaller dies:
20201018_164033.jpg

I'll post pics of the first billet out of these. Thanks for everyone's help & input.
 

Attachments

  • 20201018_163521.jpg
    20201018_163521.jpg
    120.6 KB · Views: 3
  • 20201018_163536.jpg
    20201018_163536.jpg
    114.5 KB · Views: 1
Last edited:
How did you cut the V’s?
Don't laugh (well, go ahead if you want, I guess), but I used a hacksaw on one, and the other I used a cut-off wheel on my angle grinder to start the cuts as deep as the disc would go, then finished up with the hacksaw. It was a lot easier to get the 45 started with the disc. I was careful to stay shy of my scribe line, then used the belt grinder and 36 grit belt to get to get to the lines, then finishing with files. I used hand tools for all the other cuts involved as well. It's seeming like the longer I work with metal, the more I dislike using loud power tools, and I'd rather something take 10 times longer, than put on all the PPE.

Perhaps not having another job that takes up time because of the pandemic probably has something to do with it too. Maybe I weird...(well, no maybes there), but there's something about feeling the teeth of the saw or file bite into the metal and seeing the swarf/shavings drop to the floor at the end of the stroke.
 
The biggest "Pro" of those type squaring dies, is also the biggest "con". The thing you will have to overcome with those dies is your urge to press a "can" too much at a time. Because of the lower surface area on those dies, you will be able to "press" much more at once then you should. ;) Been there, done that, and the only way I know how to explain it is that if you press a single portion (or "bite") of a can much more then you do others, once that portion ("bite") of the pattern/can is pressed more....you can never get it back to even with the rest of the pattern within the billet, and it will show significantly in the finished billets/blades. I'd suggest rounding out the edges (both sides), otherwise you will see/have a significant "bite" mark that will repeat itself down the length of a can being pressed. This can be somewhat "repaired" near the end of the sizing process, by switching to larger flat dies, with stop blocks, and using that method for the last fractions to get to your desired end size.

My recommendation for those kind of dies square dies, would be to use stop blocks throughout the process. Even if you're only taking 1/4" or less "bites" with each welding/pressing series, stop blocks can very often mean the difference between a "Wow" pattern, and an "Oh Crap!" pattern. :)
 
Thanks Ed.
I'd suggest rounding out the edges (both sides),
Right now they are all rounded to about 3/16" radius.

My recommendation for those kind of dies square dies, would be to use stop blocks throughout the process.
I think I've gotten into this habit when drawing out billets, and was thinking about making some stop-block saddles. So you're saying it's time to stop thinking and start doing, eh?:)

... if you press a single portion (or "bite") of a can much more then you do others, once that portion ("bite") of the pattern/can is pressed more....you can never get it back to even with the rest of the pattern within the billet, and it will show significantly in the finished billets/blades.
I've noticed this with drawing out billets too using the combo dies. IMO this was the biggest learning curve I had when I started using the press. I've got a couple of layered billets collecting rust under the table that I don't know what to do with because of going too far on a bite. Even after 8 months of using this press, I still get more nervous and have to remind myself to go slower than I want because with all this power, it's WAY too easy to go to far to fast. And a lot harder to correct when you do.
 
Back
Top