Hidden Tang... what was I thinking

Kevin Zito

KNIFE MAKER
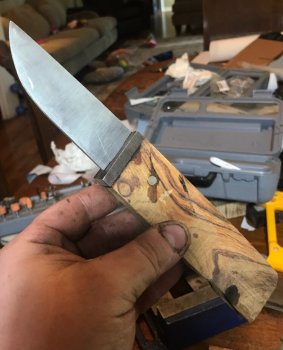
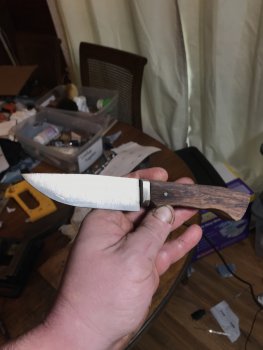
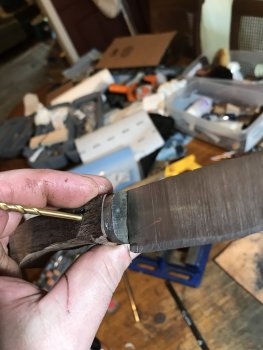
lol this was wayyyyy harder than what I had anticipated, and I’m still nowhere near finished. Blade of a nitro V handle is desert ironwood and bolster/guard is 5160. I learned quite a bit so far. I certainly have a greater appreciation for the hidden tang folks. This will be a work in progress... I judged wanted to get a thread started with some pics. The fit of the three pieces is pretty good. I’ve got to study more pics to finish up that handle and guard.99F31C96-CB8D-4386-9AF7-AFCD4D1779D9.jpeg6F1AF72C-7DD4-4E8A-94D0-75A46652F75D.jpeg
 
You are nearly there!

One piece of advice: I think you jumped the gun a little bit on fitting the handle. The great majority of the work in a hidden tang is the time it takes to get the shoulders of the blade flush to the face of the guard. That process is time consuming like nothing else. Once you have that fitment perfect, then you can permanently mount the guard. Once the guard and blade are one piece, fitting the handle to it is a no-brainer.
 
Your fit looks real good. A couple things jump out at me.

One thing, is that a 1/4 inch pin? If so, the fact you got it together is all the more impressive. I have a very hard time using that large of a pin on a hidden tang. Kudo's to you.

Second thing is where the guard meets the blade will be extremely hard to sharpen and finish. Not impossible but difficult. I always have a ricasso area in front of the guard and have a small drop from the guard to the blade. It is just easier to finish for me.

Other than that, I am looking forward to the completed project. Just keep testing yourself and you will keep learning new stuff.
 
That's a great shape Kevin! I haven't tried a hidden tang yet...........it'll probably be awhile to!
Thanks, OP! I’ve done a guard before so I had a little confidence, but to be honest, I really didn’t know what I was getting myself into. Hopefully it’ll turn out ok.
 
I guess it's time for me to share a few things on hidden tangs.......

1.
The great majority of the work in a hidden tang is the time it takes to get the shoulders of the blade flush to the face of the guard. That process is time consuming like nothing else.
It is....UNLESS you go to Home Depot, and buy one of the small Ryobi miter saws with the built in laser guide. :) Then you fit the guard to the blade, and place it on the handle block you intend to use, at the angle you want.....and use the back of the guard material as a "straight edge" to draw a line on the handle block....then just match the angle on the miter saw (using the laser guide) to the line you've drawn on the handle material. and cut the block to the exact angle of the guard material. Then you don't have to fight with getting the angle correct......just have to fight with drilling/broaching out the hole.

2. Before you ever mix your glue..... and with the guard in it's final fit position, cover the entire blade, and front of the guard with Vaseline.... anywhere you don't want glue to stick. That way IF any glue gets where you don't want it, it pops off easily after curing.... with a sharpened brass rod (brass won't scratch you blade) ;)

3. When gluing on the handle block, use a piece of vulcanized fiber spacer, (black is my preference) and then when you mix your glue, add some pigment to the glue, that matches the color of the spacer material you used. Apply glue to both sides of the spacer material (and fill ANY gap in the back of the guard material with glue) put it in place, then fill the hole in the handle material. This is my "insurance policy"......... ever heard me say..... The difference between a knifemaker, and a good knifemaker is that a good knifemaker knows how to minimize or hide their mistakes? Well in this case, you still have to be VERY close, but if you have a very slight misalignment between the back of the guard and the angle of the handle material......the fiber spacer and the like color glue will make it invisible. :)

3. With the spacer material in place, GENTLY work the tang into the handle material. In this case "glue overflow" is a good thing....you want to "burp" ALL the air out of the handle material, and have it COMPLETELY filled with glue.

4. SUPER IMPORTANT..... DO NOT use any kind of mechanical/rigid clamp! If you do, the chances are high that when you come back after the glue has cured....there will be a gap somewhere in the assembly. Either use ONLY the weight of the blade/guard, or at most two rubber bands, over the top/bottom front of the guard material. and over the butt end of the handle material.

5. When it comes to placing the pin...... Once the glue has cured, get the handle material to the FINAL profile you want. Then go to the drill press, and START by using a drill bit that is at least 3 sizes smaller than the pin size you intend to use. (I generally use 3/32" pins, which means the hole ends up at a #41.... so I start with a #50. ) Carefully line things out, and drill through the handle material, through the tang, and out the other side. Of course if you hardened the tang, you'll need hi-roc or other carbide bits to do this...but I do not harden tangs. The reason you start small on the bit is because even a screw length bit will flex and "wallow" out the handle material when you hit the tang.......once through with the #50, I then re-drill/ream with a 3/32", and then finally with a #41. This generally eliminates the "glue line" you see around the pin of many hidden tang knives. Gently round the ends of the pin, rough it with 400 grit, apply some glue, and insert the pin.....make it long enough to ensure the radius on the ends are fully outside the hole....otherwise you end up with that "glue line". Let it cure and finish out everything.

Whew! OK, I'm tapped out for today. Hope that info is helpful! :) That's just the way Ed does it...... and is certainly not the only way it can be done..... but it's what I've come to over the years of goofing up!

ADDON: After going back and reviewing the pics again, I would also suggest that the blade and front of the guard be 100% completed and finished BEFORE installing the handle......after the guard and handle are installed, it's really difficult to work on the blade, or front of the guard without causing yourself grief. ;)
 
Last edited:
They are tuff! I did one for my 3rd knife, it looks ok but if you know knives like the people on here they would be nice about it but they would tear it apart!!
 
I'll add my two cents here. One of the first things I did when I started making knives was go to the shop that was heat treating for me with two pieces of D2 steel. I had matched them up so one edge was completely level and they matched. I would use this piece and lock it in the vice with the tang in it so I could file the back of the blade so they matched perectly. I have now advanced to using the carbide surfaced file guide to do the same thing. I cut with a coarse file then go to a smooth file and have even used 220 sand paper to make them match. The surface of the guard I smooth on the disc grinder then a granite plate up to 1000 grit to make them flat. I mill the hole for the tang then use file until they match up right. I use J.B. weld to seal it all together ,clean and let dry then worry about handle material.
 
A shame about the ironwood handle Kevin. It was going to be a stunner. The stick tang is a good next step after mastering the basics and brings our skil and paitence evel up a notch or two before we are satisfied with the resuts. As has been said getting everything up to finished stage on the bolster before starting on the handle and then this is a very handy little tool. A piece of commercial hacksaw blade cut down and set into a handle is great for helping with the tang hole in the handle.
0dItMU7l.jpg

This is the little sgian dubh inspired knife I just finished for a friend with a 1095, a stick tang, copper and jarrah. An 1/8 in ricasso is enough to seperate the cutting edge from the front of the bolster.
sXa3Nq0l.jpg
 
Wow
I guess it's time for me to share a few things on hidden tangs.......

1.
It is....UNLESS you go to Home Depot, and buy one of the small Ryobi miter saws with the built in laser guide. :) Then you fit the guard to the blade, and place it on the handle block you intend to use, at the angle you want.....and use the back of the guard material as a "straight edge" to draw a line on the handle block....then just match the angle on the miter saw (using the laser guide) to the line you've drawn on the handle material. and cut the block to the exact angle of the guard material. Then you don't have to fight with getting the angle correct......just have to fight with drilling/broaching out the hole.

2. Before you ever mix your glue..... and with the guard in it's final fit position, cover the entire blade, and front of the guard with Vaseline.... anywhere you don't want glue to stick. That way IF any glue gets where you don't want it, it pops off easily after curing.... with a sharpened brass rod (brass won't scratch you blade) ;)

3. When gluing on the handle block, use a piece of vulcanized fiber spacer, (black is my preference) and then when you mix your glue, add some pigment to the glue, that matches the color of the spacer material you used. Apply glue to both sides of the spacer material (and fill ANY gap in the back of the guard material with glue) put it in place, then fill the hole in the handle material. This is my "insurance policy"......... ever heard me say..... The difference between a knifemaker, and a good knifemaker is that a good knifemaker knows how to minimize or hide their mistakes? Well in this case, you still have to be VERY close, but if you have a very slight misalignment between the back of the guard and the angle of the handle material......the fiber spacer and the like color glue will make it invisible. :)

3. With the spacer material in place, GENTLY work the tang into the handle material. In this case "glue overflow" is a good thing....you want to "burp" ALL the air out of the handle material, and have it COMPLETELY filled with glue.

4. SUPER IMPORTANT..... DO NOT use any kind of mechanical/rigid clamp! If you do, the chances are high that when you come back after the glue has cured....there will be a gap somewhere in the assembly. Either use ONLY the weight of the blade/guard, or at most two rubber bands, over the top/bottom front of the guard material. and over the butt end of the handle material.

5. When it comes to placing the pin...... Once the glue has cured, get the handle material to the FINAL profile you want. Then go to the drill press, and START by using a drill bit that is at least 3 sizes smaller than the pin size you intend to use. (I generally use 3/32" pins, which means the hole ends up at a #41.... so I start with a #50. ) Carefully line things out, and drill through the handle material, through the tang, and out the other side. Of course if you hardened the tang, you'll need hi-roc or other carbide bits to do this...but I do not harden tangs. The reason you start small on the bit is because even a screw length bit will flex and "wallow" out the handle material when you hit the tang.......once through with the #50, I then re-drill/ream with a 3/32", and then finally with a #41. This generally eliminates the "glue line" you see around the pin of many hidden tang knives. Gently round the ends of the pin, rough it with 400 grit, apply some glue, and insert the pin.....make it long enough to ensure the radius on the ends are fully outside the hole....otherwise you end up with that "glue line". Let it cure and finish out everything.

Whew! OK, I'm tapped out for today. Hope that info is helpful! :) That's just the way Ed does it...... and is certainly not the only way it can be done..... but it's what I've come to over the years of goofing up!

ADDON: After going back and reviewing the pics again, I would also suggest that the blade and front of the guard be 100% completed and finished BEFORE installing the handle......after the guard and handle are installed, it's really difficult to work on the blade, or front of the guard without causing yourself grief. ;)
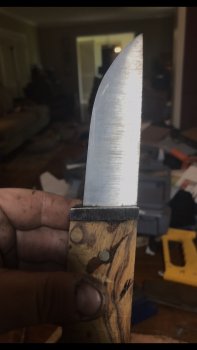
wow!!!! Ed thank you so much! One thing I’ve learned is that the order in which you do things is super important, and you’ve laid it out perfectly. You are a true educator and I appreciate your efforts immensely. I used a miter saw and it worked nicely.... I need practice of course. I now have a much clearer path to victory now on this piece... thank you!!!!
 
I'll add my two cents here. One of the first things I did when I started making knives was go to the shop that was heat treating for me with two pieces of D2 steel. I had matched them up so one edge was completely level and they matched. I would use this piece and lock it in the vice with the tang in it so I could file the back of the blade so they matched perectly. I have now advanced to using the carbide surfaced file guide to do the same thing. I cut with a coarse file then go to a smooth file and have even used 220 sand paper to make them match. The surface of the guard I smooth on the disc grinder then a granite plate up to 1000 grit to make them flat. I mill the hole for the tang then use file until they match up right. I use J.B. weld to seal it all together ,clean and let dry then worry about handle material.
This is fantastic! Quick question.... does the jb weld take the place of solder. I ask this because I’m super concerned about ruining the temper with the soldering iron.
 
A shame about the ironwood handle Kevin. It was going to be a stunner. The stick tang is a good next step after mastering the basics and brings our skil and paitence evel up a notch or two before we are satisfied with the resuts. As has been said getting everything up to finished stage on the bolster before starting on the handle and then this is a very handy little tool. A piece of commercial hacksaw blade cut down and set into a handle is great for helping with the tang hole in the handle.
0dItMU7l.jpg

This is the little sgian dubh inspired knife I just finished for a friend with a 1095, a stick tang, copper and jarrah. An 1/8 in ricasso is enough to seperate the cutting edge from the front of the bolster.
sXa3Nq0l.jpg
Gruff, your ingenuity knows no bounds. I love the hacksaw knife... I bet it works well. Great idea!!
 
Looks like a good start kevin and you triggered a great thread. I’m still a rookie in many areas of knife making. Hidden tang’s guard fit up is still a great difficulty for me. I’ve seen two tips that have helped me. One is to also cut very shallow shoulders on the front and back of the blade also. Now the entire blade has a shoulder for the guard to rest against. I’ve tried it once and I had trouble getting the shoulders to align perfectly but if I can make some kind of jig to assist me, I think it will be a good technique. Secondly, I don’t remember who to give credit but they did not use complete shoulders on all four sides. They instead fit the guard best they could with friction fit in mind. Last step was to peen edges of slot, sand out peen marks, hammer on guard.

Your knife is looking good. Thanks for starting this thread.
 
Yes I use the JB Weld in place of solder. Cleanup is paper towel with some WD40 sprayed on it.
Start over. i use a match stick to mix the JB and put some on each shoulder and on the tang where the guard will hit. I use another match stick cut as a chisel to clean excess off then the towel with WD40. It will be clean.
 
Back
Top