Moustacheknifeco
Member
I am posting this WIP to get some constructive criticism and hopefully help me sort out my handle process. I am a newer maker, so my work is nothing like the stuff you guys post, but if you what to get better you gotta stick your neck out a bit I suppose. I have a cheaper phone, photos leave a little to be desired. Hopefully we can work through it.

This is is my most popular knife design. This one has copper liners . Here I have rough cut the liners and drilled the holes. I have not shaped any of the liner, so I drilled the front pin hole and then inserted the bit to line up the second hole. This is on the drill press. In the past I have just glued the parts together and then drilled, but I thought I would try this since the liners need file work after they are shaped to the knife.

Next, I have a sheet of micarta in the mill and since I don't have a 3/16 collet, the 1/8 mill is in the chuck. I'm running at ~2000 rpm. The handle has a cross inlay that needs to be cut on the mill. I have scribed the handle profile on the micarta so I can roughly locate the center and mill.

I cut the scales out on the bandsaw and then sanded them flat, the copper liners were also sanded flat mostly to help with the glue up.

I pinned the the handles on without glue for shaping. I cut the pin and tube with the jewelers saw. Nothing too fancy here.

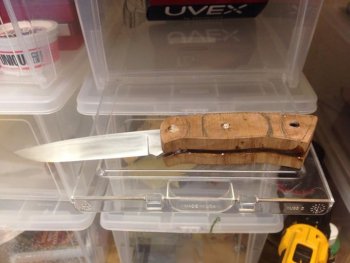
Fully profiled to 400 grit at this point. I started with a 40 grit AO belt and got close, then tried to be as close as possible without touching with a 120 grit j flex, then finished it with a 400 j flex. Hopefully more to come this week.
Thank you for your time.
This is is my most popular knife design. This one has copper liners . Here I have rough cut the liners and drilled the holes. I have not shaped any of the liner, so I drilled the front pin hole and then inserted the bit to line up the second hole. This is on the drill press. In the past I have just glued the parts together and then drilled, but I thought I would try this since the liners need file work after they are shaped to the knife.
Next, I have a sheet of micarta in the mill and since I don't have a 3/16 collet, the 1/8 mill is in the chuck. I'm running at ~2000 rpm. The handle has a cross inlay that needs to be cut on the mill. I have scribed the handle profile on the micarta so I can roughly locate the center and mill.
I cut the scales out on the bandsaw and then sanded them flat, the copper liners were also sanded flat mostly to help with the glue up.
I pinned the the handles on without glue for shaping. I cut the pin and tube with the jewelers saw. Nothing too fancy here.
Fully profiled to 400 grit at this point. I started with a 40 grit AO belt and got close, then tried to be as close as possible without touching with a 120 grit j flex, then finished it with a 400 j flex. Hopefully more to come this week.
Thank you for your time.