You are using an out of date browser. It may not display this or other websites correctly.
You should upgrade or use an alternative browser.
You should upgrade or use an alternative browser.
First attempt at ferric chloride, what happened?
- Thread starter Forgedog
- Start date
EdCaffreyMS
"The Montana Bladesmith"
Although some folks do it, I personally think 220 is not far enough..... I would go to at least 400 hand finish, and preferably 600.
Did you dilute the ferric with distilled water? Generally the best etch comes when you dilute ferric either 3 to 1 or 4 to 1 with distilled water (that means 1 part ferric, and either 3 or 4 parts distilled water. When it comes to etching a blade with ferric, the slower the etchant works, the better the end result. I personally use a 3 to 1 dilution, and with an ambient/etchat temp of approx. 70F, it's generally 5-8 mins for straight steels, and 15-30 mins for etching damascus....... larger, more open damascus patterns get a shorter etch time, and finer, tighter pattern get a longer etch. In the end, it all depends on what you are seeking.
I can't overstate the necessity of absolute clean. I put on latex or nitrile gloves....... I clean with acetone, then a second time with windex, and then after wiping/drying with a clean blue shop paper towel, I air hose it off to ensure ALL the windex is gone (a single drop of windex will kill an entire container of ferric).
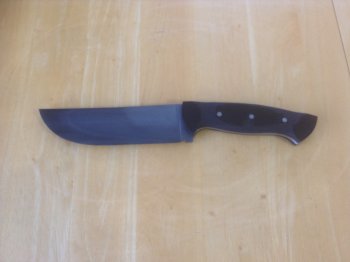
From what I can see in the image, you've got three different zones of hardness in the blade..... the edge, a transition zone (the middle), and a soft zone..... near the spine, close to the handle. It's likely that you will still see a few etched in scratch lines with a 400 grit finish, and even less with 600. I have gone as far a 2000 grit hand finish, but generally reserve that for finer patterned damascus blades. With straight steels, 800+ can be a bit tricky, as it will sometimes produce a "smeared" type look after etching.
Since there are a wide range of variables from shop to shop, it's rare that an individual can read up on etching, and make is come out as expected the first time..... it takes a bit of experimenting to achieve the specific finish you're after.
Did you dilute the ferric with distilled water? Generally the best etch comes when you dilute ferric either 3 to 1 or 4 to 1 with distilled water (that means 1 part ferric, and either 3 or 4 parts distilled water. When it comes to etching a blade with ferric, the slower the etchant works, the better the end result. I personally use a 3 to 1 dilution, and with an ambient/etchat temp of approx. 70F, it's generally 5-8 mins for straight steels, and 15-30 mins for etching damascus....... larger, more open damascus patterns get a shorter etch time, and finer, tighter pattern get a longer etch. In the end, it all depends on what you are seeking.
I can't overstate the necessity of absolute clean. I put on latex or nitrile gloves....... I clean with acetone, then a second time with windex, and then after wiping/drying with a clean blue shop paper towel, I air hose it off to ensure ALL the windex is gone (a single drop of windex will kill an entire container of ferric).
From what I can see in the image, you've got three different zones of hardness in the blade..... the edge, a transition zone (the middle), and a soft zone..... near the spine, close to the handle. It's likely that you will still see a few etched in scratch lines with a 400 grit finish, and even less with 600. I have gone as far a 2000 grit hand finish, but generally reserve that for finer patterned damascus blades. With straight steels, 800+ can be a bit tricky, as it will sometimes produce a "smeared" type look after etching.
Since there are a wide range of variables from shop to shop, it's rare that an individual can read up on etching, and make is come out as expected the first time..... it takes a bit of experimenting to achieve the specific finish you're after.
Last edited:
Thanks Ed!
Heat transition zones crossed my mind... I have no idea how I managed that.
Paragon evenheat 1475, no soak, into canola.
Yes the FC is mixed according to one of your older posts actually.
I wear the gloves as well...
I should probably pick up sme acetone.
I would like to hand sand to a higher grit then re etch... will that cause an issue on an already etched blade?
Its also getting a bit thin, im worried sanding more will make it too thin.
EdCaffreyMS
"The Montana Bladesmith"
The different "zones" are a combination of the blade's thickness in those areas, and the heat/soak. (thinner areas will reach a given heat more rapidly then thicker cross sections. Thicker areas require more time for the heat to penetrate/change the steel's matrix) The thinnest areas are the ones that got hot enough to produce full hardening. The middle zone was on the verge of being there....but didn't quiet make it. (it's very likely a pearlite type matrix) The zone near the spine/handle stayed in the pre-heated state..... and never got hot enough to change the steel's matrix.
Sometime to get the etch/look we want, we have to think/do thing that might seem "out of correct order". In this case, I would likely edge quench the blade (if it's already had the bevels ground in), OR, if I wanted the entire blade to appear "even" after etching, I'd wait till after heat treating to grind the bevels.
You certainly could re-sand and re-etch. However, it would be best if you were to start sanding at the grit you previously quit at.....and ensure you remove/sand ALL the previous etch away/out. That includes any of those tiny pits/spots that might be left from the previous etch. It might seem like a lot of work, but taking the time to do it right/completely, will likely result in the type of finished appearance you're seeking.
Lots of folks get wrapped around the axle/in a hurry, but don't let yourself fall into that trap...... the fastest way to make a knife, or any part of it, is SLOWLY. That way it's right, and you only have to do it once.")
Sometime to get the etch/look we want, we have to think/do thing that might seem "out of correct order". In this case, I would likely edge quench the blade (if it's already had the bevels ground in), OR, if I wanted the entire blade to appear "even" after etching, I'd wait till after heat treating to grind the bevels.
You certainly could re-sand and re-etch. However, it would be best if you were to start sanding at the grit you previously quit at.....and ensure you remove/sand ALL the previous etch away/out. That includes any of those tiny pits/spots that might be left from the previous etch. It might seem like a lot of work, but taking the time to do it right/completely, will likely result in the type of finished appearance you're seeking.
Lots of folks get wrapped around the axle/in a hurry, but don't let yourself fall into that trap...... the fastest way to make a knife, or any part of it, is SLOWLY. That way it's right, and you only have to do it once.
Last edited:
Is canola oil fast enough to quench 1095?
As far as I know you can use any number of oils, peanut, canola, so long as you cool the steel to 1000 degrees in about .5 seconds.
But to get the most out of a 1095 quench you need a fast quench like parks 50.
Which I believe (dont quote me lol) to get the most out of a fast quench you really need need a controlled heat treat in some sort of HT oven.
Chris Railey
Well-Known Member
I have hardened 1095 (and achieved hamons) using Canola oil. Understand though, that is using simple HT and pre-heated oil. I do not have a way to measure how hard the steel got but 1/8” snapped like glass. I am sure I did not get max hardness though.Is canola oil fast enough to quench 1095?