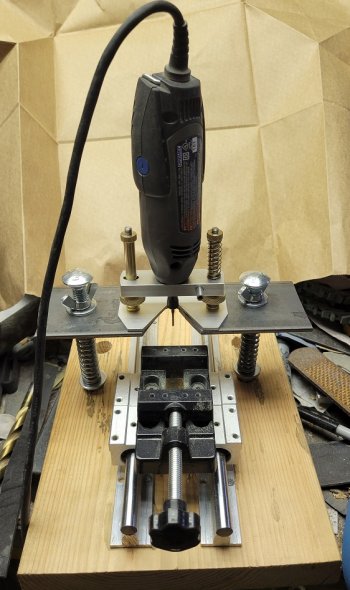
So I wanted to figure out some way to use my Dremel to cut slots in Micarta and G10 to use as guards on hidden tang knives and also to do the tang slot for kitchen knives on a Wa handle. I found a precision Router base for Dremel tools used in guitar building, but the too many screws kept loosening. I got a cheap $33 linear rail/carriage set on Amazon, but the round bar was coming off of the aluminum base and flexing, so that was no good. The springs I used were way too stiff, but there was a lot of wobble in the dremel platform, so I decided to build a new version!
Version 1:

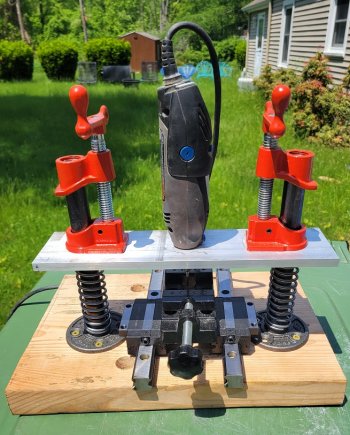
Bit the bullet and bought the 3/4-12 tap ($22)and the 21/32 ($15) drill bit for it for the Dremel threads and a piece of 3/8" thick aluminum (3x12x3/8", $21) (easier to drill and tap) to mount the dremel to. I used a 7/8" bi metal hole saw bit (Harbor Freight) to drill the holes for the 8" long 1/2" black npt pipe (Ace hardware) so the aluminum could travel up and down on the pipe. Got some 1/2" pipe clamps at Harbor Freight ($6 each) and some 1/2" pipe flanges (Ace hardware) to mount it to the wood base and some springs to go over the black pipe at Ace hardware as well. I got a 30mm linear rail with 4 carriages (only used 2, didn't need the wide version) on Amazon ($40, https://www.amazon.com/gp/product/B093KRZ2N1/ref=ox_sc_act_title_5?smid=A2COIW4JKWLTTA&psc=1) and a very $12 cheap small drill press vise at Amazon as well (https://www.amazon.com/gp/product/B0721SJ54L/ref=ox_sc_act_title_1?smid=AKUDB64FRJA68&psc=1) Some wood screws completed the package.

I will mount it on a better base soon, but it does work pretty well!!
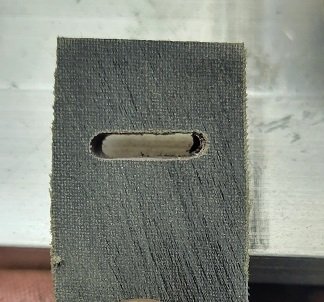
3/32" slot in 3/8" black/red linen Micarta:

I sanded the sides of the micarta to get rid of the fuzzies left over from milling.
Dremel Tungsten carbide bits (9901, 9903 style) didn't do too well. Amazon 1/8" shank rotary burr set did decently and has a wide range of sizes. 1/8" shank, 3/32" 4 flute carbide end mill worked great! I tried drilling a pilot hole and then milling, but it worked better w/o the pilot hole and just lowering the bit until it went slightly into the material and then lower 1/2 turn on the handles at a time. Maybe 2-3 minutes to mill the slot in the 3/8" material. It seemed to work better to pull the vise towards me on the rail instead of pushing away.
I tried some thick metal bar, either 410 stainless or nickel silver and the bit wanted to flex and wander, but it works pretty slick for synthetic materials!
Version 1:

Bit the bullet and bought the 3/4-12 tap ($22)and the 21/32 ($15) drill bit for it for the Dremel threads and a piece of 3/8" thick aluminum (3x12x3/8", $21) (easier to drill and tap) to mount the dremel to. I used a 7/8" bi metal hole saw bit (Harbor Freight) to drill the holes for the 8" long 1/2" black npt pipe (Ace hardware) so the aluminum could travel up and down on the pipe. Got some 1/2" pipe clamps at Harbor Freight ($6 each) and some 1/2" pipe flanges (Ace hardware) to mount it to the wood base and some springs to go over the black pipe at Ace hardware as well. I got a 30mm linear rail with 4 carriages (only used 2, didn't need the wide version) on Amazon ($40, https://www.amazon.com/gp/product/B093KRZ2N1/ref=ox_sc_act_title_5?smid=A2COIW4JKWLTTA&psc=1) and a very $12 cheap small drill press vise at Amazon as well (https://www.amazon.com/gp/product/B0721SJ54L/ref=ox_sc_act_title_1?smid=AKUDB64FRJA68&psc=1) Some wood screws completed the package.

I will mount it on a better base soon, but it does work pretty well!!
3/32" slot in 3/8" black/red linen Micarta:

I sanded the sides of the micarta to get rid of the fuzzies left over from milling.
Dremel Tungsten carbide bits (9901, 9903 style) didn't do too well. Amazon 1/8" shank rotary burr set did decently and has a wide range of sizes. 1/8" shank, 3/32" 4 flute carbide end mill worked great! I tried drilling a pilot hole and then milling, but it worked better w/o the pilot hole and just lowering the bit until it went slightly into the material and then lower 1/2 turn on the handles at a time. Maybe 2-3 minutes to mill the slot in the 3/8" material. It seemed to work better to pull the vise towards me on the rail instead of pushing away.
I tried some thick metal bar, either 410 stainless or nickel silver and the bit wanted to flex and wander, but it works pretty slick for synthetic materials!

