2 brick forge

N.N

Well-Known Member
I ordered a used benzomatic ts4000 on ebay, $15. Another member graciously donated 3 firebricks to the cause. Another $15 in brackets and such and my forge build is on it's way.

I used a 2" pvc pipe and sandpaper to create the hole and drilled out a hole. I drilled an angled hole for the torch head at the top of the inner brick tube to try and make the heat "Swirl" as I've seen on videos and such. What is not pictured below, and the next step to complete it is a metal frame that I'm constructing to hold the thing.

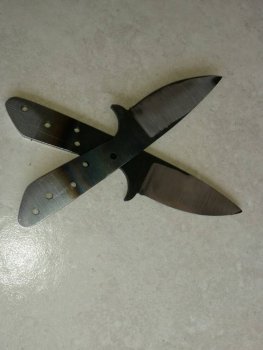
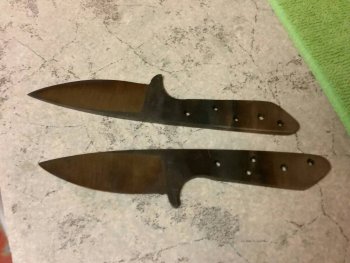
I got it fired up for a first test last night, wanted to do it at night so I could really see the colors. It seems to be a decent start, but it doesn't seem to be getting hot enough. I stuck a 1/4" thick piece of mild steel in this thing and after about 10 minutes of sitting in it, it never got to non magnetic. It was starting to turn red. So am I just not waiting long enough? Is 1/4" too thick? I've read where these things should be getting really hot, really fast, like a couple of minutes. I angled the hole and the torch head at the top of the inner brick tube to try and make the heat "Swirl" as I've seen on videos and such. But I've seen these things where the fire is roaring out of the holes. I never saw that roar. It was hot, but I could hold my hand 6 inches above the holes where the fire came out with no problem.

So what am I doing wrong? Is it the torch or something else? The pictures make the fire look a lot brighter that it really did look. And my old backyard forge gets way hotter, much faster.

11638774_835703709846767_1904137873_o (1).jpg20150618_221019.jpg20150618_221034.jpg20150618_221039.jpg20150618_215650.jpg20150618_215654.jpg20150618_215705.jpg
 
Last edited:
I have a couple ideas.
First off, i would take that 3rd fire brick and set it up against the opening in the back of the forge to keep more heat in. unless you're heating a blade longer than 8" or so, you shouldn't need the back open, it just lets the heat out.
I would also flip it over so the fire inlet hole is on the bottom of the chamber instead of the top. Since heat rises, it seems to me like it should swirl better upward and around then trying to make it go down? (I could be wrong, just a theory)
I'm not 100% familiar with the difference of torches, but I use a Bernzomatic 8250 on my 2-brick forge, and from what I understand is the swirl flame on the 8250 is supposed to be 30% hotter than the standard tip. The 8250 is adjustable, so I usually open it all the way when I first start heating the chamber, and then as I get close to nonmagnetic, I back it down to about 1/2- 3/4 power so I don't overheat.
I haven't done any 1/4" stock, but i can get some 3/16" x 1 1/2" up to nonmagnetic in 5 minutes pretty easily.

Here's a couple pics of mine when I first set it up. On the left side, you can see my fire inlet about 1/3 of the way back and towards the bottom. I coated around the hole with some furnace cement so it didn't crack too much when it got hot, but I don't know if that makes a difference. I also, had some hard firebricks laying around so I added them for insulation on the sides. The main goal was to seal where the two soft bricks mate, thinking i was just losing heat there.
forge 1.jpgforge 2.jpg
Hope this helps,

-Aaron
 
I tried it for some of that time with the 3rd firebrick blocking the back hole with this same theory in mind.....however, when it wasn't heating up as fast as I would have thought it should, I removed it. a Few minutes after that is when I noticed it finally getting the steel to turn color. I'm wondering if I really should have tried it on something more knife sized to start. Perhaps with something thinner, the HT temps will come quicker.
 
Managed to get a 1/8" thick old file to heat up past non-magnetic on my test burn this past saturday. Perhaps it just takes a lot longer to heat up than I thought it would

20150620_163829.jpg
 
Looks like it turned out great. The bolt standoffs for feet are a great idea, I may have to incorporate on mine.

-Aaron
 
Perhaps it just takes a lot longer to heat up than I thought it would


Or perhaps my hair dryer forge in the backyard is getting WAY hotter than I realized it is...and way hotter than it should be. Makes me wonder if I've been overheating some knives.
 
I recently had the opportunity to heat a half inch square rod in a blacksmith'so forge. It got white hot in no time. I believe a charcoal fire with blown air has a good chance to overheat a blade, while a two brick forge that heats slower will not overheat. Also the two brick forge will be affected more by wind and humidity. Just my thoughts!
 
I don't what was different, but the first two small knives I heat treated with this ting worked great! Did them both in about 15 to 20 minutes. Got both up to a dull cherry, checked with a magnet, held it there for a bit and quenched. They got hard. Tempered to a straw color at 400 degrees.

I'm a happy camper. This was so much easier to setup, cleanup, faster, easier to clean them up afterwards. Hardly no scale or decarb.
 

Attachments

  • uploadfromtaptalk1435460408016.jpg
    uploadfromtaptalk1435460408016.jpg
    62.9 KB · Views: 38
After temper
 

Attachments

  • uploadfromtaptalk1435461083592.jpg
    uploadfromtaptalk1435461083592.jpg
    75.2 KB · Views: 36
and after a soak in some ferric and taking a tumble with some rocks from the playground...

20150628_215222.jpg
 
Looking good. How long do you soak in Ferric? I tried stone washing a knife a little while back, and maybe I soaked it too long, but it didn't seem like the rocks did much to the acid etch. The stone washing was pretty minimal. I was thinking i might try with ceramic media on my next go around.

-Aaron
 
I use to do a 5 minute soak, clean it up, soak again for 5 to 10 minutes, clean it up....then decided one day just to try leaving it in there. I now soak in ferric for about 15 to 20 minutes. Rinse with windex and water to stop the reaction, then go straight into the tumbler for stone wash (if that's going to be done), then I boil in water with backing soda to help keep the finish from wiping off.

I use playground gravel, but have a slightly unconventional way of stone washing. I only stone wash for about 20 minutes. I have a tall plastic container that can withstand everything beating around inside. close it up with the gravel, knife and a bunch of wd40. I then shake the container by hand, roll it around the floor, let the kids kick it, shake it some more. I call it a light stonewashed finish. It leaves the blade darker than grey but not quite still black with just enough bumps and dings in the color to look stonewashed.
 
Last edited:
Back
Top