I am building a Heat treat oven

Insawool is a good idea. I thought of using it after I had my frame built so may not use it. I would have to re-cut my firebricks.

By all means use it if you can. It will help seal your firebricks and hold your heat at an even temperature. I am using a castable refractory material to seal the bricks inside.

Hot diggity dog, Fedex came while I'm writing this...time to get off here and head to the shop and finish my HT oven. Catch ya later.

Larry
 
Yeah almost all my stuff is in My motivation is I sent a knife off to be heat treated and it is going to be 3 weeks and cost $25 after shipping I think I am going to have my oven built before the knife comes back.
 
Here's some in-progress pics of my 110v unit that I finished recently (think it was your thread on BF that I mentioned it in already-I can post pics on here). The body is all 22 ga. plain steel. I used multiple layers of 1/2" inswool, I had to buy a 25' roll and this thickness gave me the right volume without having a ton left over. My oven is 18" long x 6" wide x 4-1/2" high inside. Outside it measures 24" long including the door, 15" wide and 14-1/2" high, not counting the feet which I mounted.

The first pic shows the bottom of the body before I put in the inswool and the metal tray that holds the bricks. The two pieces of steel angle bolted into the bottom support the brick tray so the weight of the bricks dosen't compress/collapse the inswool.
The second pic shows the bricks on the tray installed, ready to pack the inswool around the sides, which is done in pic # 3.
Pic 4 shows the door and control box which is standoff-mounted to the side of the body.
 

Attachments

  • 5 010.jpg
    5 010.jpg
    66.4 KB · Views: 66
  • 5 015.jpg
    5 015.jpg
    64.1 KB · Views: 58
  • 5 018.jpg
    5 018.jpg
    54.1 KB · Views: 61
  • 5 022.jpg
    5 022.jpg
    75.9 KB · Views: 62
Unfortunately I don't have many more pics that are very worthwhile, I barely remembered to take a few as an afterthought just as I started to assemble it. I will post some more here but don't expect too much...
 
Here are some random shots after assembly. The door is packed with 5 layers of 1/2" inswool, adhered together and stiffened with Satanite. The final layer that closes against the firebrick stands proud of the inside of the door and has a few coats of Satanite on the surface and is set for correct standoff so that it presses against the bricks just tight enough to seal the door when it is closed. The inswool has just enough give to make this work, the Satanite cracked which I expected but seems to be holding up fine.
 

Attachments

  • 5 023.jpg
    5 023.jpg
    72.7 KB · Views: 56
  • 5 036.jpg
    5 036.jpg
    63 KB · Views: 55
  • 5 040.jpg
    5 040.jpg
    53.8 KB · Views: 58
  • 5 034.jpg
    5 034.jpg
    60.2 KB · Views: 53
  • 5 045.jpg
    5 045.jpg
    84.1 KB · Views: 55
Last edited:
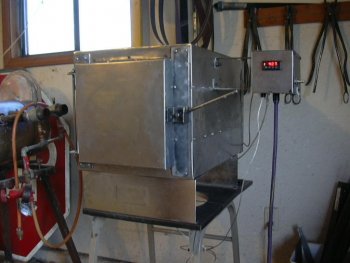
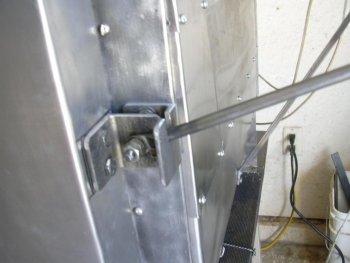
The 3 trickiest parts to figure out for me were the door, the configuration of the bricks, and how to insulate the leads going to the element where they pass through the oven body.

The door I already ran down.

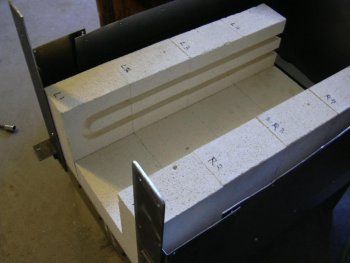
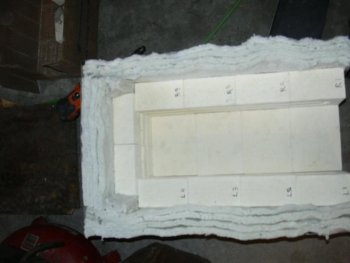
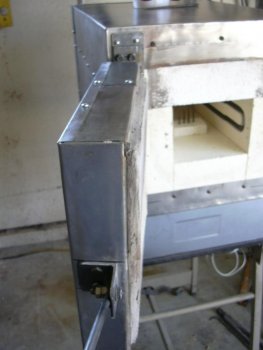
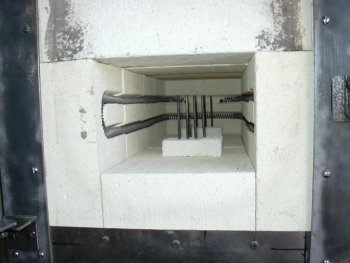
The config. of the bricks you can kind of see in the pics. I used (12) 2-1/2 x 4-1/2 x 9 bricks for the bottom and sides and (4) 3 x 4-1/2 x 9 bricks for the top. The only reason for the different brick sizes was because I already had the 3" bricks on hand.
The bottom bricks are cut to 6" in length, this creates the width of the inside of the chamber (there are 4 of these). The side bricks are cut to 7", grooved for the element, and stand vertically on either side of the bottoms (there are 8 of these, 4 on each side). The cutoffs from the side bricks were used to make the back wall of the chamber. The cutoffs from the bottom bricks were cut down again to 1" thick and mortared onto the ends of the top bricks so that they are 11" long, which fits flush with the side bricks when placed across the top.

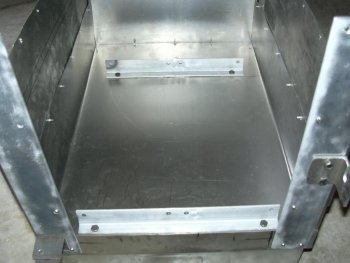
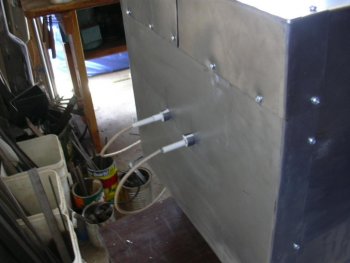
I used 3/16" stainless tubing to connect the high temp wire to the element leads, crimping either end of the tubing down to make the connections. I drilled 5/8" holes throught the body to route them through, then rolled bits of 22 ga. steel into sleeves about 1" long that fit snugly into the holes. I placed the stainless tubing connectors through these sleeves and then packed inswool around the tubing, inside the sleeves to isolate them from each other. Later I scrounged some washer-shaped ceramic insulators from a thermal switch which fit into ends of the sleeves to supplement the inswool and create more positive standoff.

Hope this helps you out somewhere. Took a long time to type:eek:
 
Great build along thread! 2thumbs

Any update info on time to heat and to what temps?
Any info or advice on anything you would do differently if you were doing the build?
 
Back
Top