
You are using an out of date browser. It may not display this or other websites correctly.
You should upgrade or use an alternative browser.
You should upgrade or use an alternative browser.
WIP: First Knife
- Thread starter murphda2
- Start date
murphda2
Super Moderator and KD Blade Show Boss
HERE WE GO AGAIN
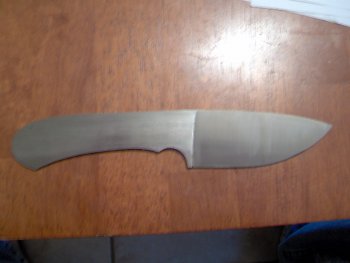
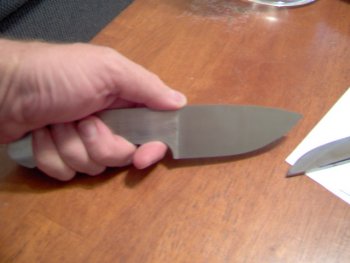
As I previously posted, I started all over. This time I decided to cut three blanks. Though I'm not real impressed with my grind work, my bandsaw work is pretty good. I kinda impressed myself with how well I got into the tight fit between the blanks without screwing up.


Here are the "almost finished" photos. I still need to do a little bit more shaping on the tang, just a couple of minor adjustments needed. I also looked closer at the edge and realized it's a little uneven so I need to correct that as well and do a little hand sanding to check for flaws and deep scratches prior to sending it to Rusty for HT.
If I'm lucky, I'll have time to finish this up tomorrow and get another one in the works. With each one I grind I'm seeing errors that I've made that and want to kick myself because I know better than to make those mistakes. The good thing is as I screw up, it's really driving home those "lessons learned".
Please feel free to critique my work thus far.
Thanks Guys,
Murph
As I previously posted, I started all over. This time I decided to cut three blanks. Though I'm not real impressed with my grind work, my bandsaw work is pretty good. I kinda impressed myself with how well I got into the tight fit between the blanks without screwing up.
Here are the "almost finished" photos. I still need to do a little bit more shaping on the tang, just a couple of minor adjustments needed. I also looked closer at the edge and realized it's a little uneven so I need to correct that as well and do a little hand sanding to check for flaws and deep scratches prior to sending it to Rusty for HT.
If I'm lucky, I'll have time to finish this up tomorrow and get another one in the works. With each one I grind I'm seeing errors that I've made that and want to kick myself because I know better than to make those mistakes. The good thing is as I screw up, it's really driving home those "lessons learned".
Please feel free to critique my work thus far.
Thanks Guys,
Murph
Attachments
Josh Dabney
Moderator
Murph,
Now I understand what the issue with the original blank is. I'd agree that as is you wouldn't get a satisfactory result with what you have. I had the same problem on my second tapered tang and ended up solving the problem by decking the tang flat on a piece of 100 grit paper and our glass breakfast table. Scratched the heck out of the table but I did get the tang flat, LOL.
Like you though I've decided that it's ok to scrap a few blades in the process of learning to use my grinder so I understand your logic completely.
Good on you for getting right back to work !
-Josh
murphda2
Super Moderator and KD Blade Show Boss
I'm debating on what to use for handle material on this one, but do like the idea of maybe doing the jimping on the spine. I'm most likely going to use black linen or brown canvas micarta, maybe curly maple. Whichever way I decide to go, I'm pretty sure I'll contour the handle for ultimate grip. I need to find some scrap lumber to practice handle shaping prior to working this one though. I don't want my first try to be when I'm putting a handle on my first blade.
Murph
Murph
John Barker
SUPERModerator & KNIFE MAKER
Looking good!
-John
-John
murphda2
Super Moderator and KD Blade Show Boss
Thank you John. On the next one, I'll do the taper the proper way which I have received instruction on in the past, as demonstrated in your "How To" thread. I realize there are a couple of things I need to purchase to assist with my grind work, 1.) ceramic plate for my platten (it's getting way too hot), 2.) a magnet (I have a finger that will soon start showing bone if I hit the belt again).
I appreciate all the encouragement guys.
Murph
I appreciate all the encouragement guys.
Murph
Last edited:

Josh Dabney
Moderator
Murph,
Just a word of caution from my bad experience. Drill ALL holes before tapering the tang. As many things, it could be carefully done after but the first one I did got chewed up like this....
Drilled pin holes.
Tapered tang.
Decided to drill another weight reduction hole and bent tang in process. (did Not notice)
Back to platten to remove burr from drilling.
Due to the bend when the tang was against the platen the top idler wheel ate a nice hollow right on the side of the blade, LOL. The blade was 1/8" O1 and the hollow went a full half way through the blade. OOOOPS lol.
Just thought I'd share in case my stupidity may help you.
-Josh Your blank is looking sweet by the way !