You are using an out of date browser. It may not display this or other websites correctly.
You should upgrade or use an alternative browser.
You should upgrade or use an alternative browser.
Forge help
- Thread starter opaul
- Start date
Bühlmann
Well-Known Member
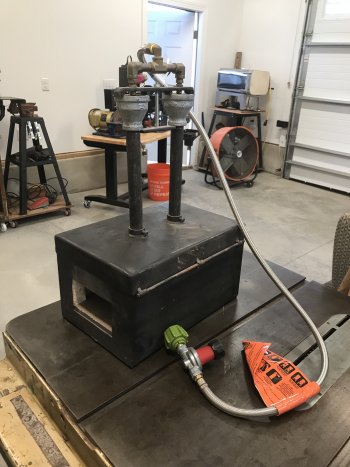
Should just have to unscrew your nozzle from the 90 degree elbow, and add a short length of threaded pipe to a gas-rated ball valve, then another short section of threaded pipe to a threaded coupler to connect the pipe to your nozzle. You can do that to both legs, or just one since you’ll always run one burner. Doing both will allow you to choose which one to run single, though. Pretty simple & easy, hope that makes sense.
You may also be able to find a single 3-way valve to replace the tee fitting and avoid the extra pipe & fittings, but I’m not sure if one is made that allows both flow paths to be open simultaneously. Maybe something like this:
Not sure if that’s correct for your setup, but just an idea for reference.
ETA: If you get the correct male threaded valve(s), you can omit the additional pipe sections entirely.
Last edited:
Edwardshandmadeknives
Well-Known Member
You need more garbage in your shop! That’s way way too clean lol. I’ve built a few forges, the ones I built all had electric blowers. I’ve got a Venturi forge, but I’m in the works of building a new 48” long one, with a ribbon burner that is in three sections so I can just run what I need. If you are going to run that one, I would just unscrew the gas feed from the top, add in a valve for each burner. I’ve heard that ribbon burners are really efficient, so that’s why I’m going that route. If you do much welding you may want to consider adding a blower. I added a thermocouple and DRO, the Venturi runs at 2350 wide open, might want more heat than that.
opaul
Well-Known Member
This is/will be a spare. My main forge is a Chili tobacco.You need more garbage in your shop! That’s way way too clean lol. I’ve built a few forges, the ones I built all had electric blowers. I’ve got a Venturi forge, but I’m in the works of building a new 48” long one, with a ribbon burner that is in three sections so I can just run what I need. If you are going to run that one, I would just unscrew the gas feed from the top, add in a valve for each burner. I’ve heard that ribbon burners are really efficient, so that’s why I’m going that route. If you do much welding you may want to consider adding a blower. I added a thermocouple and DRO, the Venturi runs at 2350 wide open, might want more heat than that.
Gliden07
Well-Known Member
This will do it just add 2 hand valves so you can turn off the desired burner. Please note that you may have burner inconsistencies. 1 properly sized burner will always be better than 2 individual burners. Another thing to consider is you still have to heat up the entire mass of the forge so using 1 burner will take longer to heat to operating temp
opaul
Well-Known Member
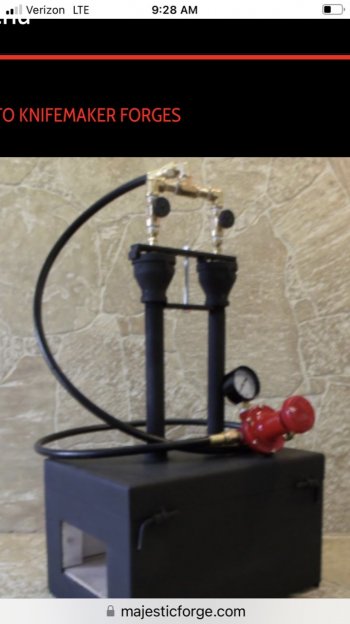
Thanks 07! That looks perfect. Majestic sells the same forge with this option as an ‘upgrade’ and calls it a knife forge. Like I said I picked this up cheap and I think it was only used one time. Having a two burner option for a spare forge is a plus for me and those components you listed aren’t that much $.
This will do it just add 2 hand valves so you can turn off the desired burner. Please note that you may have burner inconsistencies. 1 properly sized burner will always be better than 2 individual burners. Another thing to consider is you still have to heat up the entire mass of the forge so using 1 burner will take longer to heat to operating temp
Edwardshandmadeknives
Well-Known Member
When I had multiple burners that could be individually run, I would usually crank them all on to heat it up, the shut down the ones I didnt need
MTBob
Well-Known Member
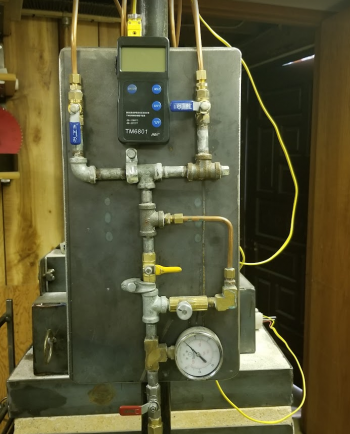
More ideas for your consideration. The valving is standard except for the yellow ball valve that, when closed, directs the inlet gas to a needle valve that can more accurately control the gas flow. While each burner is controlled with a ball valve, the down side to this plumbing arrangement is that when the yellow bypass valve is closed the needle valve controls both burners. That works OK unless there needs to be unbalanced flow to the burners. I've found this arrangement works OK, but trying to heat treat to a close target temperature can be challenging.

opaul
Well-Known Member
That looks really completely.More ideas for your consideration. The valving is standard except for the yellow ball valve that, when closed, directs the inlet gas to a needle valve that can more accurately control the gas flow. While each burner is controlled with a ball valve, the down side to this plumbing arrangement is that when the yellow bypass valve is closed the needle valve controls both burners. That works OK unless there needs to be unbalanced flow to the burners. I've found this arrangement works OK, but trying to heat treat to a close target temperature can be challenging.
View attachment 82027
Chris Railey
Well-Known Member
I would keep it. If you decide you want to make longer blades it will come in handy because you can place it front to back with your current forge. That is what I do when I make blades longer than my kiln will accomodate. I have the Majestic 2 burner Artisan's forge and have used it a lot.
opaul
Well-Known Member
Got a good point there. I got it for $80 so yeah, I think I’ll do that.I would keep it. If you decide you want to make longer blades it will come in handy because you can place it front to back with your current forge. That is what I do when I make blades longer than my kiln will accomodate. I have the Majestic 2 burner Artisan's forge and have used it a lot.
Chris Railey
Well-Known Member
I may or may not have even had my son standing at the other end of the forge with a oxy/aceytlene torch heating the tip when I made my last sword. Try to get even heat through two forges and a torch...


