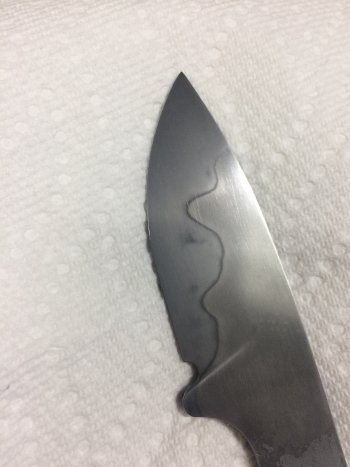
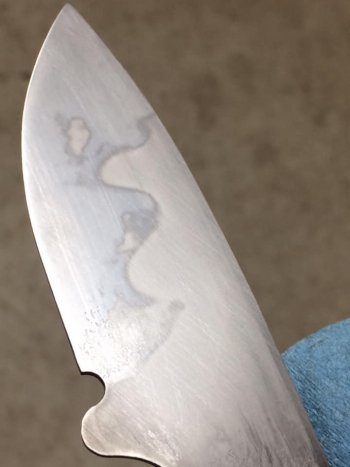
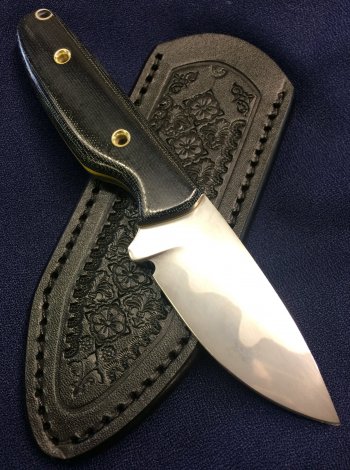
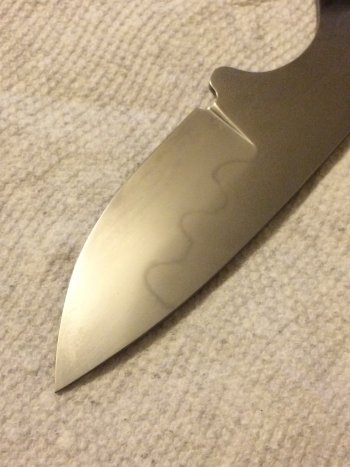
Christmas Hamon!

Delta Handmade Knives

Well-Known Member
Merry Christmas Everyone! I hope everyone is having a healthy and peaceful Holiday. –

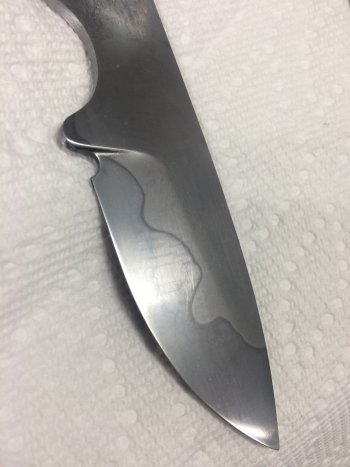
This year for Christmas I gave myself my very first Heat Treat which also happens to be my first Hamon.

I clayed-up two W-2 blade blanks with Rutland's Furnace Cement and this is how they came out. Please bear in mind that I have no idea what I am doing. I am new to knife making and I had no clue if this would work or not but after watching about 150hrs. of YouTube hamon videos I had to give it a shot. There is still a lot of work to do on these two blades but seeing this my first time around gives me a lot of hope for what may be possible going forward.

Too excited.. had to share.

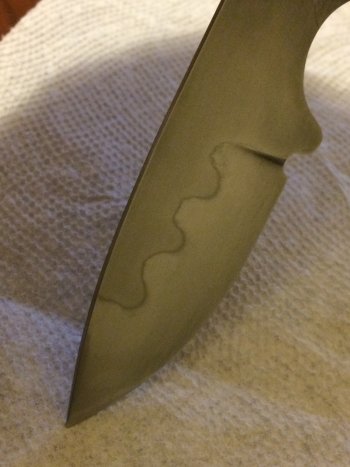
Blade A - Right side
IMG_9816.jpeg

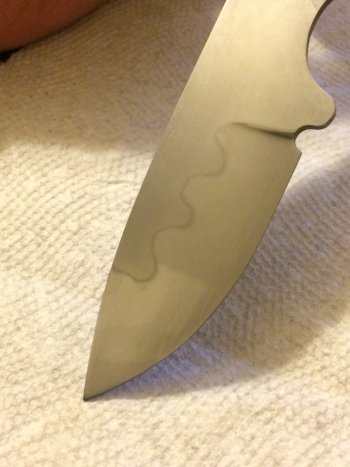
Blade A - Left Side
IMG_9815.jpeg

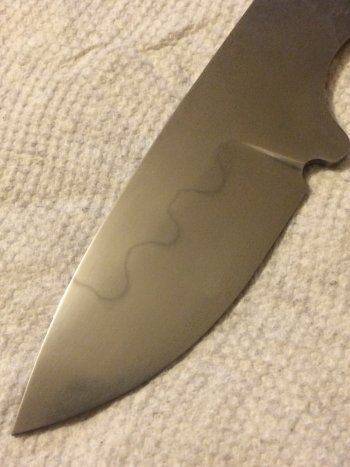
Blade B - Left side
FirstHamon.jpg

I will follow up with more progress pictures as these move forward in the process. Still a lot of work to do.

Thank you for looking and have a Merry Christmas!!
 
Nice job! Turned out great.

I grew up in Escanaba. My folks and sister still live there. I miss the Lake.
Thank you!

But don't underestimate my ability to screw this up still. A bit more to go before it is a knife. With luck one of these two might make it there.

My wife and I love the lake and the small town life. I love small town traffic. oh so nice! As you could imagine I lived in big cities previously so I appreciate these little things.
 
Thank you gentlemen. I have been making sheaths for a couple of years now so I know my way around that block. Just now getting into knife making as of the last few months. Looking forward to many more!
 
Thank you Sean Jones and Opaul! Much appreciated.

Maker's mark supplies have been ordered and I will soon be able to add my mark to it. Also, the next two blades is already clayed up and ready for heat treat.
 
Thank you Daniel!

Happy New Year everyone!

Well, I quenched the next two blades today. Blades are straight, edges skate the file and looks like I am somewhere between the 60RC and 65RC on both per the little 5-file hardness test kit but this could just be wishful thinking on my part because I am not really sure how to use the little files. I did temper at 375*F for two hours, twice. Allowing them to reach full room temp between temper cycles. In true noobie fashion, I am shooting for edge holding over toughness. After all it is a small EDC, not a chopper or a bush craft knife.

Looks like I got active hamons on both blades but leave it up to me to mess with things.

Blade "A" was completely dunked into the parks 50 and quenched normally. Upon inspection after the second temper cycle it looks like I got my hamon exactly where I put the clay on that one. Thumbs-up. This one is a-OK and good to go for the next step.

Blade "B" .... for some reason I opted to do a very short edge quench on this one (1 maybe 1.5 sec.) before completely dunking it in the oil. Good news is that it worked. Bad news is that my clay hamon also worked. So, now I have two hamons on that one and they are not aligned. I am not sure how that one will look. I am going to hand sand it anyway and etch it to see what's there. If I don't like I will start over. I have to go back to my book "Knife Engineering" by Dr. Larrin Thomas to review exactly how "re-set" the steel to do the hardening over again. Great book BTW. I'm sure you more experienced folks already know all the stuff in there but it was a gold mine of information and understanding to someone like me.

So! Tomorrow I will likely finish hand sanding those blades and etch them. I'm sure one will be good to go and we'll see what that other one looks like.

I know 2020 was tough on a lot of us but I will always remember it as the year I started making knives and I am grateful to have gotten this far.
 
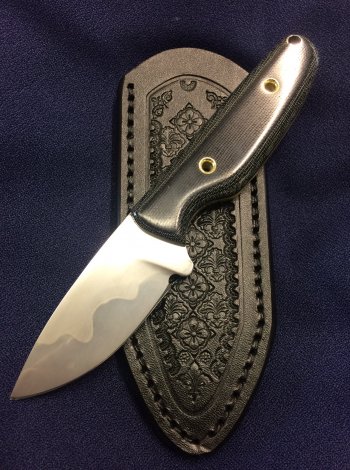
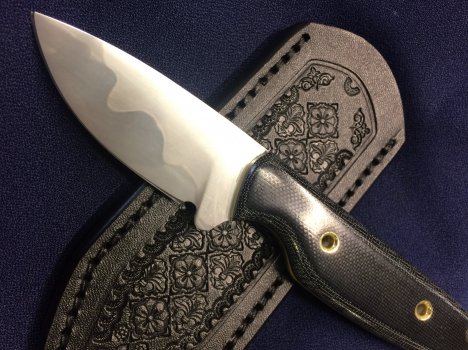
OK here is my second go at it with the hamon.

I left the one that I am not sure about to the side and moved forward with the good blade.

Hand sanded both sides and then etched.

The hamon is just about where I put down the clay. Here she is.

IMG_9885.jpgIMG_9884.jpgIMG_9883.jpgIMG_9882.jpg


This time around I did a few things differently.

  • Cleaned up the entire profile up to 150 grit before hand sanding.
  • Cleaned up inside the sharpening choil. (this was done on the first one after it was put together. This time I did it before hand sanding.
  • At the start of the post-heat-treat cleanup on the belt grinder, I decided to wear my magnifying goggles headgear so that I could see things better. This was great as a magnified view of the blade during plunge line matchup and bevel finishing and hand sanding proved quite useful. This minimized any missed details and helped me get a much more symmetric blade altogether.
  • I focused heavily on maintaining an even edge geometry from point to choil. The first two blanks were thicker at the tip and the base of the edge and thinner in the belly. When sharpened to 17 degrees (per the KME sharpener) the secondary bevel was wider at the tip and the base and thin on the belly and this bothered me. Seems to have been caused by an edge geometry that was not even through the entire blade courtesy of noobie grinding. So, this time I made sure to keep that in check during post heat treat cleanup as I thinned out my edge. Cleanup took longer. But it was worth it. I am happy with my edge geometry and when I sharpen it it should look a lot better.

Things I plan on doing different on the next go around.

  • I will begin to get a little more creative with the hamon design. I'd like to see if I can get an even more active and interesting hamon based on how I put the clay down.
En-route are the Brother T-touch 750 and a couple of stencil tapes which I intend on using to make the stencils to etch my mark on these going forward.

Have a great New Years day everyone and thank you for reading!
 
Last edited:
  • I focused heavily on maintaining an even edge geometry from point to choil. The first two blanks were thicker at the tip and the base of the edge and thinner in the belly. When sharpened to 17 degrees (per the KME sharpener) the secondary bevel was wider at the tip and the base and thin on the belly and this bothered me. Seems to have been caused by an edge geometry that was not even through the entire blade courtesy of noobie grinding. So, this time I made sure to keep that in check during post heat treat cleanup as I thinned out my edge. Cleanup took longer. But it was worth it. I am happy with my edge geometry and when I sharpen it it should look a lot better.
I'm doing the same thing. I can tell I'm most comfortable grinding in the middle and more nervous near the tip and plunges. Need to fix that, too.
 
Those Hamons are great! I've been struggling to get a good one with 1075 and you nailed it on your first try. But I now have some W2 that I will try next.

What's your etch process to bring them out?

Andy
 
Back
Top