Advice needed- Crack during Tempering

aelgin

Well-Known Member
I tried putting a hamon on knife for the first time and ran into a snaffu while tempering. After tempering the blade cracked at the the choil. I heat treated 2 other 1084 blades at the same time, and had no issues. The only difference was the attempt at a hamon on this one, but it doesn't look the crack is any where near the hamon. Attached are pics showing after hardening and after tempering. The blade is 1/8" thick 1084 created using stock removal. Here's the process i went with:

Blade was shaped and ground to 220 grit. Washed the blade with dish soap and hot water. Dried the blade. Applied refractory cement. Let dry (ended up being about 2 days). Heat treated in a small forge. Brought up to nonmagnetic. Quenched in 130-140 degree canola oil. Let cool to room temperature. Scraped of clay, and lightly sanded to remove scale. Rinsed off scale. (1st pic was taken) Placed in oven at 375 degrees for 1 1/2hrs. Removed and cooled to room temperature. Placed back in oven at 375 for 1 1/2 hours. (2nd pic was taken)

Any advice as to why this would have happened or improvements in my process would be great.

Thank you,
Aaron
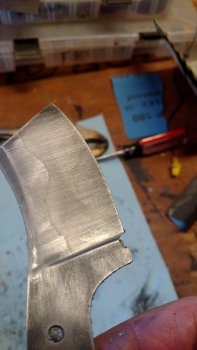

after HT.jpgcleaver after temper.jpg
 
Some times all you can say is damn the luck. Just going by eye and reaching non-magnetic in a forge there is always the risk of getting it a little too hot especially if you can't spot decalesance (a shadow like phenomenon that passes across the steel as the iron in it changes from a body centered cube to a face centered cube). It also seems like it arises from where the choil and the plunge line meets. That might cause a stress riser the way it meets but maybe not. It might even be set up by the stress created between the formation of the pearletic steel of the spline and the martensetic steel of the edge. Other than that it looks like you did everything right.

Doug
 
I tried putting a hamon on knife for the first time and ran into a snaffu while tempering. After tempering the blade cracked at the the choil. I heat treated 2 other 1084 blades at the same time, and had no issues. The only difference was the attempt at a hamon on this one, but it doesn't look the crack is any where near the hamon. Attached are pics showing after hardening and after tempering. The blade is 1/8" thick 1084 created using stock removal. Here's the process i went with:

Blade was shaped and ground to 220 grit. Washed the blade with dish soap and hot water. Dried the blade. Applied refractory cement. Let dry (ended up being about 2 days). Heat treated in a small forge. Brought up to nonmagnetic. Quenched in 130-140 degree canola oil. Let cool to room temperature. Scraped of clay, and lightly sanded to remove scale. Rinsed off scale. (1st pic was taken) Placed in oven at 375 degrees for 1 1/2hrs. Removed and cooled to room temperature. Placed back in oven at 375 for 1 1/2 hours. (2nd pic was taken)

Any advice as to why this would have happened or improvements in my process would be great.

Thank you,
Aaron
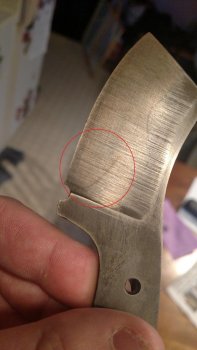

View attachment 58361View attachment 58362

Can't say what went wrong but notice where the crack originates at the edge! I personally do not like choils. I know they are highly used today and maybe it is just more preference than anything, that I don't like them! Choils are suppose to eliminate that tiny area that a blade can not be sharpened up against the plunge line!!!
Anyway back to what I was saying, if you notice where the crack originates. It begins at the top of the choil where the plunge line dies into that choil! Basically you have two stress areas. IMHO. If you are going to use a choil I suggest moving it forward enough that the back of the choil is at the plunge line!

As stated I don't care for choils IMO I feel they just add another area for stress to begin, and then again,................ it is like has already been stated sometimes you do everything right and the knife Gremlins say, oh no this one is not to be born and you can't seem to do anything about it!

I once was talking to a knife maker much more experienced than I. I told him I was having real problems with quench and tempering. Tinks, cracks and not getting the hardness I wanted.
He suggested that I video my process as I was going for the quench. He went on to say more often than not that is where the problem begins. He said when he first started he was as frustrated as I told him I was at the time. He said by videoing I realized that perhaps I did not hold the quench as long as I thought I had or I had made some other error. My brain missed it at the time but the camera did not. And then he told me about the knife Gremlins!!! LOL

Also you may want to double check the actual temp on your tempering oven, it could be off and you are overheating/underheating!! Just an after thought on that one!
 
Last edited:
I think you waited too long to get it into tempering. Letting it cool to room temp, scraping clay, grinding, rinsing with water etc..

I go into tempering while the blade still feels a little warm to touch. Not hot, but warm. I think you had too much stress built up in there. Wouldn't hurt to normalize the blade a couple times before applying clay either. Just my 2 cents

Sent from my SM-G920P using Tapatalk
 
I appreciate the input guys, lots of details to keep an eye on.

I was wondering about how long to wait till tempering and if that had an impact on things. I guess I've always cleaned the scale off before tempering, but maybe I shouldn't be? Does it hurt anything to temper it with the scale and clay still on it? I assume as long as I temper it long enough to get an even temper through, then it should come out fine?


Thanks,
Aaron
 
I was wondering about how long to wait till tempering and if that had an impact on things

While bad things don't always happen, its a good policy to temper a blade as soon as possible after hardening. By that I mean as soon as the blade is cool enough to handle with bare hands, get it to the tempering oven, just to ensure stress relief. I think it's more important how you allow the blade to cool immediately after hardening..... DO NOT place the blade any type of "heat sink" (anything that will "suck" the heat out of it). I've made this mistake several times over the course of my career, always when I let me attention stray, and regretted it. (ended up with edge cracking/checking).

In most cases taking the time to clean off scale won't cause any issues, but just try not to get it hot enough where you need to dip it in water, or cool it down....that CAN compound the stresses that are already in the blade from hardening. I generally recommend that newer makers clean off the scale prior to tempering, for no other reason then to be able to see the visual color changes after tempering...it just aids in the learning curve. Once you gain an understanding of what the tempering colors look like, my perspective is that it's less important to actually see those colors.
 
Back
Top