Lock back build,not a WIP.

Calvin Robinson

Moderator Christian Forum
This is not a WIP,just some photos of my progress building this lockback knife.
I've never made a lockback folder before although I've been wanting to for years. Enrique Pena told me a few weeks ago," Just do it", so that's what I'm doing. With a lot of help from Craig Brewer I've gotten this far along.
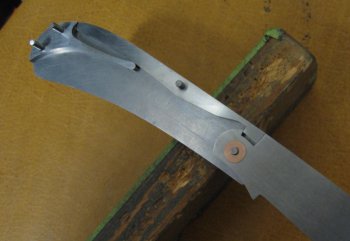
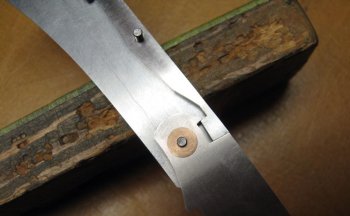
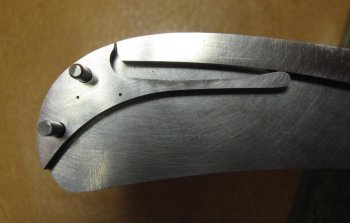
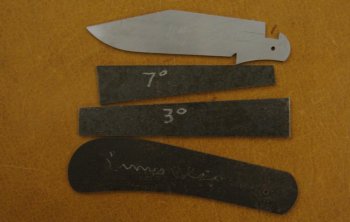
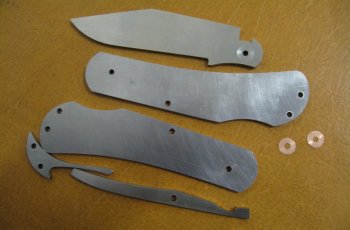
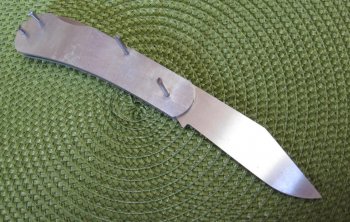
The first photo shows my blade pattern,my handle pattern and the angle jigs I made in order to mill the proper angles on the blade lock notch and the lock bar lug. The second photo shows the parts I have made,blade,handle,washers,lock bar and spacer/spring. The third photo is the assymbled knife,I'm happy,it locks and unlocks perfectly and detents closed very well.
There is still a lot of work to be done,I'll keep yall posted.
 

Attachments

  • image.jpg
    image.jpg
    139.9 KB · Views: 156
  • image.jpg
    image.jpg
    146.2 KB · Views: 77
  • image.jpg
    image.jpg
    168.7 KB · Views: 73
I took apart a production lock back for a pattern and the lock bar was square no angles.
This is my first one almost finished. Question is, what purpose do the angles provide?
 
the angles provide clearance while disengaging the lock, but with tight, flush fit while locked.
The lockbar locking tab has to lift in an arched path, so it has to be wedge shaped....if the notch has the same wedge shape you have maximized the contact area.
 
the angles provide clearance while disengaging the lock, but with tight, flush fit while locked.
The lockbar locking tab has to lift in an arched path, so it has to be wedge shaped....if the notch has the same wedge shape you have maximized the contact area.

Yeah,what he said.
 
What would you like to see?

I have this great talent for picking stuff no one else likes :)

I'm sure your choice will be awesome. Are you going to have bolsters on it as well?
 
I have this great talent for picking stuff no one else likes :)

I'm sure your choice will be awesome. Are you going to have bolsters on it as well?

Yes Brad,it will have bolsters and caps.
I have some core mammoth Ivory that I am thinking seriously thinking about using,it's a creamy,off white,color.
 
I don't think you can go wrong with mammoth ivory. I'm curious how are you going to fix the bolsters silver solder? I'm looking forward to watch it progress
 
I don't think you can go wrong with mammoth ivory. I'm curious how are you going to fix the bolsters silver solder? I'm looking forward to watch it progress

Brad,
I don't solder bolsters on my slipjoints or this lockback or anything for that matter.I use 410 or 416 stainless thick enough to mill out space for my scale material,that's why I referr to them as integral bolster/liner/caps.
 
Here are some photos I should have shown at the start. Close ups of the inside of the knife that show how everything fits together.
 

Attachments

  • image.jpg
    image.jpg
    130 KB · Views: 118
  • image.jpg
    image.jpg
    123.1 KB · Views: 48
  • image.jpg
    image.jpg
    131.5 KB · Views: 49
Here the Ivory is glued and clamped up for drying.
I didn't show the milling of the scale pockets or shaping of the bolsters and caps because,like I said,this is not a WIP,just show and tell.
Since I'm using Ivory and don't want to overheat it I shaped the bolsters to 400 grit before gluing the scales in place. I'll have to be very careful when grinding down my pins after peening in order to not overheat the Ivory.
 

Attachments

  • image.jpg
    image.jpg
    147 KB · Views: 42
This shows the integral bolsters/liners /caps shaped,with scales and scales pinned,all finished roughly at 400 grit.
These are not realy pins. I took some 0-80 straight slot stainless screws,chucked them up in an arbor I made,put that in my cordless drill and,using my horizontal grinder ground the slots off and then ground the heads down to .080" diameter, domed them then polished them. Counter sunk them in the Ivory so they look like recessed domed pins. They are long enough that I can tighten them from the other side before cutting them off and grinding them down flush on the inside. When I peen my other pins and finish off the knife these wil be recessed,out of the way of my hand finishing and polishing. So far I like this look and there are four less opportunitys to crack the Ivory while peening.
These scales are very thin,.065" thick at the thickest part,down the center line of the handle. I use Conap epoxy and have never had a failure.
 

Attachments

  • image.jpg
    image.jpg
    127.6 KB · Views: 53
Back
Top