Slip Joint Folder WIP- First time for me, Help needed

Daniel Rohde

Well-Known Member
Hey Guys!

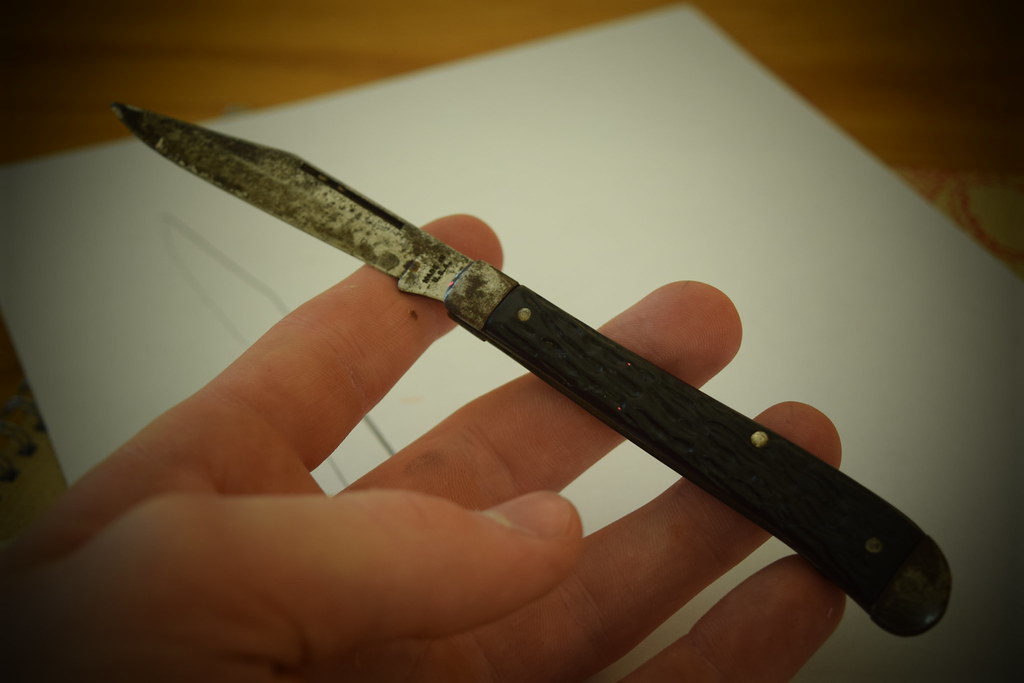
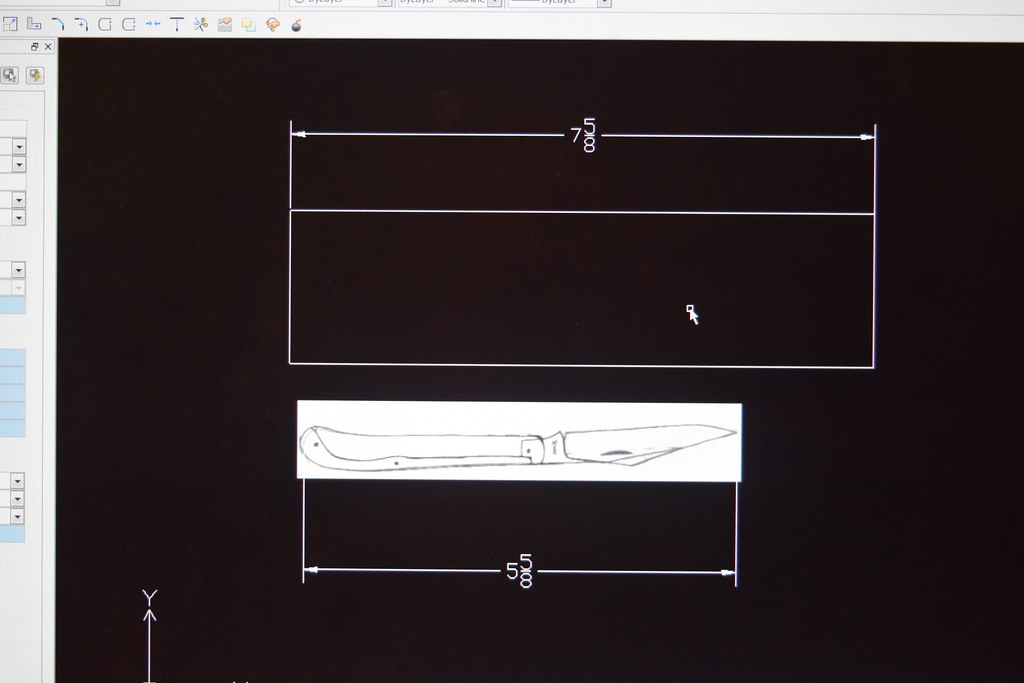
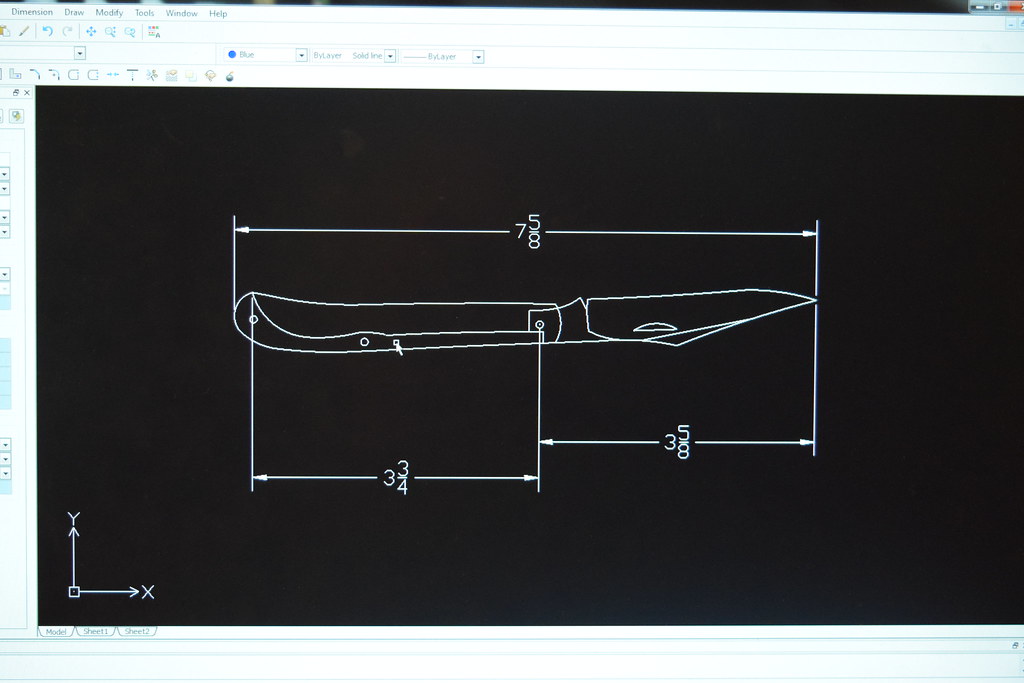
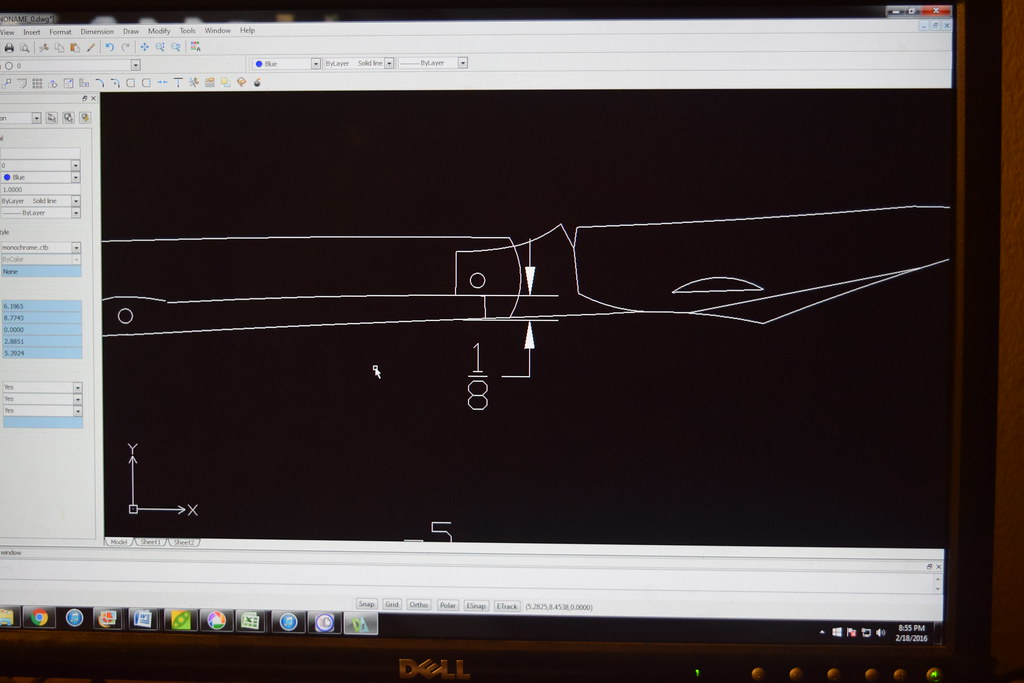
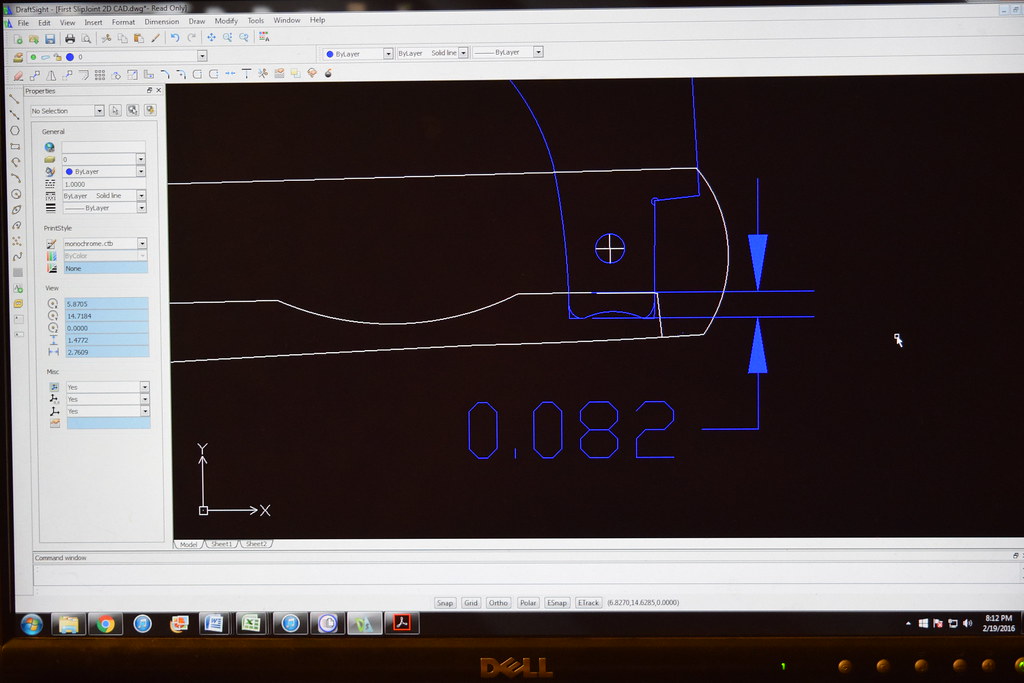
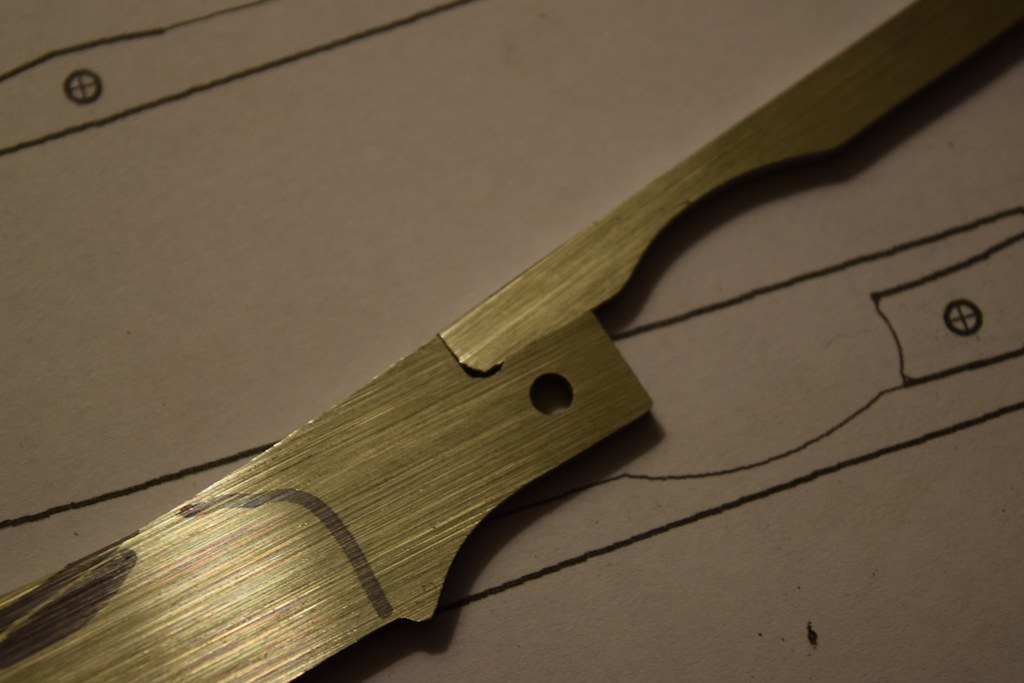
I'm going to start a slip joint. I have been wanting to do it and it's time. I have this pocket knife that I want to use as my model(shown below). What I'm most worried about is the design

I'm not sure how much things should bend and the locking size, I assume after you start making them you get designs that work and you make them allot but this is my first so I'm

learning as I go. Here's the knife:

24729138699_9e619b5d11_b.jpg


24471286783_698629873b_b.jpg


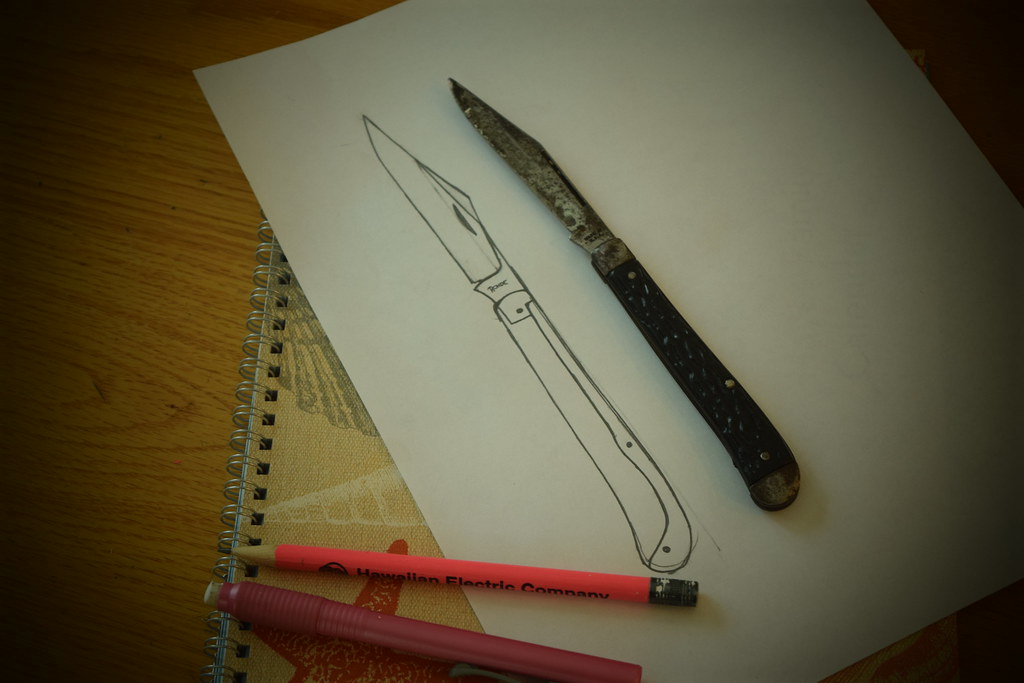
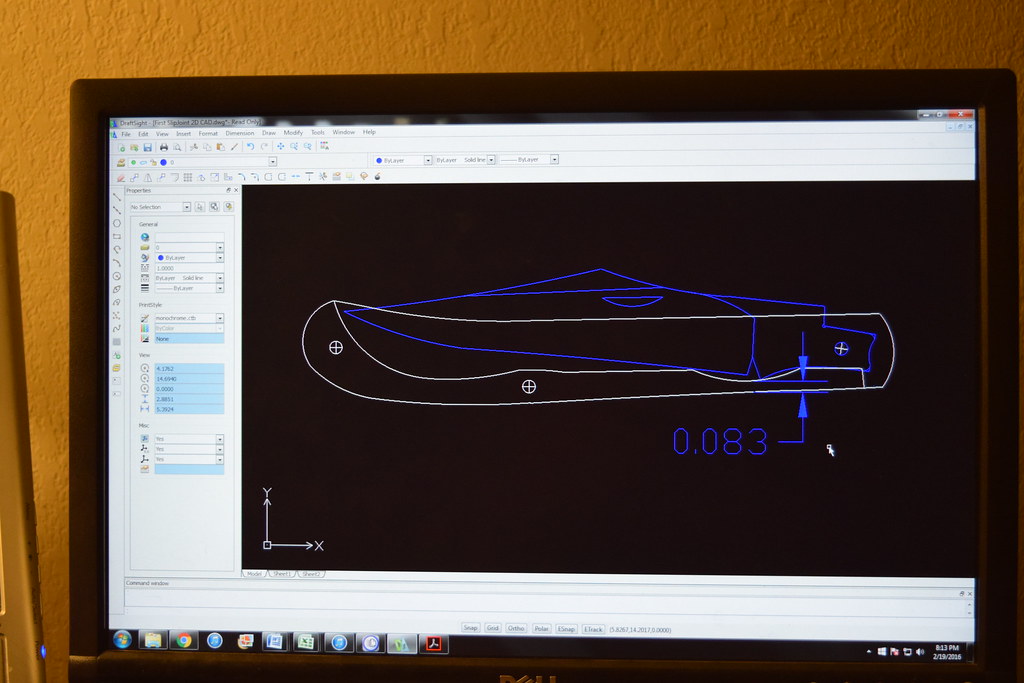
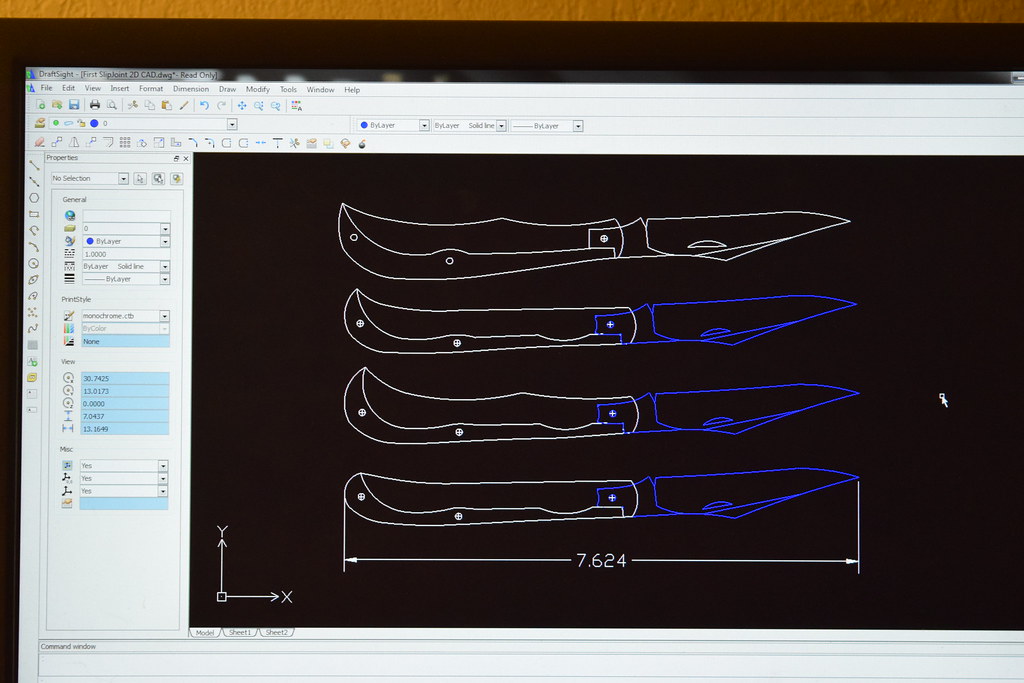
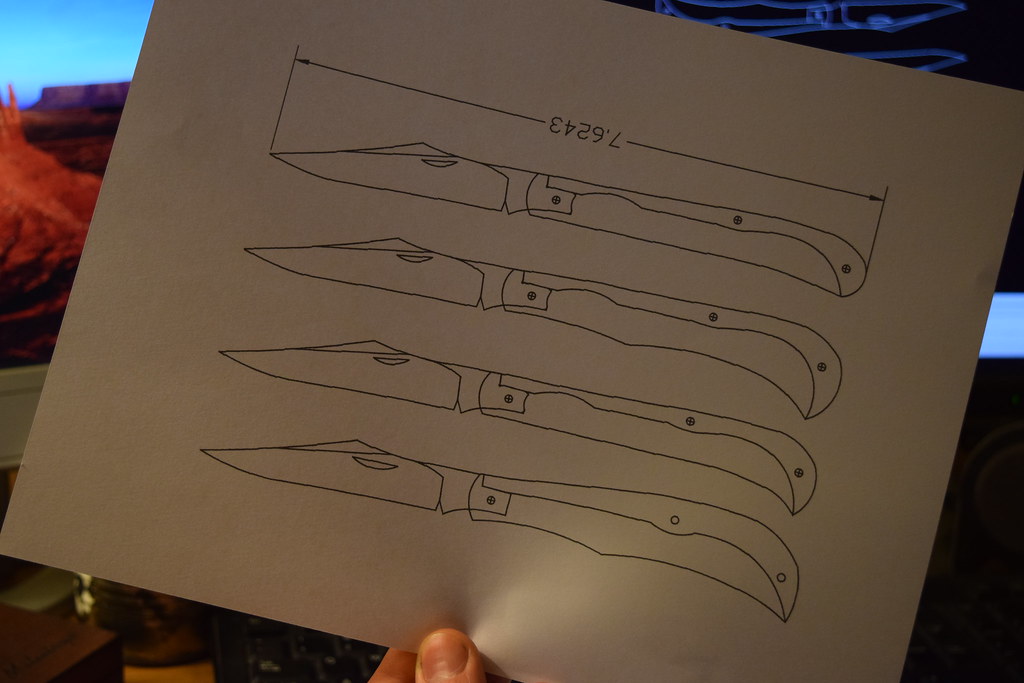
all I have done so far is trace it best I could; then draw in everything about how I think it should be. I will have some questions and could really use some help. I'm going to

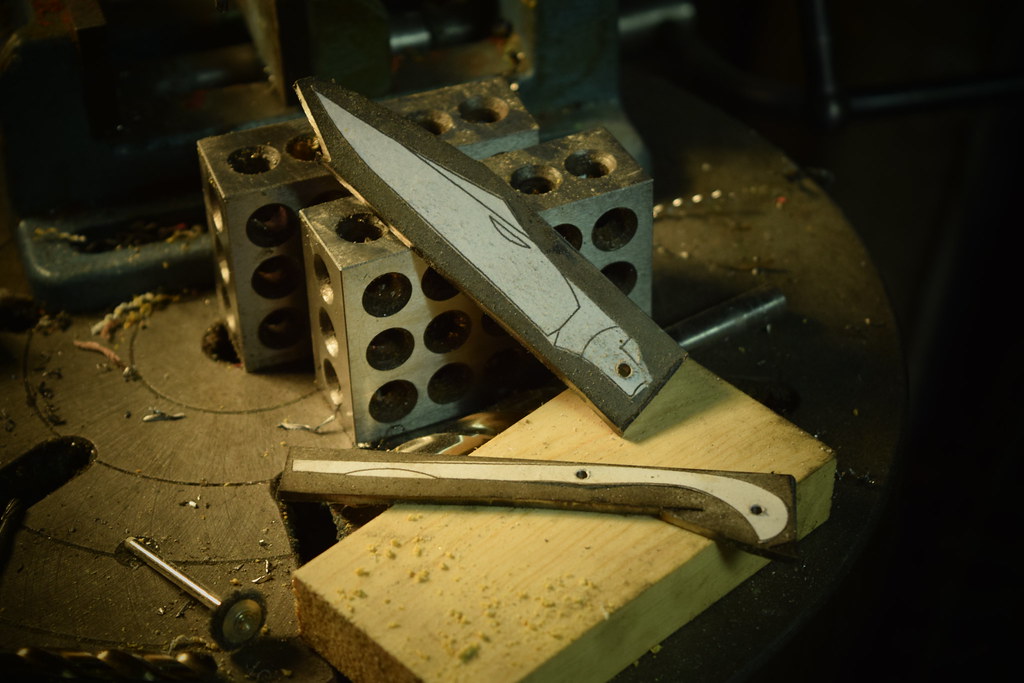
make a CAD model and then start cutting.

I haven't thought too much about the questions yet so will post a couple questions tomorrow to get this thing going. I just wanted to get it up here and prepare you guys for the influx of questions!

Thanks guys! I hope you'll stick and round to watch and teach.

-Daniel Rohde
 
At the outset, congratulations for taking on a slip joint. they are frustrating at times, challenging but always very satisfying, in the end. But while I like your design, aesthetically, I don't think it will work. When you close the knife the spring will be raised above the liner/scales. The notch of the spring pocket, the back of the blade and where the kick rests on the spring has to be exactly the same. Your kick is too deep. Think of it like a circle around the pivot hole. See this picture for a blade where I start with a pivot hole of 1/8 ". I then take the pivot stock, in my case 1/8", tape around it until it increases the radius. Then I tape the the carbide tip of a scribe and scribe a circle. Grind exactly to the edge of the circle for the spring pocket, back of the blade and the kick. Later you can do the re-curve in the kick, just don't touch the back or front of the kick.

The spring pockets I make are 1 1/2 times the thickness of the blade/spring stock (always flat or precision ground).


23713204721_66fef57ea3_z.jpg
 
Last edited:
At the outset, congratulations for taking on a slip joint. they are frustrating at times, challenging but always very satisfying, in the end. But while I like your design, aesthetically, I don't think it will work. When you close the knife the spring will be raised above the liner/scales. The notch of the spring pocket, the back of the blade and where the kick rests on the spring has to be exactly the same. Your kick is too deep. Think of it like a circle around the pivot hole. See this picture for a blade where I start with a pivot hole of 1/8 ". I then take the pivot stock, in my case 1/8", tape around it until it increases the radius. Then I tape the the carbide tip of a scribe and scribe a circle. Grind exactly to the edge of the circle for the spring pocket, back of the blade and the kick. Later you can do the re-curve in the kick, just don't touch the back or front of the kick.

The spring pockets I make are 1 1/2 times the thickness of the blade/spring stock (always flat or precision ground).


23713204721_66fef57ea3_z.jpg
Just saw this! Thanks for the info! I'm a little rusty on the a few of the terms you are talking about(Mainly: the"kick " ?)

Good info.

I agree that I'm probably going to have to tweak this design and I could really use some help!

Here's what I did last night but I can definitely adjust the design in CAD if somthing is looking off:

I scanned the image onto the computer and then inserted it into DraftSight for a reference image
25026929901_515edb9201_b.jpg


Whenever I insert an image it always messes with the size, so I just make a square that is the exact size then expand the image till the knife is the right size:
24825228340_4f6f15109e_b.jpg


I trace it, then I delete the image and am left with my trace. Then I can play with it and adjust it how I think it should be(I like the look of it here but need help with my lock bar ratios and such)
24489991764_5f9a0732e8_b.jpg


This is a close up of the lock bar fit up. I think I need to adjust the pivot hold location.
25027159751_02b8878bcd_b.jpg


Okay so this is what I'm planing on with some questions:

-I want to use 3/32" thick 1095 for the blade and spring- Is that a problem?
- can you use almost any blade steel for the spring?
-In my CAD model I used 3/32" pins for the pivot and everything else. Should I go up to 1/8" for the pivot?


How am I doing? what needs to change for this design to work?

Suggestions and comments are very welcome!
 
Looking good Daniel! Send me the PDF when you get it done ☺ I'm not much help but hopefully some experienced guys will help. I'm subscribed.
 
Looking good Daniel! Send me the PDF when you get it done ☺ I'm not much help but hopefully some experienced guys will help. I'm subscribed.

Sure! I hope to put a nice clean tutorial on my website when this is all done...I hope it works out. I really like slipjoints but they sort of mess with me LOL
 
Sure! I hope to put a nice clean tutorial on my website when this is all done...I hope it works out. I really like slipjoints but they sort of mess with me LOL
Best way to learn for me was just jumping into it. I learned so many things that didn't work that I eventually changed things up to where they did start working. The process was very frustrating but hugely rewarding when I completed my first slip joint. I like forward to seeing your knife.

John

Sent from my SM-N910P using Tapatalk
 
Looking good Danial. Your on your way and two months from now you will look back and think wow! Why did I do that?

overall your design looks fine. I would be concern about the pivot hole being so close to the top of the blade notch. But ultimately blade machanics trumps all. Blade has to pivot and fold into the scales properly and any movement of the pivot pin changes that drastically.

I use 3/32 stock for my blades and springs. So far I haven't had any issues with that. I also use 3/32 pins for almost everything. 1/8 just seams visually too big for the gent folders I make. I do use 1/16 pins to add holding points for scales when I feel the need.

I I agree with the guys, get to the shop and try what you have. When you start building get yourself a binder and keep lots of notes. It will help you sort your thoughts and ideas and give you a place to look when your building your next folder for information.

Erik
 
3/32" blade and spring is typical, 3/32" pins also , if you have scale pins use 1/16".
Can you close the knife to the 1/2 stop position on your computer screen? If so, do so and see if the tip of the spring spans the width of the tang and a little more. If not, it should or it will be lazy in that position. Also close it all the way and see how it looks as far as dropping into the handle to the desired depth. Also look at the back of your spring in the 1/2 and closed position to see if it will be flush like in the first open position. All of this has to be worked out for it to turn out proper.
 
Daniel,

Take a look at Bill Vining's tutorial on building a Texas Toothpick, posted on this forum. I found this very helpful. He show's the proper geometry for a half stop slip joint. The point I made about grinding to the "circle" may be clearer. The reason I mark the circle is that I start with the blade and the first part of the blade I make is to drill the pivot hole. Everything is designed after that, because then I know the pivot hole is in the correct place. (For some reason I never drill a hole exactly where I want to and with a slip joint that is crucial.) Bill Vining also posted a tutorial on soldering bolsters which is very good. I agree with the suggestion to use 3/32" stock and pivot pins. I'll use 3/32" in the future. In fact, that is what Craig Brewer recommended to me and along with Calvin and the other good makers I accept that as the better way to go.

http://knifedogs.com/showthread.php...pjoint-WIP-Tutorial&highlight=texas+toothpick

And if your really bored sometime you could read the post I did several years ago on my slip joint build. It is by my own admission obnoxiously long but may have some advice....

http://knifedogs.com/showthread.php...-Lemony-Snicket-quot&highlight=lemony+snicket

Jay
 
Last edited:
Daniel,

You asked about using 1098 for the spring and blade. I've never used anything but air quenched steel and don't about 1098, but I think it is oil quenched and may be more susceptible to warping if you do your own heat treating. I think many current commercial slip joints are 1098, maybe "Great Eastern"?

But, if you don't have a surface grinder I would definitely use "ground" or "precision ground" stock, the same piece for the blade and spring. They should be the exact same width. If you want to use a tool steel A2 is good. Its air quenched, resistant to warping and makes a good spring. But lately I haven't seen it available in 3/32".
 
Thanks So much for the advise guys! There allot of info pack in a small area. I'll have start looking over these links and check more of this stuff out.

I can definitely relate to learn more when you just jump in and get your feet wet but I also like have a plan and know what I'm doing(even if it's only a "sort of Knowing" )

So I looked up the Steve Culver's website and found this PDF: http://www.culverart.com/Slip-Joint Folder Designing.pdf that seemed to help allot

This is what I have after a hour of playing with the CAD. I played with moving the pivot and I moved allot of things around but I think I'm close..er...I'm starting to be REALLY thankful for this CAD it is really handy for seeing how this goes together it's really cool. My first model I didn't make it so that I could pivot the blade, but I changed it and that made it a LOT better. Designing a frame lock is looking easier and easier all the time! LOL

So here it is pivoted to about a 90* stop, looks like it is pushing the spring bar down 0.082". Now it is my impression that it is SUPPOSED to push it down; is that true? is for how far?
25021259652_0f3c5b439b_b.jpg


In the clossed position. I changed the angle of the nail nick so that it's parallel in the closed position. I also had to carve out a section into the spring to accommodate the blade- Is that a problem?(I think you can see how much it leaves there)
24513251873_1bd0f14272_b.jpg


I was having fun with it , and I thought I had this mechanism down pretty good so I decided to mess with the handle design a little bit; the bottom one is the original the others are messed with some.
25046654581_69328b5c42_b.jpg


I decided I wanted to see how these things look in person so I printed them, this design isn't final if I should change things let me know now and I can go play in the CAD more.

How cool is that!??
25139738595_70d5770222_b.jpg


When I was messing with the handles it occurred to me that after you have several basic lock designs that work, you could practically just keep those and design the blades and handles around that?

Thanks for your help guys, I really needed it!

I'll be looking at all the links and info you posted later today!
 
Okay! been going WAY to slow on this! I have the blanks profiled and drilled but somthing I was reading about is pre-loading the spring? I assume that means instead of bending the spring you grind it in a bent shape? well I didn't do that but here is where I am now:
25722589841_9b62fd7807_b.jpg


25722620481_4fbcaedc4e_b.jpg


So I'm not sure what would be the best thing to do next, I'm thinking that making some sort of hole jig or somthing so I can try the action? Maybe I should heat treat the spring next? I suppost there are "deffinite" rules to this but what would you do next?

Still a lot to learn! these slip joints are just plain weird to me right now;)
 
:les: I always made my tang the same distance from the hole as the other two sides. That way, the corners create the tension and rise as you open
and close the knife. I believe since you increased the distance, the spring will break.

Using your cad, start with the hole and draw a circle around it. The 3 sides should be the same distance apart. :rolleyes:
 
If you look in you cad drawing in the closed position, you also have an issue with the blade contacting the spring. You also are pretty close to the spring at the tip. You need to take into consideration there is a small bit of over travel as the blade snaps close. You will end up with a small dent in the blade if you don't allow for proper clearance.

as a personnel preference, I always design the spring so there is a flat long enough for the kick to sit on. I find it easer to to all the final fit up so the spring falls flat with the scales in all three positions.

keep up the hard work, it will pay off in the end.

Erik
 
Daniel, as Don said, your tang is still too long. The spring should be in the same position in all 3 stop positions. It does raise slightly as you transition the blade from 1 position to another. Go back and look at Sticks' picture in post #2 of this thread. You see how he has a circle scribed around the pivot? This shows that the spring should rest in the same position all 3 stops.

Keep at it and it never hurts to go through Steve Culver's tutorial again. I find stuff I missed or forgot every time I read it.

Good luck!
Chris
 
Thanks guys! Haha...stupid me, I thought that it was supposed to be slightly longer....I think that those things are sinking in now...I think what I'll do is try to salvage this one and then start another with those things in mind(just hate to leave it now).


I'll get it eventually.....some things just don't click till you've done then a lot? Thanks for you help guys! I do really appreciate it!
 
Last edited:
Okay, well this hasn't really been a build along like I planed...cause I have gotten side tracked and just haven't really updated this thread. I have been posting most of the build pictures in my Instagram but that doesn't work to good for some of you. Anyway, here are some thoughts and pictures of the finished knife.

It's definitely not perfect and I never planed that it would be but I have learn a LOT from this one and the next one will be better and faster in pretty much every way.

Thanks for encouraging me along the way! I'll be posting a final questions thread a little bit later

(Pictures are coming shortly)
 
Things I learned:

- I now relatively understand how everything works together and that is what was bothering me.

-What NOT to do

-The best order of process(or closer to it)

-What I want to do next time

-A surface grinder would make life SO MUCH BETTER

Question(s):

- How do you get your shield to fit so nice? mine is terrible!

-When I pinned my pivot the blade got way to tight, how should I have done that?

-Is using bronze washers a good idea?

-Any slip joint tips?

-What do you see thats good? bad? ugly?
 
Back
Top