Forge up and running, need some thoughts on fine tuning (videos)

Forgedog

Well-Known Member
Heres a video of the first run in this forge...
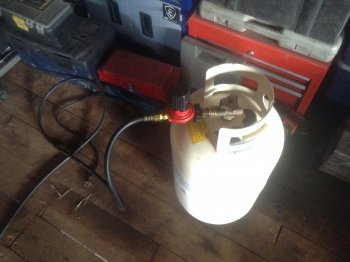
Propane tank body.
Dual burner.
Both gauges set too 30psi

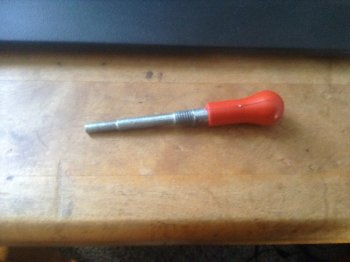
It now has air control.

The start of the video I open one burner to 5psi, light it and adjust it as close as I can get to a neutral flame.

If I go higher than 5psi the flame is about 8-10 inches out the front of the forge. Thats why I keep it around 5psi.

Next in the video I open the second burner to 5psi as well... Now both burners are running at 5psi and the air is adjusted as well as I can.

As you can see from the video the added flame from the second burner causes the flame to shoot quite far out both ends of the forge and the flame either way never seems all that neutral to me.

My plan is to run with one burner on and one burner off...
Will that cause any major issues? Like will it cause anything to ignite or explode?

The valve at the tank is also at 30psi.


So basically im wondering how to fine tune it... Should I keep it at one burner on?
What pressures should I adjust it too so that I get a good flame and less flame out of the forge body?


Ok... So it says my video file is too big to process, how do I fix that?
 
Without the video, and going with my instincts of your description....

1. Why have the tank at 30psi....when burners are running at 5psi?

2. The description of the two burners tells me that both burners are too much for the size of forge body you're using. I'd try going with a single burner....located approx. midway in the forge body.

You don't mention if the forge is square, rectangle, or round. If it's anything other then round, you'r gona have issues. There's simply nowhere to place a burner in a "square" designed forge to get anything close to even heating.

If nothing else, snap a few pics and post them....along with explanations, and we can likely be more specific.
 
Thanks! Its a bit awkard to exlain without the video... I managed to reduce the video size but now it says mp4 isnt an allowed Extension.

Now im trying to find info on what extension is alowed for videos.
 
Upload to youtube, then link there. That seems to be the most common method of posting videos. Seems like I have uploaded videos to https://imgbb.com/ but don't remember for sure. Youtube works good.
 
After playing with the files for about two hours I got them on youtube, I hope this works!

Thanks for all the help and suggestions so far! its appreciated!
As much as I would love to start a new forge or burner type... ive been working on this one for about ten years, a lot of time, cost, and frustration.
I want to get this one working before starting again from scratch.
The last decade has been a nightmare... theres finally some light at the end of the tunnel but im feeling pretty stressed.
Im praying that this forge will work without a complete rebuild or any serious modifications.
I have no more time money or nerves... it has to work or idk...

The videos show single burner and double burner test fires...

Some are 5psi at the gauges some are around 1-2 psi.

Tank gauge is set too 20psi now.

The single burner works well I think around 5psi without flames jumping out of the forge body.

With both burners going the best I can get is around 1-2psi max and the flames are 6-8 inches out the body of the forge.

Is there any way I can adjust it? or will I have to... cut the body, remove one burner port, move the other to the middle of the body and buy a lot more EXPENSIVE thermal liner products to patch the holes?

Im trying to get decent forge weld temps.


PS This is my regulator, and it has one of those wrenches...
Ive never in my life seen or found instructions for how the wrench is used, and nobody ive asked knows either.
I have an idea... but its just a guess.

Could somebody clarify this a bit for me too thanks!
 

Attachments

  • IMG_8784.JPG
    IMG_8784.JPG
    983.4 KB · Views: 1
  • IMG_8785.JPG
    IMG_8785.JPG
    1 MB · Views: 1
Something that may work...

My jet orifice size I believe is .035 mig tip.
Someone mentioned if I go to a smaller orifice it will give me a smaller flame for the amount of pressure.
Sounds reasonable to me?

Also as I mentioned earlier I want the forge to reach weld temps.
I think its reasonable well lined... That aside, I can only find a rough estimate of weld temps when I search.

I keep coming up with around 2500 degrees give or take.

What is the correct weld range and what sort of BTU and temps should I be aiming for in the forge?
 
Without the video, and going with my instincts of your description....

1. Why have the tank at 30psi....when burners are running at 5psi?

2. The description of the two burners tells me that both burners are too much for the size of forge body you're using. I'd try going with a single burner....located approx. midway in the forge body.

You don't mention if the forge is square, rectangle, or round. If it's anything other then round, you'r gona have issues. There's simply nowhere to place a burner in a "square" designed forge to get anything close to even heating.

If nothing else, snap a few pics and post them....along with explanations, and we can likely be more specific.


1. Thats a good question... Habit I guess. I set my tank to the max pressure I may need.
Then I do the forge pressures at the burner valves.

2. Its a round body, I think it gets a decent vortex.

Im hoping to avoid cutting it up and re location the burner down to just one...
Youre right though, seems like serious overkill.

I could run a single burner without moving it if its position at one end of the other doesnt have a huge effect?
Its 2-3 inch difference.
 
Based on the videos....

1. WAY too much/many burners for the size of the forge. I believe you could easily get by with only one of those burners for the size of forge you have (provided it is tuned/burning correctly)

2. Not enough velocity for a strong/clean burn. In the videos, the fuel/air mixture is WAY to fuel rich. If you insist on using those (or either) burners, you need to get more air flow/velocity..... the rule of thumb for venture burners is 3 to 1 for the air intake..... in other words, if your burner tube is 1" dia, you need to have AT LEAST 3" air intake/bell for enough velocity to create a good burn. I don't know what size those holes in the end of the burner plates are....but the area that is allowing air intake needs to be AT LEAST 3 times of whatever the burner tubes are... and POSSIBLY, in this case, because those bell extensions (the things with the holes in them) are so far away from the gas jet....that they are not creating a strong enough vacuum to "suck" in enough air into the burner(s).
(What I am hearing in all the videos is the gas flow....over the airflow/burn sound. It should not be that way..... with two venturi burners running correctly, there should be a strong steady roar of combustion.....and there isn't.)

3. Remember earlier when we talked about how burners will operate/behave differently inside, versus outside the forge? That will also apply when/if you partially block up the front of the forge (which I would recommend) leaving just enough open to get you work pieces in/out. This will create more back pressure on the burners....making them run differently then in the videos. Long story short....get your forge setup as you will be working with it.....THEN tune the burners/forge. That way you only have to discover the settings once. The way you've gone about it, you have to work out settings and making things work correctly with each step/phase.

You could try running only the back burner, but you'll still need to modify things to get more combustion velocity.... personally, I would first try getting rid of those "plates" with the holes that are blocking up the intake of the burners....and use the gas pressure/jet to control velocity. If you needed more air control, you could always put a simply swing plate, on the "bell" made from a simply piece of sheet metal (like the "gate" on the blower that I posted the pic of) My instincts are screaming that those burners are way over engineered. Understanding that a forge is nothing more then a controlled explosion..... it's always best to design/create every part of the forge with the K.I.S.S. principle..... because the more you overtake the plumbing, the easier it is to stop up the drain.

OK, all that being said/applied to your setup as it is now, IF you were to open up the back/intake of one of those burners, and get it to run/burner correctly for the size of forge you have, it would still be best if you moved a single burner to approx the middle of the forge body horizontally, and gave it more tangent to make the flame follow the internal contour.....you MIGHT be OK. Unless you do so heavy modification to the burners, it's going to be a constant struggle to use the forge as it is in the videos.

I gotta be honest..... I just don't like the design of those burners. I believe that the extensions of the "bells" with the holes is causing far too little airflow, and are the biggest part of what I called "over engineered". I suspect the burners would work OK for that particular forge IF....those bell extensions were gone, and the pipe containing the gas jet(s) was directly on the bell(s). Next is the ball valves.....those are either on or off.....you might think you can "adjust" with them by opening/closing them "a little", but the don't work that way. Those REALLY NEED to be propane needle valves....that will offer you far more control/adjustability.

I might be beating a dead horse, but with that size forge, IF you would build a single, blown burner like I posted the pic of, and use 1 1/2" black iron pipe throughout, using a 1/4" pipe nipple like in the pic I posted, AND A PROPANE NEEDLE VALVE.....you're problems would be solved, and you'd have a forge that would do everything from general forge work, to easily making forge welding temps....while needing only 2-6 psi of propane to do it. Sometimes, if you want to work, versus fighting with your equipment....you just have to take a step back, re-evaluate, and go a direction you KNOW will work, versus trying to make something work....that likely never will.

Keep use posted!!
 
Last edited:
There are many things that can be adjusted, but at the end of the day, you need to find the easiest thing to adjust in order to get the results you need from the equipment you have.
It seems pretty clear from the information provided that you are running too rich.
A Naturally Aspirated burner uses the momentum of the gas issuing from the gas jet to entrain air. The air:fuel ratio achieved is dependent on the gas speed (which varies as the square root of the gas pressure) and the restriction to airflow that results from your air inlet arrangement.
That drilled (choke?) plate setup is a major restriction to airflow. It is not obvious in the video whether it is fixed or adjustable. I'm guessing fixed and that it cannot easily be made adjustable.
Whilst you could faff about with the design to reduce the restriction to airflow and increase the air:fuel ratio, it is much easier to just reduce the size of the gas jet.
Get yourself some .024" mig tips and try them instead. It is probably worth getting some .030" mig tips as well.
The smaller mig tips will shift the air:fuel ratio leaner and will increase the flame temperature.
If the .024" tips are too hot/lean, try the .030".
If you find you need something between. 024" and .030" (or between .030 and .035"), you can fine-tune the jets with a pinvise and a set of small-diameter drills.
If the .024" tips are not hot/lean enough, things get more awkward and you will need to find smaller jets than standard mig tips. It is worth noting that the holes through mig tips are usually about .006-.007" bigger than the nominal wire diameter.
The number of burners may still be sub-optimal, but your immediate need is for something that works. Try smaller mig tips. Let us know how it goes.
 
Back
Top