Another Young Oldster

DanF

Well-Known Member
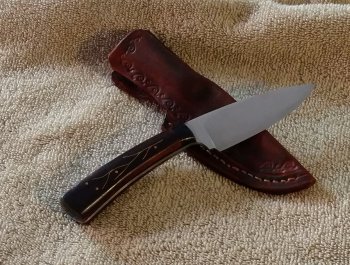
Hi folks, been perusing the threads and enjoying the site for awhile, thought it only polite to say hello and thanks for the very informative threads and very lovely knives posted. Here's a recent one I finished, am now working on a much larger version to go with a three piece set. I've come a far piece with my knifemaking but have a lot farther to go.
Thanks for looking.
IMG_20180317_151852.jpg
 
Yes sir, maple handle with gaboon ebony bolster and the "mild" inlay pattern. If my handle or scale wood is not very figured I try to dress it up a bit without getting into a lot of scroll work on a mid-range (for me), priced knife.
 
Welcome aboard Dan! you get an A for posting a pic with your introduction! Nice knife...LOVE the shape of that blade!
 
IMG_20180614_131430.jpg
I had posted this one on another site recently, a very simple low layer pattern of 1084 and 15n20. More of a 'for looks' kind of knife versus a functional knife. Walnut handle, through tang with the female side of a Corby bolt holding a brass butt cap on threaded to tang, with simlpe silver wire inlay.
This is knife #2 in a 3 knife set. I should have the big fighter finished in a couple weeks to go with these two.
 
Opaul is right - WOW!!! That "simple" wire inlay sure looks good to me. You've got me thinking I might like to try something simple like that. Sure does look good. Is that round silver wire just pressed into the groove in wood? How is it held in - epoxy? Undercut?
 
Thanks Ken, we call it "wire" but more correctly, it is a flat ribbon that's .014x.050. Use a very thin, small blade to cut a v-shaped channel, stand the ribbon on edge and hammer it in. Curly maple fibers are excellent for this and walnut (sometimes) isn't bad) but is harder to work with. After I get it in place I stain the wood and then run a bead of super glue down the length of the channel the wire is in. Let it dry and sand again and finish as you like. Don't know if that's exactly right but it seems to stay in place. I'm just a hack at it, there are some incredible old school makers out there who make works of art with it.
 
Thanks Ken, we call it "wire" but more correctly, it is a flat ribbon that's .014x.050. Use a very thin, small blade to cut a v-shaped channel, stand the ribbon on edge and hammer it in. Curly maple fibers are excellent for this and walnut (sometimes) isn't bad) but is harder to work with. After I get it in place I stain the wood and then run a bead of super glue down the length of the channel the wire is in. Let it dry and sand again and finish as you like. Don't know if that's exactly right but it seems to stay in place. I'm just a hack at it, there are some incredible old school makers out there who make works of art with it.


Hey, Dan like what I am seeing! Your work shows a great level of skill and knowledge!!

Here is a great suggestion. Why don't you do a step by step WIP on the wire/flat ribbon. I have often admired it on a knife handle I have heard the explanation's, I even went so far as making a crude set of tools. :oops:

However it is something that intimidates me to this date!! I have never tried it but, it still intrigues me every time I see it!! I for one would love to see the process step by step, the tools you use, the explanation for don't do this!! :D

Keep up the good work and welcome!!
 
Hello CCraft and thank you for your very kind thoughts, but, I have to say it is undeserved. Truly, in the world of inlay I am the village idiot :).
The nice thing about inlay is that even a very simple pattern such as I do can really dress up a plain wood handle.
The founder of ABS was a real inlayer, as well as MS's Jay Hendrickson and Joe Keeslar. What little I have been able to learn came from their books and DVD's.
I'll post up a pic of my basic set of inlay tools, but a true wip should come from someone who is truly a master, as I would not want to lead someone down an incorrect path.
I too was intimidated by inlay, particularly after seeing some of the master's works. But, a little practice on scrap wood soon alleviated those fears and now, even though my designs are very simplistic, it is something I enjoy and it adds to my knives a bit.
Once I finish the third knife in this set I'll post a pic of my setup and how to make some of them, which, if you can make a knife you can certainly make these tools.
Again thank you for your thoughts.
 
IMG_20180728_190737.jpg
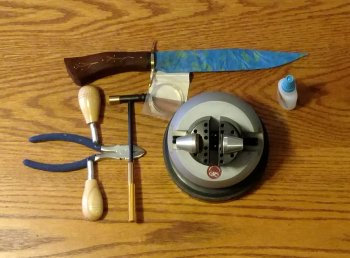
This is my basic setup, less a 2" diameter by 3" long table top anvil for flattening the wire ends as needed. I've seen two types of handles available for the cutting tools, a mushroom shape and the pear shaped as pictured. The pear shape fits my hand better. The very small hammer is from Harbor Freight, less than $5.
The fighter isn't quite finished, the devil is left in the final details. OAL is 13-3/4", blade length is 9".
 
Back
Top