
Justice4all
Member
Hello, after decades of working for others I am fortunate enough to be able to try my hand at actually crafting something useful and hopefully making some money off of this endeavor. I've spent years studying others work via the web, books and videos. And while I could say I'm self taught, a lot of credit goes to all of you that have posted information so freely on how to make knives. You all are a big part of what has made this possible.
Tracy's videos in particular made all the difference in the world in taking this knowledge from the ethereal to possibility . Watching the video's he's produced is like being in the classroom for the courses you actually wanted to take in school. Once again, all those that have posted vids or paragraphs on everything from belt selection to how-to's are people that I owe a debt of gratitude to. So, sincerely, THANK YOU!
Currently I am working on stock removal knives, but have just purchased a new Kanka anvil and a really nice forge to start my home Damascus tutorial. To this end, I'm also going to purchase a hydraulic press as I have the bug to get deep into the realm of forged metals.
So, I literally had finally gathered/built all the stuff to start making knives a few months ago. I like controlling all the facets of my creations so to this end I purchased (from Tracy) an EH 22.5 oven as I like the idea of baking my own. I also purchased a Grizzly hardness tester, an Esteem grinder (I'm building my next grinder) and a load of belts. I ended up trading a custom rifle I built for a new metal band saw which was worth it 100%. I only wish I had gotten a larger unit as this one can get bogged down even in the annealed steel I'm cutting. A no weld grinder and a larger band saw would've been a better use of my funds.
I know some would suggest a HC steel to start with for ease and cost savings but I'm getting older and time is of the essence. After literally years of studying the different steels, I've decided to focus on the CPM family. And I'm glad I did. CPM 154 in particular. While it's pretty hard, even in the annealed state, it's actually not that hard to deal with and it makes, with correct HT, quench and cryo a really great blade material. IMO. Plus, the baking process is really easy vs. some of the other steels which, as a brand new maker, makes it appealing.
While I appreciate a good art knife, I really tend towards knives that will be carried and used everyday. My goal is to make a fixed blade that falls into this category but not everyone wants that.
So without further ado, here are my first completed knives. I've only ground a total of 15 knives or so, but I've learned quick. Which is good as CPM 154 isn't cheap.
This was my first completed knife and second fully ground knife. Everything from HT to mounting the scales to the pins was brand new to me. This is the knife that also taught me how tough a truly heat treated blade could be. I ended doing the initial edge with my large DMT diamond stones. This little blade took me 5 hours of hand stoning to get to a decent edge.... I did this as I had never used a belt to freehand sharpen a blade before. Obviously this wouldn't cut it in a production environment.
Approx 5.5 inches long, 3/16 CPM 154. HT'd to 63 RC after plate quenching and before tempering down to 60-61 RC. I have also run all the knives through a cryo quench in dry ice and isopropyl alcohol. The alcohol gets down to -105 and I let them sit overnight in the cooler. Using a small cooler inside a larger unit allows 20 pounds of dry ice to last over two days. I just bought a 10L dewar for LN quenching. The handle is linen micarta which I've never played with before and of course, a nice looking 3/16 mosaic pin. I really have a thing for mosaic pins...
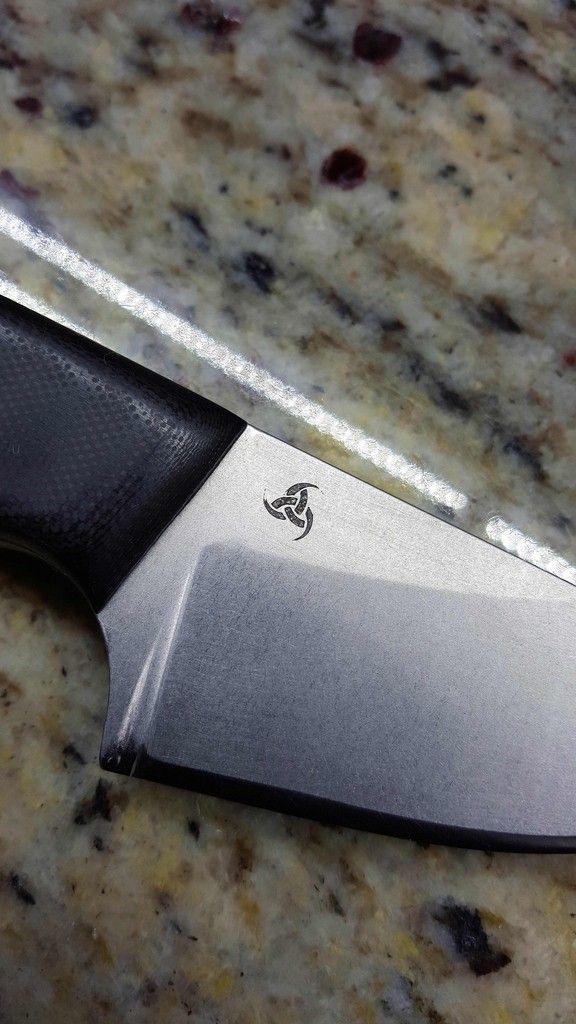
The makers mark is Triskelion. Representing the three sips that Odin took from the mead horn of wisdom. My wife actually used her vinyl printer to make the marks. The nice thing about this vs. the etched film is that, because the vinyl has a sticky back, it seals to the blade and keeps the etch from ghosting due to migrating solution. The downside is that this is as small as they can get as the machine just can't cut vinyl as small or as clear as the film.
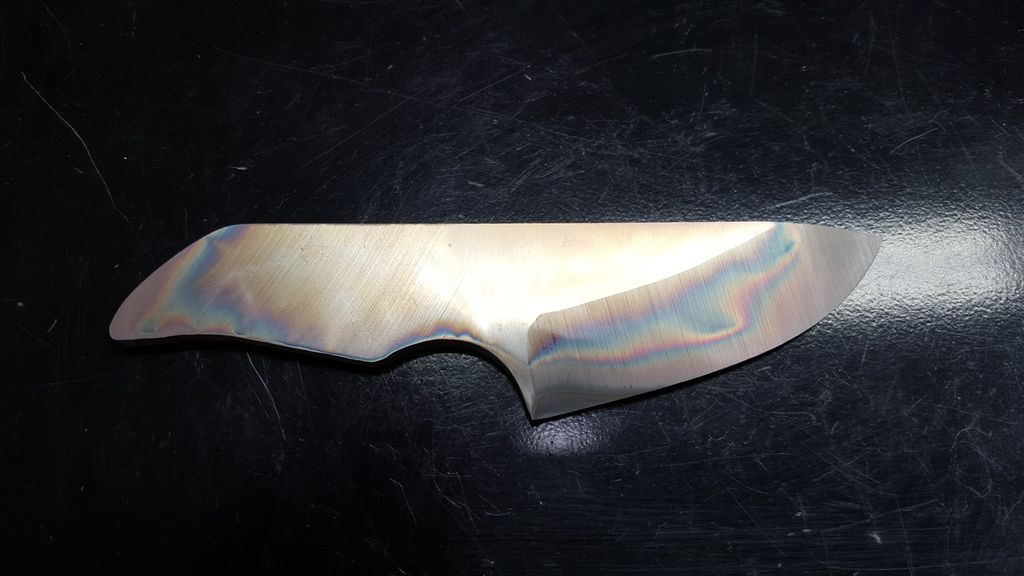
This was also one of the two first knives I've ever heat treated. Seeing the inside of the oven and the knives glow is something else. Really brings it home. Here it is after plate quench and before cryo. The patina was also something I didn't expect. I foil wrap my knives and expected them to either have a bit of carbon or a bit of darkening to them. The multi hued coloring was just awesome to see. If I could get this all the way through the making process I'd do it. I'm not that good yet though.
Here's just after the mark was etched. Never had done this before either so I was stoked with the results. I was really nervous at this point because I really didn't want it to ghost on me. Marks that aren't clear won't cut it for me.
If you click on the photos, the rest of my albums are viewable as well.
So there it is, my first completed knife. Turned out way better than I ever though it could. Next up, my evolution and education over the next month or so.
Once again, copious thanks and gratitude to those that have been so free with your knowledge.
Justin
BlackRavenArms
Tracy's videos in particular made all the difference in the world in taking this knowledge from the ethereal to possibility . Watching the video's he's produced is like being in the classroom for the courses you actually wanted to take in school. Once again, all those that have posted vids or paragraphs on everything from belt selection to how-to's are people that I owe a debt of gratitude to. So, sincerely, THANK YOU!
Currently I am working on stock removal knives, but have just purchased a new Kanka anvil and a really nice forge to start my home Damascus tutorial. To this end, I'm also going to purchase a hydraulic press as I have the bug to get deep into the realm of forged metals.
So, I literally had finally gathered/built all the stuff to start making knives a few months ago. I like controlling all the facets of my creations so to this end I purchased (from Tracy) an EH 22.5 oven as I like the idea of baking my own. I also purchased a Grizzly hardness tester, an Esteem grinder (I'm building my next grinder) and a load of belts. I ended up trading a custom rifle I built for a new metal band saw which was worth it 100%. I only wish I had gotten a larger unit as this one can get bogged down even in the annealed steel I'm cutting. A no weld grinder and a larger band saw would've been a better use of my funds.
I know some would suggest a HC steel to start with for ease and cost savings but I'm getting older and time is of the essence. After literally years of studying the different steels, I've decided to focus on the CPM family. And I'm glad I did. CPM 154 in particular. While it's pretty hard, even in the annealed state, it's actually not that hard to deal with and it makes, with correct HT, quench and cryo a really great blade material. IMO. Plus, the baking process is really easy vs. some of the other steels which, as a brand new maker, makes it appealing.
While I appreciate a good art knife, I really tend towards knives that will be carried and used everyday. My goal is to make a fixed blade that falls into this category but not everyone wants that.
So without further ado, here are my first completed knives. I've only ground a total of 15 knives or so, but I've learned quick. Which is good as CPM 154 isn't cheap.
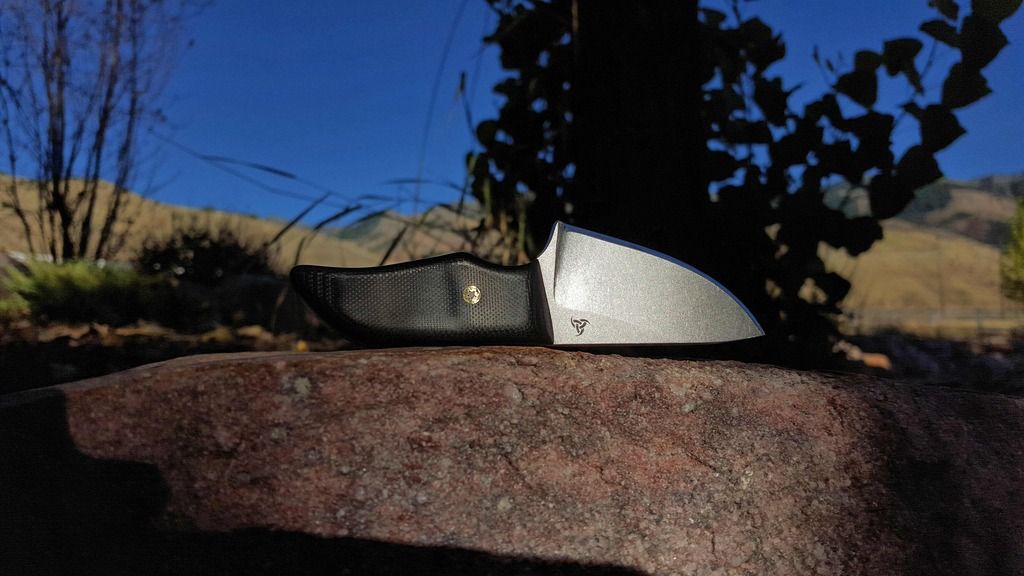
This was my first completed knife and second fully ground knife. Everything from HT to mounting the scales to the pins was brand new to me. This is the knife that also taught me how tough a truly heat treated blade could be. I ended doing the initial edge with my large DMT diamond stones. This little blade took me 5 hours of hand stoning to get to a decent edge.... I did this as I had never used a belt to freehand sharpen a blade before. Obviously this wouldn't cut it in a production environment.
Approx 5.5 inches long, 3/16 CPM 154. HT'd to 63 RC after plate quenching and before tempering down to 60-61 RC. I have also run all the knives through a cryo quench in dry ice and isopropyl alcohol. The alcohol gets down to -105 and I let them sit overnight in the cooler. Using a small cooler inside a larger unit allows 20 pounds of dry ice to last over two days. I just bought a 10L dewar for LN quenching. The handle is linen micarta which I've never played with before and of course, a nice looking 3/16 mosaic pin. I really have a thing for mosaic pins...
The makers mark is Triskelion. Representing the three sips that Odin took from the mead horn of wisdom. My wife actually used her vinyl printer to make the marks. The nice thing about this vs. the etched film is that, because the vinyl has a sticky back, it seals to the blade and keeps the etch from ghosting due to migrating solution. The downside is that this is as small as they can get as the machine just can't cut vinyl as small or as clear as the film.
This was also one of the two first knives I've ever heat treated. Seeing the inside of the oven and the knives glow is something else. Really brings it home. Here it is after plate quench and before cryo. The patina was also something I didn't expect. I foil wrap my knives and expected them to either have a bit of carbon or a bit of darkening to them. The multi hued coloring was just awesome to see. If I could get this all the way through the making process I'd do it. I'm not that good yet though.

Here's just after the mark was etched. Never had done this before either so I was stoked with the results. I was really nervous at this point because I really didn't want it to ghost on me. Marks that aren't clear won't cut it for me.

If you click on the photos, the rest of my albums are viewable as well.
So there it is, my first completed knife. Turned out way better than I ever though it could. Next up, my evolution and education over the next month or so.

Once again, copious thanks and gratitude to those that have been so free with your knowledge.
Justin
BlackRavenArms
Last edited:


