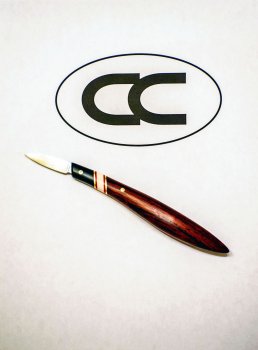
Epoxying question for you "seasoned" pros.

Chris623

Well-Known Member
I'm in the process of making a carving knife for myself right now. Decided to put the extra time into it to make it uniquely mine. This is the first stacking of materials I've done on a knife handle. So I'm stacking, front to back, Gabon Ebony, .040" brass, .040" red fiber, 1/4" Walrus Ivory, .040" red fiber, .040" brass and the balance of the handle is Cocobolo. I'm using System Three Quick Cure 5 Epoxy. (supposedly a 5 minute epoxy) I've had this epoxy on the shelf for a year or so...................might it be "dated"? It seems to set up hard overnight.

I glued my stack with epoxy and let it set overnight. Then I cut it in half lengthwise and rabbited a slot for the blade in one half. Used C-clamps to hold it together while I shaped the outline of the handle with a belt sander. It seems when the epoxy gets hot, it "lets go". :mad: I've had two joints fail so far. :mad: Finally decided I was going to get the piece/pieces that fall off epoxied back on and drill pin holes for the blade. When I tried to put the first pin through the handle half to align hold the blade for drilling of the second hole, the Ebony broke off. :mad: I'm going to install the blade and Epoxy both halves together and then see if I can finish shaping the handle.

Am I approaching this wrong? Am I using the wrong Epoxy. I don't think I starved the joint of epoxy when I clamped it...........but who knows?

Any help from you guys who stack materials would be greatly appreciated.
 
The quick set epoxies don’t seem to stand up to extreme heat or cold. The issue may be that the epoxy was already starting to kick (cure) before you clamped it all up. 5 minutes is often wishful thinking. Even though the glue is still soft, the activation is already taking place even as it’s being mixed.

Add to that the stress of gluing up very expensive materials as fast as you can before the epoxy kicks and you see why most of us abandon the hardware store epoxies fairly early on in our career.

Acraglass from Brownell’s and G-Flex 650 from West Systems are the primary epoxies you’re going to have suggested to you. Blade Bond is (was) a sponsor to this site. I haven’t used it but I hear good things.
 
Here are some basics:
Most important is: Surface preparation matters far more than the adhesive. Clean the surfaces of any oil, wax, what ever. Sand blasting is best but rough grit sand paper will also work.
You have to give the glue a decent surface for purchase. Avoid oily or soapy chemicals when cleaning for a glue up. Acetone is commonly used and will leave an oily surface.
I use 90% rubbing alcohol.

Having said that, good epoxy matters and there is a wide range out there. Better epoxy costs more. Pretty simple. I would not use any purchased at the local home or hardware store. It is budget glue and will fail much quicker than an industrial epoxy.

Most epoxies are 50/50 mix of resin and hardener. I always go 60/40 Hardener to resin. Keep in mind the more hardener you use, the faster it will go off.

Temperature affects cure time. Warmer is better and faster. Anything less than say 65 degrees and your epoxy may never set up completely - even if you warm it up later to finish curing. I'll heat up an oven to 150F and turn it off or aim a lamp bulb close to my glue up. Get it over 75 degrees and you should be fine.

Fast expoxy like 5 minute stuff is never as strong as 15, 30 minute or 24 hour cure. Generally, the longer the set time, the stronger it is.

Nearly all general epoxy fails around water boiling point. Some, like JBWeld will take a little more heat but not much more. When grinding metal layers flush, it's important to manage the heat or the bond will soften and fail. It won't re-harden nearly as strong if it over heats. Grind and dunk.

Most guys (and I mean most) use way too many clamps/pressure and squeeze too much adhesive out. A couple light spring clamps are sufficient. If your material is warped enough it won't lay flat and you need to clamp it down, you are doing it wrong.
 
Thanks to both of you.

I know there was plenty of "tooth" in mating surfaces and I cleaned all surfaces with Denatured Alcohol, so no body oils. Surfaces mated well enough I probably should have used spring clamps instead of C-clamps.

I suspect the culprit is the combination of heat and the epoxy I'm using. System Three is a good epoxy, but I've never subjected it to the heat generated by sanding that brass. I've used West Systems materials for many years............but never Acraglass G-Flex 650. I'll check into them.

I've got it all epoxied and clamped and will wait patiently until tomorrow to see what I end up with. Anxious to get this little knife finished and in my tool roll.
 
I'd be surprised if you "real" knife makers are anxious to see my tiny little knives. ;)

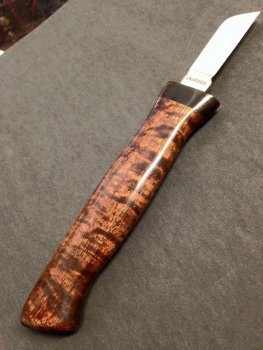
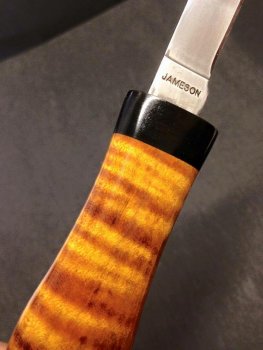
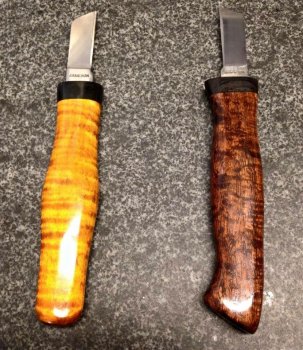
Before i started making knives I was doing a lot of re-handling. A huge seller was electrician knives. (Insulation knives).

It’s about the creativity, not the scale. We’d love to see them.
 
Jameson electrician knives.

6C8E513F-A315-4EDC-8DFC-76D78066589B.jpeg84CA9EC2-AC2F-4E5A-B1CA-24C73672FB21.jpeg7D8A8C08-2FBC-444B-818C-33B4E1FCC5FB.jpeg


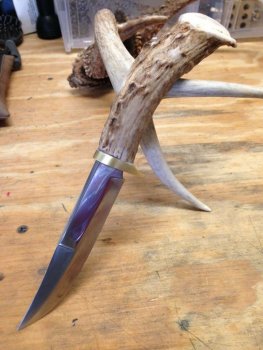
And the knife that started it all for me was this one. It was a knackered out, rusty old knife my buddy’s Dad bought at the PX in Germany 50 years ago. His Dad passed and he wanted it restored. As I was taking the handle off it began crumbling. The thin brass guard was beat to death. I ended up using this antler from a hunt he and his Dad had shared and fashioned a guard from brass stock. I reground the blade on my Harbor Freight 1x30 and hand sanded it.

When I finished, I realized that the only part I had not made from scratch was the blade. And that’s when I decided to jump in with both feet.

098B05BC-02D1-4CFF-A8B3-C4D9925F84C6.jpeg
 
Most important is: Surface preparation matters far more than the adhesive. Clean the surfaces of any oil, wax, what ever. Sand blasting is best but rough grit sand paper will also work.

AMEN!

Most guys (and I mean most) use way too many clamps/pressure and squeeze too much adhesive out. A couple light spring clamps are sufficient. If your material is warped enough it won't lay flat and you need to clamp it down, you are doing it wrong.

Double Amen and Amen...
 
THANK YOU, THANK YOU, THANK YOU!!!!

I've said for awhile that acetone causes more issues than it solves.

I've had an issue when cleaning the ricasso area with acetone and a Qtip it dissolves too much epoxy and leaves a small valley under the scale. What's the best way to clean that area?
 
Okay, Gentlemen, let me introduce my first wood carving knife................"Ebony & Ivory". It's actually a lot purdier than the picture, but I wasn't going to put together all my lighting equipment for a quick shot like this one. I've been at it a long time and I'm tired of messing with it. Since I'm not selling it, I probably won't take a better picture, but this one will give you an idea how it turned out. Not happy with the brown reflection on the blade and the brass, but that's what you get when you don't set up all your soft lights and tents, etc.

DSC_8265-Ebony and Ivory_copy-half.jpg
 
Now that is a new one on me Boss so an alternative is going to be had
I totally support and use alcohol for cleaning all mating surfaces. But if you read the directions for G-flex epoxy it says (or used to say) use acetone.
I did indeed use acetone when I first started until I joined the forum and the members recommended alcohol only.
 
Okay, Gentlemen, let me introduce my first wood carving knife................"Ebony & Ivory". It's actually a lot purdier than the picture, but I wasn't going to put together all my lighting equipment for a quick shot like this one. I've been at it a long time and I'm tired of messing with it. Since I'm not selling it, I probably won't take a better picture, but this one will give you an idea how it turned out. Not happy with the brown reflection on the blade and the brass, but that's what you get when you don't set up all your soft lights and tents, etc.

Very nice Chris. How thin is the steel you start with. I am not so familiar with carving knives. I looked them up and there seems to be number of different ones for different applications?

View attachment 68495
 
Wow! That is beautiful! I am a big fan of the stacked materials look, and the angles you used along with the gentle sweep of the handle really really works.
 
Thanks, Retro. I started with 1/16" 01.

Wow! That is beautiful! I am a big fan of the stacked materials look, and the angles you used along with the gentle sweep of the handle really really works.

Thanks, John. It's certainly not going to be a handle I replicate often. I know I couldn't make any money if I were trying to sell them. Most carving knives seldom sell for over $65. This angled stack was a booger-bear to do, especially since it was on my first knife and the first time I've stacked. I'll just make my regular carving knives with one type of wood.
 
Back
Top