You are using an out of date browser. It may not display this or other websites correctly.
You should upgrade or use an alternative browser.
You should upgrade or use an alternative browser.
First Guard - Need help
- Thread starter Casey Brown
- Start date
C Craft
Well-Known Member
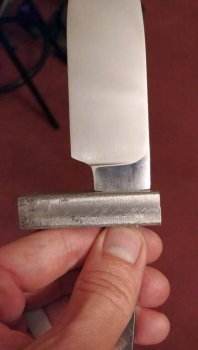
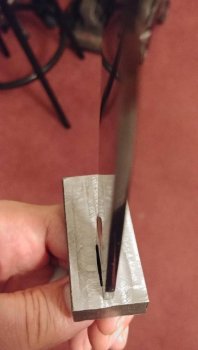
Should I just throw this guard away and start a new one? There's some pretty big gaps.
View attachment 65061View attachment 65062
OK this one is possibly fixable. You won't know till you try!
First picture
First off the area where the guard slides up against should not be squared off! Squaring the blade off at that point, can and will cause a stress fracture during the HT process. Take a round file and instead of the area being 90* file that area with the round file. When you fit the guard against it. You can place the blade in a vice, wrapped of course of in such a way not to scratch the blade. Take a round pipe or similar against the back of the guard. As you bump it you will see exactly what you need to remove. The idea is too under-fit the area and bump it forward to get a tight fit!!!
Second picture
This one is a bit harder to fit. First remember always under-fit You should be cutting checking and just when you can get it too start you are probably pretty close. I have a piece of pipe that is slightly squashed on the end. Often I get it too where I think it will slide but you can't get it too. Put the blade in a padded vice or similar, heat the guard red hot and put it over the knife's tang and bang it home. You can use a chunk of other wise useless leather to pad the pipe against the guard. Whatever it is the heat is gonna be burning it up so that will increase your need to get it done!! You can put a wet rag around the blade as a heat sink to keep from messing up the blade but usually there is not enough heat transfer to create a problem!!
Now to deal with what you have their! You may be able to lay the side of the guard on your anvil and take your hammer and whack the opposing side from the anvil. Sometimes it will close up and not be seen and sometimes you may not be able to close it! See how you have more gap in the middle of that cut! That is going to make it harder to close but sometimes you can make it close. A lot depends on the material the guard is out of!
In your case I think I would try and close this gap before I tried to get a better fit to the back of the Ricasso. Because if you can't close this gap it ain't gonna matter how good it fits the Ricasso.
I hope this helps. Others may have different ways but this is what I would attempt at this point. Next one make it tighter than dick's hatband as they say! File a stroke and test the fit, file a stroke and re-fit, sometimes it seems like for ever to get it just right!!
Last edited:
Casey Brown
Well-Known Member
Thanks! I'm already making some progress closing that gap. Luckily, I have a lot of meat on the guard that I can manipulate, then grind off later. One side looks pretty good, and the other is getting much closer. I appreciate the help. It may be salvageable.
Gene Kimmi
KNIFE MAKER
I can't tell from the pictures, but a guard is easier to fit if the tang is tapered both ways. Thicker and wider at the ricasso than it is at the end of the tang.
Milling the back side of the slot larger helps too, so you don't have the full thickness of the guard to file. I've been leaving around .080" - .100" thickness at the front of the guard.
Milling the back side of the slot larger helps too, so you don't have the full thickness of the guard to file. I've been leaving around .080" - .100" thickness at the front of the guard.
John Wilson
Well-Known Member
You can fix that guard because there is more than enough meat there, and you're going to end up removing some if you do it my way.
Remove the guard. Lay it on it's side, and use a big hammer to pound the snot out of it. Close up that slot a bunch. The slot will need to be re-filed square and the guard will no longer be square. You'll have to grind the sides down square again, but you have more than enough guard width.
That slot is no good as it is, so there's nothing to lose. You get a second chance at filing it just right to fit. As Gene says, you want a big opening in the back of the guard and only about .100 at most that actually contacts the blade. It's a lot easier to file a .100 lip than to try to fit .250 worth of slot thickness.
It also helps to have the tang tapered so that only the last .200 or so of the tang is the full width of the slot. Between the tang taper and the thin lip of the guard face, that's how you get that interference fit everyone talks about where you tap the guard into place and it basically fits itself. That will never happen without having the tang taper and the thin guard lip.
C Craft
Well-Known Member
Now to deal with what you have their! You may be able to lay the side of the guard on your anvil and take your hammer and whack the opposing side from the anvil.
Remove the guard. Lay it on it's side, and use a big hammer to pound the snot out of it.
See and you thought I was just blowing smoke up your...…….!! Granma always said a big hammer will fix most anything! If it doesn't work get a bigger hammer!

John Wilson
Well-Known Member
HAHA! For most things the answer is finesse. But occasionally brute force is required LOL.
Casey Brown
Well-Known Member
C Craft
Well-Known Member
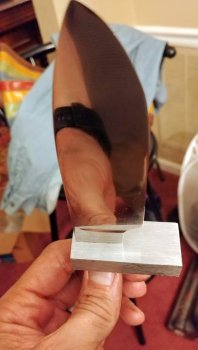
Much better!
The small divots you see there now are file strokes, in other words it is where the edge of the file cut deeper!
Nice flat strokes. A file that is almost as large as the opening works best, and make your stroke kind of like a draw file stroke. In other words not straight in but slide the file sideways as if you were draw filing. So that the stroke starts at one side of the cut and ends at the other side of the cut! It also helps to use a file with at least one safe side so that while you are intent on getting the fit just right in width you don't end up accidently cutting the height of the slot to wide!! Don't ask how I know that!!
You still need to check often with a straight edge to make sure you are not getting the divots and start correcting before it gets to final fit! Another thing if you are going to mirror finish like that everything has to be perfect or it shows up against the mirror finish, every time!!
Getting that guard fitted to the knife is why most of will fit that before we worry about is the guard cantered or is there more meat to one side or the other. All that can be corrected after you fit to the blade. You see all that goes away when you start to sand it out. That is why I always like to leave extra. I learned that on the first one I did!! Like you I had problems and honestly I am not sure my first was fitted as well as you did on this one!! But when I did decide it was an acceptable fit, I then realized it was cantered on the blade and by the time I got that ground to take care of the canter, the guard was narrower than I really wanted.
See we all go thru a trial and error period, it helps to know for next time what to do and, what not to do!! Or at least you hope you don't make the same mistake twice!!

The small divots you see there now are file strokes, in other words it is where the edge of the file cut deeper!
Nice flat strokes. A file that is almost as large as the opening works best, and make your stroke kind of like a draw file stroke. In other words not straight in but slide the file sideways as if you were draw filing. So that the stroke starts at one side of the cut and ends at the other side of the cut! It also helps to use a file with at least one safe side so that while you are intent on getting the fit just right in width you don't end up accidently cutting the height of the slot to wide!! Don't ask how I know that!!
You still need to check often with a straight edge to make sure you are not getting the divots and start correcting before it gets to final fit! Another thing if you are going to mirror finish like that everything has to be perfect or it shows up against the mirror finish, every time!!
Getting that guard fitted to the knife is why most of will fit that before we worry about is the guard cantered or is there more meat to one side or the other. All that can be corrected after you fit to the blade. You see all that goes away when you start to sand it out. That is why I always like to leave extra. I learned that on the first one I did!! Like you I had problems and honestly I am not sure my first was fitted as well as you did on this one!! But when I did decide it was an acceptable fit, I then realized it was cantered on the blade and by the time I got that ground to take care of the canter, the guard was narrower than I really wanted.
See we all go thru a trial and error period, it helps to know for next time what to do and, what not to do!!
bladegrinder
Well-Known Member
Man, that was a good fix !
John Wilson
Well-Known Member
Great job! Pack that sucker from the back side with JB Weld to fill that back pocket and make the guard/blade joint essentially solid. A tiny bit of JB Weld will squeeze through that tiny remaining crack. Trim that epoxy bead neatly on the guard face and it will look fantastic.
mike miller
KNIFE MAKER
^^^ is good and after you wipe the excess off clean it better with some WD-40 to remove the JB Weld.
Guindesigns
Well-Known Member
would you use solder on the back of the guard to keep it in place?
John Wilson
Well-Known Member
The back side of the guard usually has a huge gap, too big for solder to fill. By filling it with JB Weld it all becomes basically solid.
Guindesigns
Well-Known Member
Do I solder the front then?The back side of the guard usually has a huge gap, too big for solder to fill. By filling it with JB Weld it all becomes basically solid.
John Wilson
Well-Known Member
You can solder if you wish. It was done that way for many years and some still do it that way. I use a press fit and back fill with JB Weld instead.
Guindesigns
Well-Known Member
Oh... ok I only ask because I had a pre made blank i need to handle and it was a guard just not attached so I have to figure out how to attach it.You can solder if you wish. It was done that way for many years and some still do it that way. I use a press fit and back fill with JB Weld instead.
John Wilson
Well-Known Member
is it a full guard, like a stick tang, or is it a half guard that slides on from the front?
If it’s a half guard with a slot that is really tight to the blade then you can solder it or pin it.
If it’s a half guard with a slot that is really tight to the blade then you can solder it or pin it.
Guindesigns
Well-Known Member
It slides over a the full handle.is it a full guard, like a stick tang, or is it a half guard that slides on from the front?
If it’s a half guard with a slot that is really tight to the blade then you can solder it or pin it.
Robert66
Well-Known Member
I sent away for some Araldite 2 part weld stuff which worked on my only 2 small try outs finger guardss which I did not have confidence in, incidentally the liquid part went hard in the tiny tin before I could use most of it.
I
would like to make a big Bowie but am put off by the lack of brazing gear nowadays.
I will try a knife with some brass riveted on it now I have bought some 1/4 inch x 1 inch flat bar.
I am glad I have read this post.
Thank you.
I
would like to make a big Bowie but am put off by the lack of brazing gear nowadays.
I will try a knife with some brass riveted on it now I have bought some 1/4 inch x 1 inch flat bar.
I am glad I have read this post.
Thank you.


