Cast block forge wip

Diamond G Knives

Well-Known Member
Started working on a project today that has been sitting for over a year. I had purchased the block and brick last year and just got around to working on it today.
Decided I would take pictures as I went and try to do a WIP. This is my 1st so please bear with me. And as I try to give credit where it is due, this design was inspired by MS Jim Crowell of Mtn View AR. He has one of this style and was kind enough to tell me where to get the parts and study his forge as well as sending me detailed drawings on how it was constructed. Thanks Jim!

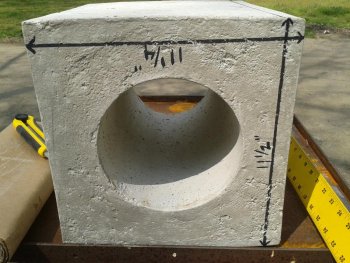
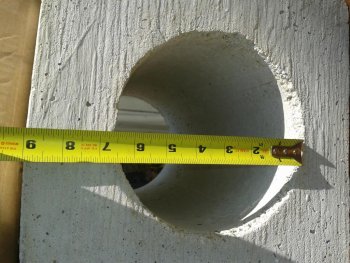
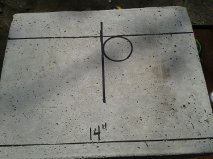
The forge body is a hard cast refractable rated for 3000 degrees. It is specifically made as the flame holder for an industrial furnace. It is 14" long X 11 1/4" square with an inside bore of 6 1/2" wide.

I was puzzling over how to drill a hole into a hard cast body, first thought buy a concrete core drill = $197 = No Go. Then a cabinet shop that did granite counter tops = they would not do it, they wouldn't say why. Then I called a rental company, Central Rentals in Russellville, rented a core drill and 2" bit (smallest they had) on a 4 hour rental for $55. This took longer to set up than to drill the hole! I have the hole cut tonight, and decided to call it a day.

My plan is to build a outer box for the forge body from some thin plate I have, leaving enough space to wrap the entire block in koawool. My thoughts are that a metal box will protect the block as well as give me a base to mount the fitting needed to hold the gas/air inlet in place. The front and back will be made of fire brick with an angle iron frame to hold the brick in place. May modify the door at a later date after some trial runs.

More to follow.

Thanks and God Bless,
Mike
 
Last edited:
shipped.jpg
This is how the block arrived. VERY well packed!
Also the dimensions of the block as well as the hole location. The drawings say in the middle at the top of the radius us the curve. I decided to go just a bit farther back.
 

Attachments

  • 20130409_115411.jpg
    20130409_115411.jpg
    158.7 KB · Views: 17
  • 20130409_141127.jpg
    20130409_141127.jpg
    158.9 KB · Views: 21
  • GetAttachment.jpg
    GetAttachment.jpg
    9.2 KB · Views: 13
Last edited:
Here are some photos of drilling the block, and the rig used to do it as well as the finished hole and a shot of yours truly running the drill! And the carbon plate in place. I have also attached a word document that has the detailed drawings. Thanks again Jim!

20130409_174502.jpg20130409_174946.jpg20130409_175000.jpg20130409_174524.jpg20130409_173955.jpg20130409_141214.jpg20130409_141148.jpg
 

Attachments

  • Gas forge single .doc
    126 KB · Views: 6
Last edited:
Worked on getting my old forge piping broken apart to use for the new forge. decided to mount the blower under the bottom shelf to protect it and have it out of the way.
The blower is one I bought from Kayne & Sons many years ago and if I remember right is 168CFM.

20130410_133136.jpg
 
The piping from the blower is 1 3/4" (don't ask me why, 2" will work fine. I believe I got a good deal on the valves so I used this size piping) the gas is a 1/4" stem of black pipe attached to rubber gas line, and comes in ahead of the air via a "T" fitting and reducers. The Valve body is to regulate the air flow. I do not like using the air gate as I find I can better tune the forge with the valve.
20130410_133150.jpg
 
Last edited:
20130410_133207.jpgthe "T" fitting is reduced down above the gas inlet to 1" pipe. I may go to 1 1/2 later as I seem to have plenty of air volume. I normally try to reduce by at least a 1/2" to help boost the air/gas mix flow volume. The hole into the block is 2" this was the smallest drill bit I could get locally, but it seems to seal very well with koawool. No air or heat escaping at this joint.
 
20130410_133219.jpg

Well I couldn't wait to finish it up to try it out!
The block took a bit longer to heat up, about 21 minutes, verses about 7 minutes for the koawool forge.
I am new the cast forges, but think I will really like them. After 21 minutes, I was able to back the gas down more than half and yet keep a nice
roar going. I believe the secrete is the thermal mass of the block, slower to heat up, but once it is hot, very easy to maintain with very little fuel.
This photo was after 21 minutes. The flame swirl is very even and controlled, and neither end seemed to be hotter than the other.
Wanted to the classic swirling flame in the dark, but it started raining :(.

Next is to start fabing the shell and brackets to hold the piping in place. I think I will add an angle iron to the front left leg to mount the gas valve on.
Will probably be next week, so stay tuned!
 
I've done something similar to that. Let me suggest the following changes. Replace the ball valve on the air line with a gate valve. It will give you better control of the air flow. Put a needle valve and a ball valve on the gas line right where the gas line is connected to the brass nipple. The ball valve there will allow you to shut off the forge with a quarter turn of the handle if you need to shut things down in an emergency and the needle valve will give better control of the gas flow. I also use the ball valve when I'm lighting the burner.

Doug
 
Thanks Doug, I can see the advantage of being able to shut down in a hurry!
With the needle valve, are you referring to what they call a "Red Head" I have one but this was already inline so I used it. Seems to give me good control, just not use to the other yet.

Thanks and God Bless
Mike
 
Just guessing here but it might pay to line the outside of the block with kwool and metal. Similar to how a kitchen oven is built. The block would then heat quicker and the insulation would retain it too the block. Just thinking out loud here as I have no experience with a block like that!
 
20130413_114100.jpg
That's just what I did! I was concerned that the block being hard cast might become brittle with repeat use. I wrapped in one layer of koawool then a plate steel shell.

God Bless
Mike
 
20130413_231229.jpg

Running at roughly 3/4, reached a full welding heat in roughly 17 minutes. Once reached, I backed down the gas and was able to maintain welding heat. I feel this will be a fairly fuel efficient forge. going to play with it a bit and see what the gas consumption is like. I believe I will cut the soft fire bricks for the back door to act as a plug that inserts into the actual hole rather than stack in front of it. Seemed to be losing a bit of heat there. The shell was warm to the touch at a welding heat after about 45 minutes. Figure I'm still loosing a bit of heat there, but think I can live with it. Also thinking of a metal framed insaboard door with smaller opening for general forging.

Thanks for watching, if anyone has any questions feel free to ask. Will post modifications in the future as they come about.


Thanks and God Bless
Mike
 
Looks good, I'm thinking the cast block should be real durable and tough. How dose it handle borax for welding?
 
Mike, on both of my forge burners the needle valve is attached directly to the ball valve on the gas line and my regulator is on the other end of the line by the tank. So my regulator is pretty much set on one setting and I regulate the gas flow with the needle valve which is right by the forge so I can stand beside the forge and adjust both the air and gas entering the burner. What I do in operating the forge is to turn on the blower and make sure the ball valve is off and I then open the valve on the tank. I then light a propane torch and direct the flame at the forge opening and open the ball valve on the line. I might have to open the needle valve a little too to get the forge to light, depending on how far back I adjusted it when using it last.

To turn off the forge, I shut the ball valve, close the valve on the tank, open the ball valve again to bleed off gas in the line the close it. I turn off the blower last. Residual heat in the forge will burn off that little burst of gas that is bled off the gas line in the shut-down procedure. Never have the valve on the gas tank open without the blower going.

Doug
 
Bradley: I'm hoping since it is hard cast, it will be more flux resistant than soft brick and should be much more so than koawool. I did order what they refer to as a silicon carbide plate that I am told should be impervious to flux, we will see!

Doug, what type of regulator do you have at the tank? Is it adjustable? I really like the idea of small finite adjustment with the needle valve. Just the little playing around Ive done, I can get a nice forging temp with very little gas. Hoping this will be a fuel saver.
I greatly appreciate the input. Its been I while since I built my last forge, and close to seven years since I've had forge to fire up. So this has been an exciting build for me!

Working on an adjustable anvil stand now so hope fully will be beating hot steel again by the end of the week!

Any suggestions on how to better this design are greatly appreciated!

Thanks and God Bless
Mike
 
Yes, the regulator that I have on my tank is adjustable, though I don't recall what I have it set at. My small forge, which is also cast from refractory isn't set very high. I was trying to get welding temperature from my large one built in a mailbox and had to open the regulator up more but I still basically just adjust the gas flow with the needle valve.

Doug
 
Back
Top