Shane Wink
Well-Known Member
I was hesitant to post this because of all the vertical forge builds out there but after talking to one of the mods I decided I would share how this one is being made. The goals are simple in that Safety and Thrifty are my tenants. This is my first vertical build as well but not my first or even second forge I have crafted so if others see an issue in design or function please post it as polite critique is always welcome.
I chose the vertical after having used one at a buddies shop and found several advantages over the horizontal I had used in the past.
1) For me being able to heat a portion of the blade rather than the entire blade is awesome for several reasons including not over heating thinner sections and when forging only the heated working section moves rather than the entire blade.
2) I recently learned to weld simple random patterns and plan to do a lot more. The vertical forge I understand was designed with this in mind as the floor of the forge is coated and is sometimes filled with clay kitty litter to catch the flux that drips off the billet so that the flux does not melt the kaolwool liner. Once done forging and the forge has cooled the flux and kitty litter can be scooped out and replenished. This improves the longevity of the forge liner.
The Burner
I took the simple Design Don Fogg originally posted and updated the burner as well as the coating to suit my wants. This forge will be blown using a fasco 60cfm squirrel cage fan that can be purchased here http://www.surpluscenter.com/item.asp?catname=electric&item=16-1404-A If you know someone that works in the A/c or HVAC industry you can probably have them find you one from free when they are changing out older units but for me 52 bucks shipped was cheap enough as I did not want to wait and see if my buddy could find one so I ordered it.
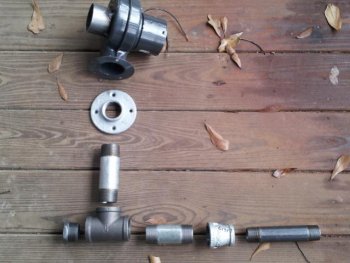
For those that do not know much about or may be wonder which burner to use for their forge a quick google search will turn up several post asking that very question. I am choosing to go blown as it is simple in construction and design, cheaper in construction than purchasing a venturi like the T-rex or Chili pepper burner unless you build one of the side arm burners such as those from High Temp, no fiddle factor. I want a reliable simple safe system that will preform the same everytime and for me that was the blown burner. The parts in the pics below make up the burner I have used in horizontal forges and is the same one that will power the vertical. Again for those new to building burners USE A SEALANT MADE FOR THE GAS YOU ARE GOING TO USE TO SEAL ALL THE FITTING OF THE BURNER. This burner is not my design but was copied from another build from a gentleman whose handle is Geoff.
1-1/4 Pipe T
1-1/4-3/4 reducer (this will reduce again to accept either 3/8's or 1/4" gas fitting)
1-1/4x5" nipple
1-1/4x4" nipple
1-1/4 to 1" bell reducer
1"x 6" nipple
1-1/4 floor plate ( you can purchase a 2 or 2.5" floor plate to match the fan outlet but you will need a 2 or 2.5 to 1-1/4 reducer) Also if you want to use just the floor plate with the 1-1/4 pipe simple place the floor plate on the pipe 5" nipple so that the center part of the flange is going up into the fan. See pic below.
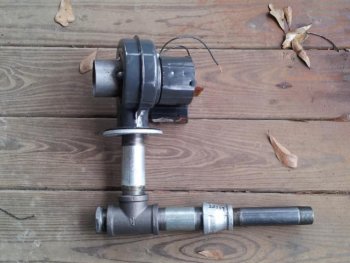
I will post more on the burner when the POL fittings, regulator and gauges arrive. I will also know if I will be using 1/" or 3/8s gas fittings and to which size reducer to purchse to place into the 1-1/4 to 3/4 reducer on the left of the T-pipe. A quality shut-off valve will be installed inline with the gas line as well.
The Forge
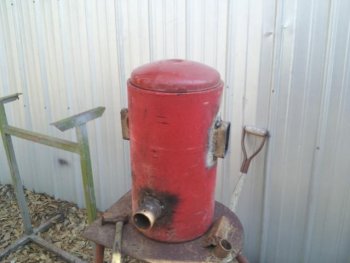
I scored a forge body for FREE several years ago. 3/8 thick 10" ID 18" tall with a 3/8's bottom welded on. You DO NOT need a body this thick and it can also be a negative thing to have one this thick as its pretty heavy but since I am an over weight firefighter in his forties I just knew I was man enough, atleast while my men were watching their capt load it up in the truck, however as soon as I could get out of their sight I was think what the heck! Again you dont need a body this thick, same goes for fire fighters as well
The lid was scavenged from the end of an airtank that was also made into a forge. The weld around the airtanks ends provides a lip to prevent the lid from dropping into the forge and seals off well. It also allows you to place 2.5 inches of kaolwool into the lid.
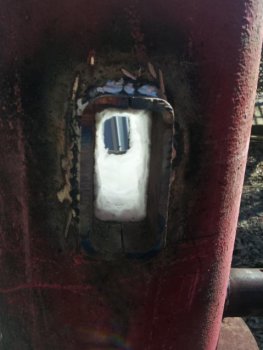
The door ways were cut using a cutting torch and I mad the openings slightly larger than the plans Don Fogg had provided said to accommodate two ports made from some square pipe. I had to cut a piece out of the square pipe to get the ports to their final size of 3-3/4 tall 1-5/8's wide. The ports are located 4"s from the top of the forge body.
The burner holder is a 1-1/2 diax 4"L piece of drill pipe that was also scavenged. I drilled and tapped it to accept 3 5/16" bolts that will securely hold the burner once its placed in the forge. I also ground down the two flanges on the 1-1/4 to 1" bell reducer so the bell will fit into the burner holder and seal it up. Untill I have everything ready to fire up I will provide a pic of what I am saying here for those that might not understand. The burner port is 3" off the bottom of the forge body and 1" above the floor of the forge.
Once all the welding was done It was time to add the kaowool blanket. For this entire project I used 6 feet of 1" refractory blanket from high temp that I had purchased a couple years ago and just now found the box in the shop with all the supplies to build the vertical forge. Due to a personal tragedy that has left an indelible mark upon me after responding to a call and having to work on my brother who a year latter had complication resulting from his accident and passed I had completely forgotten about the box from hight temp I used 2 layers of kaowool to line the inside and taking how far the lid sets into the forge I left enough blanket sticking up to seal it very well.
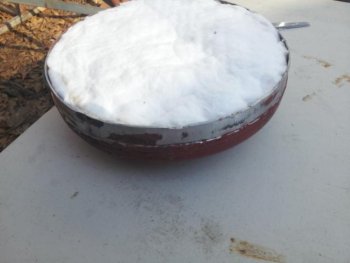
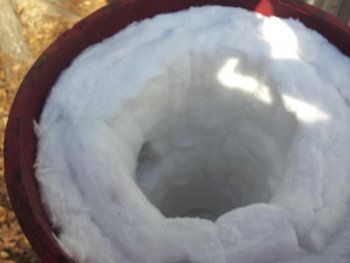
Later this week I will paint in the sananite followed by the bubble alumina then the ITC-100. If you have any questions or comments please ask and thanks for looking.
shane
I chose the vertical after having used one at a buddies shop and found several advantages over the horizontal I had used in the past.
1) For me being able to heat a portion of the blade rather than the entire blade is awesome for several reasons including not over heating thinner sections and when forging only the heated working section moves rather than the entire blade.
2) I recently learned to weld simple random patterns and plan to do a lot more. The vertical forge I understand was designed with this in mind as the floor of the forge is coated and is sometimes filled with clay kitty litter to catch the flux that drips off the billet so that the flux does not melt the kaolwool liner. Once done forging and the forge has cooled the flux and kitty litter can be scooped out and replenished. This improves the longevity of the forge liner.
The Burner
I took the simple Design Don Fogg originally posted and updated the burner as well as the coating to suit my wants. This forge will be blown using a fasco 60cfm squirrel cage fan that can be purchased here http://www.surpluscenter.com/item.asp?catname=electric&item=16-1404-A If you know someone that works in the A/c or HVAC industry you can probably have them find you one from free when they are changing out older units but for me 52 bucks shipped was cheap enough as I did not want to wait and see if my buddy could find one so I ordered it.
For those that do not know much about or may be wonder which burner to use for their forge a quick google search will turn up several post asking that very question. I am choosing to go blown as it is simple in construction and design, cheaper in construction than purchasing a venturi like the T-rex or Chili pepper burner unless you build one of the side arm burners such as those from High Temp, no fiddle factor. I want a reliable simple safe system that will preform the same everytime and for me that was the blown burner. The parts in the pics below make up the burner I have used in horizontal forges and is the same one that will power the vertical. Again for those new to building burners USE A SEALANT MADE FOR THE GAS YOU ARE GOING TO USE TO SEAL ALL THE FITTING OF THE BURNER. This burner is not my design but was copied from another build from a gentleman whose handle is Geoff.
1-1/4 Pipe T
1-1/4-3/4 reducer (this will reduce again to accept either 3/8's or 1/4" gas fitting)
1-1/4x5" nipple
1-1/4x4" nipple
1-1/4 to 1" bell reducer
1"x 6" nipple
1-1/4 floor plate ( you can purchase a 2 or 2.5" floor plate to match the fan outlet but you will need a 2 or 2.5 to 1-1/4 reducer) Also if you want to use just the floor plate with the 1-1/4 pipe simple place the floor plate on the pipe 5" nipple so that the center part of the flange is going up into the fan. See pic below.


I will post more on the burner when the POL fittings, regulator and gauges arrive. I will also know if I will be using 1/" or 3/8s gas fittings and to which size reducer to purchse to place into the 1-1/4 to 3/4 reducer on the left of the T-pipe. A quality shut-off valve will be installed inline with the gas line as well.
The Forge
I scored a forge body for FREE several years ago. 3/8 thick 10" ID 18" tall with a 3/8's bottom welded on. You DO NOT need a body this thick and it can also be a negative thing to have one this thick as its pretty heavy but since I am an over weight firefighter in his forties I just knew I was man enough, atleast while my men were watching their capt load it up in the truck, however as soon as I could get out of their sight I was think what the heck! Again you dont need a body this thick, same goes for fire fighters as well
The lid was scavenged from the end of an airtank that was also made into a forge. The weld around the airtanks ends provides a lip to prevent the lid from dropping into the forge and seals off well. It also allows you to place 2.5 inches of kaolwool into the lid.
The door ways were cut using a cutting torch and I mad the openings slightly larger than the plans Don Fogg had provided said to accommodate two ports made from some square pipe. I had to cut a piece out of the square pipe to get the ports to their final size of 3-3/4 tall 1-5/8's wide. The ports are located 4"s from the top of the forge body.
The burner holder is a 1-1/2 diax 4"L piece of drill pipe that was also scavenged. I drilled and tapped it to accept 3 5/16" bolts that will securely hold the burner once its placed in the forge. I also ground down the two flanges on the 1-1/4 to 1" bell reducer so the bell will fit into the burner holder and seal it up. Untill I have everything ready to fire up I will provide a pic of what I am saying here for those that might not understand. The burner port is 3" off the bottom of the forge body and 1" above the floor of the forge.
Once all the welding was done It was time to add the kaowool blanket. For this entire project I used 6 feet of 1" refractory blanket from high temp that I had purchased a couple years ago and just now found the box in the shop with all the supplies to build the vertical forge. Due to a personal tragedy that has left an indelible mark upon me after responding to a call and having to work on my brother who a year latter had complication resulting from his accident and passed I had completely forgotten about the box from hight temp


Later this week I will paint in the sananite followed by the bubble alumina then the ITC-100. If you have any questions or comments please ask and thanks for looking.
shane

