Shane Wink
Well-Known Member
Jason Wilder and I were texting back and forth today and he mentioned about placing a backing under the blade when I flat sand it. I told him I do but because I busted the light over my work bench out I had brought it outside the shop to take the pic. This got me to thinking that some new knife makers may not have seen a flat sanding base before so I built another one real quick to share with the dogs and put my name in for the 50 bucks that Jason is not going to win! :biggrin:
The Flat sanding base keeps a firm backing on the blade as you flat sand. There are bolts underneath the blade that simply tighten up to the bottom of the blade to support it. Its a simple to build tool and one that works better than just a board. You will need a vice to hold the base or make a bracket, a 1" wide flat piece of steel, WD-40, duck or painter tape and shop roll from 150-400 and beyond if you like.
As for the tools needed to make the base;
a drill with 5/16ths bit
foot of 1.5 angle iron
4 - 3/8ths bolts and nuts
a 3/8ths tap and lube
a strip of leather
files or a grinder with a flat platen
some type of clamp such as a C clamp is fine
In the pics below you can see the order of how to build it.
I used a foot long piece of 1.5 angel iron as the base. The angle iron needs to match the width of the blades you are working with as best you can.
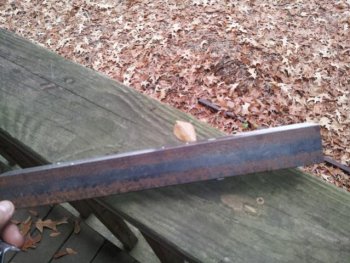
punch, drill with a 5/16ths bit and tap with a 3/8ths a series of holes on one end of the angle iron. Drill as many as you will need to support the blade lengths you plan to do. This one is for the skinners I build.
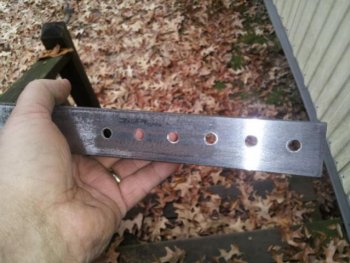
In this case I used 3/8 bolts with a nut on the back as it give a little more surface area to support the blade. Place the bolts in with about 1/8 of the bolt sticking above the surface of the base and tighten the nut on the back of each bolt so its tight. Then grind or file off flat with the surface of the base.
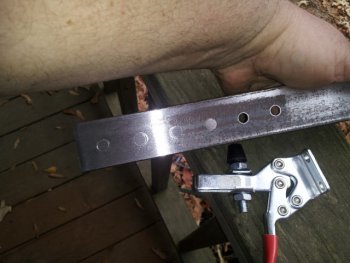
Place a strip of Leather the width of the sanding base and about an inch longer than the blades you will place on it. Place the blade on the base with the side to be sanded up and use some sort of clamp to hold the blade down tight onto the base. Be sure and place another piece of leather between the blade and the clamp to keep from scratching the blade.
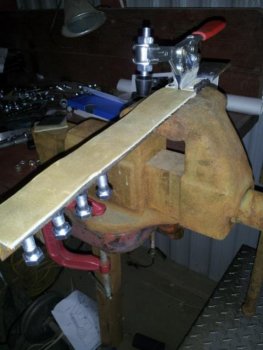
Once the blade is secure loosen the nut on each bolt and hand tighten them up against the leather till they are snug and the lather is flat along the blade. You can tighten the nuts up if you like.
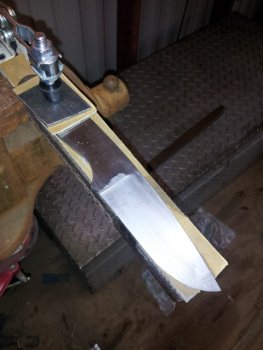
Tape up the flat bar you will use to sand the blade with. Should it slip off the shop roll it wont gouge the blade or leave an ugly scratch. lube your shop roll with some wd-40 to keep the paper from loading up as fast with metal and keep things moving nice and smooth. Draw the flat bar to you and at different angles making sure the blade is flat and never moving to the next level grit till all the scratches have been removed with the grit you are using. When you do change to the next grit make sure the blade is clean of all grit from the last level or you will be adding it to the grit you are using now and making more scratches.
I grind my blades to 120 then use the flat sanding base. I am not saying this is the way or the best way but it is my way and is a simple way to make sure the flats are flat. I dont go to 220 on the grinder because I will be going through 220 while flat sanding. I find this quicker and safer for me this way and it progresses very quickly even on a piece of CPM 3v like the one in the pic. Also since the 3v is taken to .015 at the edge before heat treat flat sanding this way lets me get the thickness I want without burning the edge which is very easy to do when getting that thin.
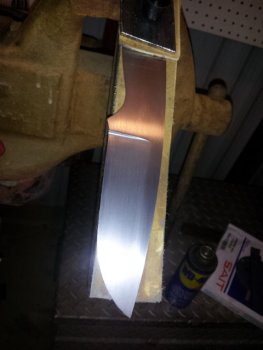
Once I am done I go back over it and mic the edge if the blade is too thin at the edge I use the 400 grit shop roll backed with a flat piece of steel to bring the entire edge back to the thickness I desire. I also go a 1/16th of an inch over the final size I want the blade to be be so I can fix little things if needed.
Thanks for reading and I hope you enjoyed this little tute on the flat sanding base.
shane
The Flat sanding base keeps a firm backing on the blade as you flat sand. There are bolts underneath the blade that simply tighten up to the bottom of the blade to support it. Its a simple to build tool and one that works better than just a board. You will need a vice to hold the base or make a bracket, a 1" wide flat piece of steel, WD-40, duck or painter tape and shop roll from 150-400 and beyond if you like.
As for the tools needed to make the base;
a drill with 5/16ths bit
foot of 1.5 angle iron
4 - 3/8ths bolts and nuts
a 3/8ths tap and lube
a strip of leather
files or a grinder with a flat platen
some type of clamp such as a C clamp is fine
In the pics below you can see the order of how to build it.
I used a foot long piece of 1.5 angel iron as the base. The angle iron needs to match the width of the blades you are working with as best you can.

punch, drill with a 5/16ths bit and tap with a 3/8ths a series of holes on one end of the angle iron. Drill as many as you will need to support the blade lengths you plan to do. This one is for the skinners I build.

In this case I used 3/8 bolts with a nut on the back as it give a little more surface area to support the blade. Place the bolts in with about 1/8 of the bolt sticking above the surface of the base and tighten the nut on the back of each bolt so its tight. Then grind or file off flat with the surface of the base.

Place a strip of Leather the width of the sanding base and about an inch longer than the blades you will place on it. Place the blade on the base with the side to be sanded up and use some sort of clamp to hold the blade down tight onto the base. Be sure and place another piece of leather between the blade and the clamp to keep from scratching the blade.

Once the blade is secure loosen the nut on each bolt and hand tighten them up against the leather till they are snug and the lather is flat along the blade. You can tighten the nuts up if you like.

Tape up the flat bar you will use to sand the blade with. Should it slip off the shop roll it wont gouge the blade or leave an ugly scratch. lube your shop roll with some wd-40 to keep the paper from loading up as fast with metal and keep things moving nice and smooth. Draw the flat bar to you and at different angles making sure the blade is flat and never moving to the next level grit till all the scratches have been removed with the grit you are using. When you do change to the next grit make sure the blade is clean of all grit from the last level or you will be adding it to the grit you are using now and making more scratches.
I grind my blades to 120 then use the flat sanding base. I am not saying this is the way or the best way but it is my way and is a simple way to make sure the flats are flat. I dont go to 220 on the grinder because I will be going through 220 while flat sanding. I find this quicker and safer for me this way and it progresses very quickly even on a piece of CPM 3v like the one in the pic. Also since the 3v is taken to .015 at the edge before heat treat flat sanding this way lets me get the thickness I want without burning the edge which is very easy to do when getting that thin.

Once I am done I go back over it and mic the edge if the blade is too thin at the edge I use the 400 grit shop roll backed with a flat piece of steel to bring the entire edge back to the thickness I desire. I also go a 1/16th of an inch over the final size I want the blade to be be so I can fix little things if needed.
Thanks for reading and I hope you enjoyed this little tute on the flat sanding base.
shane
Last edited:

