My GIB Build

Mike Martinez

Well-Known Member
Where to start, this one. About a month ago I grew tired of my sears grinder and decided to get one of the Bader Clones in the way of the EERF grinder. I sourced it out to a local company that couldn't meet a deadline and depleted me of all patience and confidence in their ability. They made multiple attempts at cutting it and failed miserably each and every time. Thankfully, my wife caught me looking at Jamie's site and "suggested," that I call the local guys and "fire them." Advice taken.

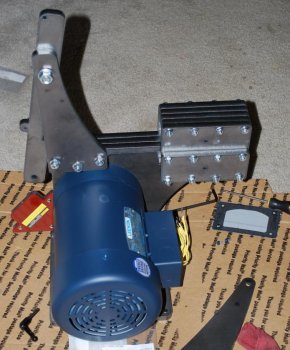
I emailed Jamie on a Friday and placed my order, lo and behold, it was at my door today at the same time that my Leeson 2hp 3ph Motor arrived. Happy me! I've been playing with it for the past hour or so before this post, and took some pictures of the mock-up aimed to see if a 145TC motor would be interchangeable with the 56C. Well, all but my decision to go with a 7/8 shaft was identical.

After coming down from the initial high that accompanies a new toy, the camera came out and some shots were taken. Bellow is my slow progress in a 115 degree Texas garage.
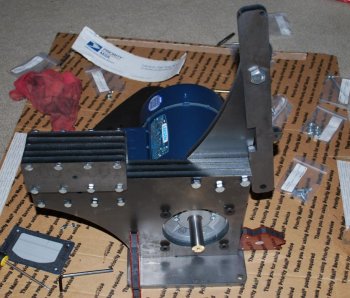
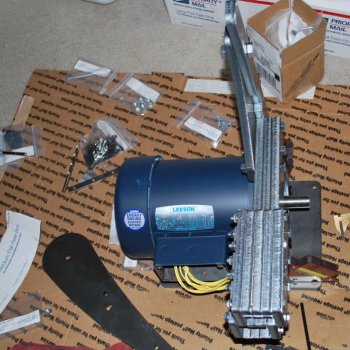
DSC_0038.jpgDSC_0037.jpgDSC_0039.jpg
 
Hopefully the temperature drops before my grinder is done. I'd hate to pass out in the garage while grinding. Darn garage gets up to about 120 since it gets direct sunlight from 9AM until the sun retires.
 
So, UPS swung by today and brought me a gift. Two band new wheels fresh from sun-ray! One a 6" drive wheel and the other a 3" tracking wheel. I'll be ready to wire the VFD tomorrow and get some sparks flying if it all goes well! Pictures to follow.
 
I've built a couple of these grinders and have two suggestions that will make it work and track MUCH better....

1. Build yourself a compression spring for the belt tension rather than using the tension spring it's designed for. No matter how many, or how big a tension spring you put on it, it will never do as good a job at tensioning the belt as a compression spring.
Grindercompressionspring1.jpg


Grindercompressionspring.jpg


2. Drill another hole as close to the end of the idler arm as practical, and mount it that way......this will bring the idler wheel forward, which gives the drive wheel more "bite" on the belts, and reduces belt slippage greatly. It will also give you more leverage, making it easier to change belts.

GrinderIdlerarmmount.jpg
 
Last edited:
Thank you Mr. Caffrey!

So now, I just need an electrical wiz to enlighten me in the finer points of wiring a motor and vfd. UPS showed up today with the correct VFD, as the first one was not the correct specs (my fault for jumping the gun.)

I went with a Teco FM50 FLUXMASTER 2HP 3PH VFD... luckily the instructions look pretty simple to follow.
 
Ed,

That's a great modification. Thank you for sharing. But I have what may be a silly question. How is the compression spring attached to the GIB?

Jay
 
The spring isn't attached to anything. In the image showing the spring, I built a "holder" (the knurled portion) for the spring to fit down over, and the threaded rod makes it adjustable. It's positioned/aligned so that the idler arm sits directly on top of the spring.....no need for any attachment......nothing special, I just stole the idea from my KMG! :)

Mike....I gotta ask the question....why did you choose that controller? Price? The reason I ask is because I have had experience with that type of controller, and I didn't like them at all. The up/down arrows change the current frequency, and they are very slow to react compared to the KBAC controller (like the one in my photos) with the "twist" knob. I hope it works out well for you, but if you find yourself hating it, my recommendation is a KBAC-27D from Wayne Coe.....he has the best prices around, and the KBAC controllers are the best on the market in my experience.
 
Mr. C, a friend of mine uses the Teco VFD and it seemed okay when I tried it out. The price was not bad either... if it doesn't work out, I'll give Mr. Coe a call.
 
As someone who knows nothing about VFD's or wiring, I chose the KBAC 27 I think its called. Any way, its the one that is in Ed's picture and t comes with the Beaumont KMG Grinder. It was very easy to wire and set up. And I say this as a guy who tripped a 240v circuit breaker three times trying to wire the receptacle.
 
"The spring isn't attached to anything. In the image showing the spring, I built a "holder" (the knurled portion) for the spring to fit down over, and the threaded rod makes it adjustable. It's positioned/aligned so that the idler arm sits directly on top of the spring.....no need for any attachment......nothing special, I just stole the idea from my KMG!"

Ed: That's cool; so it just stay where you place it there while you compress the spring!
 
Hi Guys,
I just ordered a GIB From Jamie @ Polar Bear Forge and am concidering my motor options. I know NOTHING about motors or VFD's, where can I learn more about these two ?

Thanks- Scott
 
Scott, Wayne Coe is the man to talk to. He will fix you right up.
I recommend him highly. Prices are good as well.
I don't know much about electric stuff, but Wayne walked me through everything and with the instructions
that Wayne includes with the VFD, it was actually pretty easy to set up. Didn't even pop a breaker, got it right the first time.

Trust me, call Wayne.

Here is a link to his website.
http://www.waynecoeartistblacksmith.com/Grinders.html
 
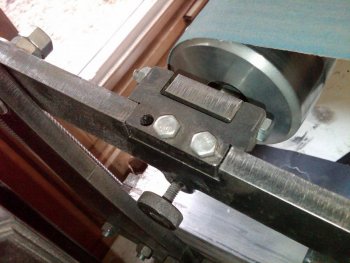
Howdy gents. I'm waiting for my GIB to show from Jamie. I have a question for you fellows that have already built your grinders. The pics on his site have me a bit confused. The assembly pics shows the tracking pivot plate or rectangular block with the 1/2-13 threaded hole in a vise with the cross (pivot) hole center punched, ready to be cross drilled on the opposite end of the threaded hole. But the pic or 2 below shows the tracking mech assembled with the pivot hole drilled just above the 1/2-13 threaded hole. Just trying to figure out which way is the correct way? Thanks for your help, Paul.
 
Paul,

I don't have the instructions, but I think you're referring to what is in the picture below. If so maybe the picture will help. Also it is somewhat instructive of another point. When you drill the holes to be tapped drill all the way through the piece, in this case the arm. I didn't and you can see the "empty" hole where I broke a tap. If you don't drill all the way through, once the tap hits the end of the hole it has no where to go. One more twist and "snap goes the tap" and a broken tap is no fun.

Jay


IMG00008-20110312-1017.jpg
 
Thanks for the response Jay. I was actually referring to the following 2 pics. The first photo shows the piece clamped in the vise in preparation for the cross hole or pivot hole to be drilled on one end while the last photo shows the two parts assembled with the cross hole drilled (on opposite end from 1st pic) for the pivot bolt just above the 1/2-13 threaded hole. Maybe I'm not explaining it well enough or does this make any sense?


Man, okay... I had to go and check my grinder... I followed the picture in the vise and drilled the point farthest from the 1/2" hole.
 
Last edited:
Ahh. Thanks for clearing that up Mike. That makes the most sense, just wasn't sure. Jay, I do know how much of a PITA a broken tap can be, have had more than a few. Fortunately enough, I have access to a mill for drilling/tapping & will at least do the drilling in the mill. Tap & hole alignment are crucial when hand tapping. Chamfering your hole & getting the tap started straight are as important as using the correct (taper, plug, bottoming) tap, especially on blind holes. Using a piloted or T-type tap wrench in a drill press also helps tremendously.
 
Paul,

Now I remember that discrepancy in the instructions. I drilled where Jack describes above, that is the farthest from the 1/2" hole, as in the picture with the item in the vise, and it worked out fine. Actually the kit is so forgiving you probably could drill both holes, instead of one, and then see which works best. ;)

Its good that you have experience and equipment for proper drilling and tapping. That should make your build quicker and better. But, not wanting to discourage the "newbies" (like myself) with nothing more than a drill press, I put a GIB together and it was my first time twisting a tap. The kit is VERY forgiving and satisfying for the novice to build.

Jay
 
Back
Top