BULLDOG FRAME LOCK WIP Mark Behnke

Mark Behnke

Well-Known Member
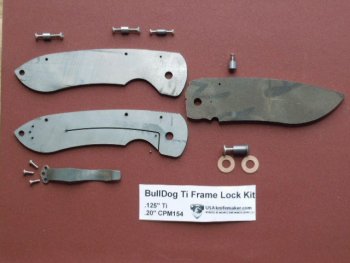
Received my kit this week, this dog is BIG, good it's going to be my EDC.
attachment.php


Here's some of the tools used.
frame lock build 003.jpg


First thing, measure everything and record for reference.
Drill and ream frame for pivot pin, but first I need to square the drill press table to the spindle.
Flat, square and parallel, very important in knife making.
I used a 123 block shimmed with a feeler gage bolted to the table.

frame lock build 2011 002.JPG
newthread.php


The parts are so precision cut that I just aligned edges clamped and ready to drill

frame lock build 2011 003.jpg
newthread.php


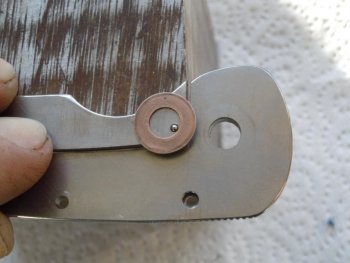
Drilled the pivot pin hole in the frame with a "D" letter drill and reamed with 1/4" reamer, The stand off holes were drilled to a #35 drill for a tight clearance for the 4-40 screws and the stop pin to a #44 for the 2-56 screws, the inside of the frame at the stop pin was drilled with a 1/8" drill for the recess
newthread.php


I said it was big, but how big? I weighed it, liners first then blade. Frame 98grams
frame lock 004.jpg
newthread.php


Blade and frame before grind 216 1/2 grams
frame lock 005.jpg
newthread.php


I plan to do a deep hollow grind that will reduce weight a lot but haven't decided on that yet.
 

Attachments

  • 2011 LL 001.JPG
    2011 LL 001.JPG
    72.8 KB · Views: 82
Last edited by a moderator:
I went out and reamed the blade pivot hole so I could assemble the knife and discovered that my #45 clearance hole for the stop pin was too tight. I had drilled the hole in a strip off mild steel and checked it but in Ti frame it was too small. I edited the text in previous post.

Working towards blade grind today so hopefully will have more progress pics later to day.

Thanks for looking in.
 
I did a rough grind (36) and that reduced the blade weight to 67 grams
linerlock blade grind 014.jpg
newreply.php

linerlock blade grind 019.jpg
newreply.php

linerlock blade grind 017.jpg
newreply.php


I'll heat treat the blade before finish, heat treating this steel will be a first, cross my fingers, the edge is about .030 now.

I filed the stop pin shoulder for a tight fit and shortened the screw on the 1/3 hp bench grinder equipped with a fine and coarse cratex wheel
linerlock blade grind 009.jpg
newreply.php

linerlock blade grind 005.jpg
newreply.php


That's all for today.
This is my second folder and my eighth knife so I'm a beginner and I know there are better ways of doing things but you gotta start somewhere.
Feel free to add comments, corrections and advice.

Thanks for looking, see you tomorrow.
 
I like that you weighed it. The bugger is stout isn't it?
You should have received the correct screws to replace the security pin screws I sent in the first batch by now.

Good WIP.. you are right on track.
 
I got the screws friday, thanks for sending those out.
This knife fills your hand, nice and simple, a work horse, can't wait to put it to use.
 
Hi Eric
Glad you're watching, I used a 10" wheel , but I watched S R Johnsons video and he grinds the loveless style, goes from a 8" or 10" then deepens the grind with a 3". Others working in that style use a 4" or 5"

Being the type that can't leave well enough alone I'm going to try it with a 2" because that's all I have, may be a big mistake, if it is I'll make a new blade. Wish me luck.
 
The lock reduction slot is cut, with a die grinder and 1/4" carbide bit.
liner lock 120 blade 006.jpg
newreply.php

I took the 2" wheel and ground the blade flatter in the middle with a steep ramp to the spine.
liner lock 120 blade 005.jpg
newreply.php

liner lock 120 blade 007.jpg
newreply.php

liner lock 120 blade 009.jpg
newreply.php

I cleaned up the frame sides on the disc sander and drilled and counter bored for the thumb stud. Next will be heat treat Thursday.
liner lock 120 blade 001.jpg
newreply.php

liner lock 120 blade 002.jpg
newreply.php
 
Did a little finish work today, polished the edges of the frame and cleaned up the lock relief, I'm sure this has been done before, I think they sell a split mandrel to do the same thing, anyway it's just a roll pin and you wrap sand paper around it, those rolls are from the auto paint store and are adhesive backed.
LL frame 004.jpg
newreply.php


LL frame 032.jpg
newreply.php

400 grit on the edges then buffed
LL frame 021.jpg
newreply.php

Tool wrap should arrive tomorrow so I'll work on the blade then final assembly.
 
I have the tool wrap but got side tracked making a pot rack,haven't done anything like that for about 20 yrs.
pot rack 014.jpg
newreply.php

Hopefully will finish the knife this week end.
 
I keep finding areas to polish and I cleaned up the blade edges near the pivot, but forgot to stay away from the spot that the stop pin contacts so I had to take a little off the blade edge to keep it off the stand offs in the closed position. Just little things like that. I'm a little nervous about Ht, being first time with SS. but its ready to go.
linerlock blade HT. Detent ball 001.jpg
newreply.php
linerlock blade HT. Detent ball 004.jpg
newreply.php
linerlock blade HT. Detent ball 008.jpg
newreply.php
linerlock blade HT. Detent ball 009.jpghttp://knifedogs.
The detent ball hole was drilled with a #53 drill and I used the .016 washer to gage depth[ATTACH]20309.vB[/ATTACH][IMG]http://knifedogs.com/newreply.php?do=postreply&t=15824

I also filed the blade and lock, went a little to far but it's Ok, more on that at final assembly.

I'm excited about finishing this knife, It's been assembled and functioning and it's a nice big knife really snaps open and closed well, not heavy but fills the hand.
 

Attachments

  • linerlock blade HT. Detent ball 007.jpg
    linerlock blade HT. Detent ball 007.jpg
    65.7 KB · Views: 46
Thanks Dwane,
The blade went in and I knew it would take a while to get to 1900 degrees, it has never been above 1500 with me and that took 1 hour and the higher the temp the slower. About 1600 I noticed my little 120v. converted wax burn-out kiln says don't exceed 1700 degrees, oh well we're going to 1900 if it will. It did reach 1900 at 11:30 soaked for 30 min. and came out clean and straight.LL HT 001.jpg
newreply.php

I clamped between the plates and shot it with compressed air.
Came out nice and clean. I struggled with Turco previously on my 1084 blades, and it pitted deeply no matter what I did.
LL HT 002.jpg
newreply.php

LL HT 003.jpg
newreply.php

LL HT 006.jpg
newreply.php


It's on its second 2 hr. temper at 400 degrees. Today I tapped the holes for the pocket clip.
A 2-56 tap drill is #50, #49 for Ti, I did one at #49 and it was slow going with the tap, so did one w/#48 and was much easier and the screw threaded in fine.

Tomorrow I hope to finish up and review.
 
I spent a lot of time on the blade, with my idea to use a 2" wheel for a deep grind, turned out like a straight razor grind. It would have been easier to use a 10" wheel then a 4" or "3" before a 2". It was hard to maintain a flat area on the blade with the 2", but it turned out well but not without flaws, it satisfied my curiosity. The spine is rounded.
linerL Finish 004.jpg
newreply.php

linerL Finish 002.jpg
newreply.php

linerL Finish 005.jpg
newreply.php
linerL Finish 006.jpg
newreply.php

linerL Finish 007.jpg
newreply.php

One thing I didn't cover was the fit of the lock bar. This pic shows the blade grind angle, this is 7 degrees and works well.
linerL Finish 008.jpg
newreply.php


That's about it, razor sharp and weighed in at 5.55 oz. Next is to cut up some rope to see how the HT holds up, carry and enjoy.
This build has really boosted my confidence so I'll try one from scratch next.
Thanks for looking and don't be afraid to try one out.
 
Nice build. It looks like it went together reasonably easy for you. That is a good sign. Now you have a heck of a good folder..
 
Back
Top