
You are using an out of date browser. It may not display this or other websites correctly.
You should upgrade or use an alternative browser.
You should upgrade or use an alternative browser.
Kitchen Knife Design
- Thread starter Justin W.
- Start date

John Wilson
Well-Known Member
Justin, first off, that design is beautiful to look at. However, it’s kinda sorta a hybrid between a chef knife and a slicer. In my opinion, the tiniest of tweaks would improve its functionality a whole lot.
For a chef knife, you’re looking for two primary characteristics because of the way the knife is used.
1. Knuckle clearance to the board. Chef’s knives are used for all manner of board work. Banging your knuckles on the board repeatedly is maddening.
For knuckle clearance, a good rule of thumb is an inch from the tip of the heel to the bottom of the handle at the ricasso. This is why chefs knives tend to be 2 inches tall at the heel.
2. A long, sloping belly. This is for rocking the knife on the board. A German style chef knife looks like a pregnant guppy. The French style has a flatter belly. A Japanese gyuto is based on the flatter French pattern with a little bit of flatter curve towards the heel. (The curve of the belly flattens out about two inches to the heel.) In my opinion, the gyuto pattern is the best of all worlds.
A slicer, on the other hand, tends to be long and straight with no belly. This is to allow for long, controlled strokes in the push and pull directions. A belly serves no purpose and often causes problems because it hits bone before the tip or heel does, preventing you from getting a complete cut.
Your knife, although beautiful, is somewhere between a chef and a slicer.
My suggestion for a chef knife is to make it 2 inches tall at the heel and to make a long sloping belly. Move the tip to be in line with the bottom of the handle. (Somewhere centerline-ish to the blade in general.)
For a slicer, put the tip on the centerline and flatten that belly by drawing a straight line from the heel to the tip.
Tip: Make one of each and you have a matching set!
By the way- your handle design is gorgeous.
Last edited:
Chris Railey
Well-Known Member
It sure is...By the way- your handle design is gorgeous.
Justin W.
Well-Known Member
The steel that I was planning on making this blade from is going to be 1.5" (because I couldn't find 2"wide aeb-l for a reasonable price) I'm going to cut out a blank out of wood or mild steel and figure out how much clearance I have for my knuckles then I will decide how to proceed
John Wilson
Well-Known Member
The steel that I was planning on making this blade from is going to be 1.5" (because I couldn't find 2"wide aeb-l for a reasonable price) I'm going to cut out a blank out of wood or mild steel and figure out how much clearance I have for my knuckles then I will decide how to proceed
1-1/2 is fine. Angle the belly of the blade such that the knife angles upward away from the board (raise the tip but keep the same sloping curve). Don’t be a slave to the dimensions I called out. They are just rules of thumb.
Last edited:
Justin W.
Well-Known Member
OK guys so I made my blank from a piece of 1/8" plastic I had lying around and i fixed some of the issues the first is that I curved the blade upward so that it can roll back and forth on the cutting board once in use. The second thing is I shaped the way the spine flows down to the tip and finally I added just a hair more real estate at the end of the handle. Whenever I was holding the blank like I would while cutting vegetables my last finger hit the point at the end of the handle instead of going in the groove so thats why I did that
Here's the revised sketches

Here's the revised sketches
John Wilson
Well-Known Member
That looks very good. Excellent.
What is the thickness of your steel? The reason I ask is because your bevels as drawn are only about an inch high. On a sushi knife that’s fine because the food you are cutting is so soft that it presents very little resistance. On thicker and firmer foods you want the thinnest wedge you can make, which is a full height grind.
It’s your knife- I don’t mean to change your design elements. Just throwing ideas out there to consider.
John Wilson
Well-Known Member
Okay, that’s pretty thick. Real thick for a slicer. For a kitchen knife that is heavy chopper territory. Don’t panic. You’re fine.
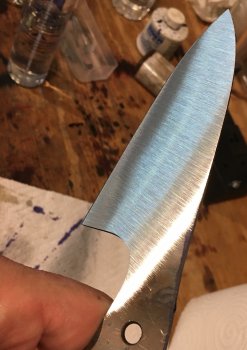
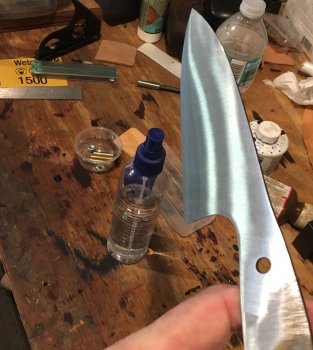
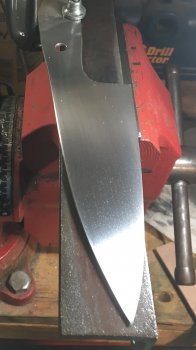
If you plan to make knife with great slicing performance, thin is the name of the game. Most Gyuto are about 2mm at the spine above the heel. That is about half the thickness of your steel. You definitely ought to consider a full height grind- mainly because you are going to want distal taper. I’ll explain.
You already know that the finished knife will be a wedge from the spine to the cutting edge. A full height grind also allows you to make it a wedge from the handle to the tip. This is called “distal taper”.
A full height grind is just that- you grind the whole side of the blade. There is no flat running along the top of the blade above the bevel. To do this you have two choices: to grind plunge lines like a normal knife, or to have no plunge lines. I prefer no plunge lines. A full height grind that goes back into the handle area will automatically make distal taper.
Here’s a couple of different knives so you can see a plunge-less distal taper from several angles.


The steel is AEBL in .110 thickness
If you plan to make knife with great slicing performance, thin is the name of the game. Most Gyuto are about 2mm at the spine above the heel. That is about half the thickness of your steel. You definitely ought to consider a full height grind- mainly because you are going to want distal taper. I’ll explain.
You already know that the finished knife will be a wedge from the spine to the cutting edge. A full height grind also allows you to make it a wedge from the handle to the tip. This is called “distal taper”.
A full height grind is just that- you grind the whole side of the blade. There is no flat running along the top of the blade above the bevel. To do this you have two choices: to grind plunge lines like a normal knife, or to have no plunge lines. I prefer no plunge lines. A full height grind that goes back into the handle area will automatically make distal taper.
Here’s a couple of different knives so you can see a plunge-less distal taper from several angles.
The steel is AEBL in .110 thickness
Justin W.
Well-Known Member
You say that and it makes me start to panicOkay, that’s pretty thick. Real thick for a slicer. For a kitchen knife that is heavy chopper territory. Don’t panic. You’re fine.
 lol I'm gonna go for the full height grind with the distal taper thanks for the help I will have to msg you guys threw this process so that I don't goof this thing up Thanks John!
John Wilson
Well-Known Member
Don't freak out, LOL. It's not THAT thick. But if you only grind halfway up the side, it won't be the best slicer in the world. A full height grind will make it a real performer.
Don't overthink it. The knife will come out just fine no matter what you do. Don't let some tiny advantage one way or the other make you think that all is lost if you don't do X or Y. Nonsense. Even if you make the worst knife ever in your eyes it will still outperform anything you buy at the store.
All of these things I bring up are just things to consider. It certainly doesn't mean that it's the only way, or even the best way. Even if you don't change a thing about your design, it will be a fine knife.
Andre Grobler
Well-Known Member
John said it all i think...
John Wilson
Well-Known Member
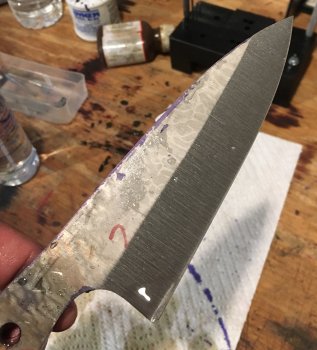
Justin, here’s my process for a distal taper with no plunges.
60 grit does most of it. I go halfway up one side then flip the blade and match it on the other side. Then up to the spine, flip and repeat. Then to the pin, flip and repeat. You get the idea.
I’m looking at three things as I go:
1. The centerline on the cutting edge
2. the centerline on the spine to make sure i’m keeping both sides symmetrical. (Without flats you need to mark the spine for reference.)
3. the grind comes back to just behind the first handle pin hole.
120 grit to final thickness. (about 15 thousandths at the edge.)
220 grit to remove 120 grit scratches.
320 grit to cut down on hand sanding time. I also round the spine here. If I don’t go to 320 on a knife I’ll round the spine at 220.
These subsequent grits will cause you to end up somewhere around 10 thousandths at the edge, give or take.
Then I hand sand at 320 and 600.
Attachments
-
 5545BCEF-E785-4E61-9992-C84659B6D15B.jpeg1.8 MB · Views: 9
 -
 C2A0D870-188B-4420-AD38-71D3967BC63D.jpeg1.7 MB · Views: 10
 -
 8403541D-1F86-45FD-AAC8-6419D521A4C0.jpeg1.5 MB · Views: 9
 -
 7EB4C86A-AD78-4FBB-BA8E-96DA2D345D9C.jpeg1.3 MB · Views: 10
 -
 DF766997-9298-499A-B170-AE6F05C9AE6E.jpeg942 KB · Views: 9