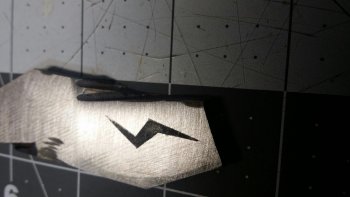
First Attempt at Etching - Help!

Jason, I don't think the carbon pad will be that big an improvement, after this is totally isolated from the stencil by the felt pad. The brass (or carbon) only purpose is to conduct electrical voltage from negative wire to the solution. I suspect folks who find a BIG improvement over a brass pad is the learning curve has been taken care of. Just like a homebuilt etcher vs commercial unit - as long as the homebuilt is providing same voltage/current (very little current is required) the stencil doesn't know the difference between homebuilt and commercial. Since carbon is a semi-conductor compared to brass, this should help if voltage is a bit high for the stencil.

Wallace, I'm with you on the red lead for negative - just ain't right! I did it correctly by using red for positive and black for negative. Had I tried to use red for negative, it would have kept me totally confused with all the other DC leads laying around where red was positive. I'd LOVE to hear someone who has a commercial unit chime in if his red lead is neg or positive.

Ken H>
 
Jason, I don't think the carbon pad will be that big an improvement, after this is totally isolated from the stencil by the felt pad. Ken H>

Ken, what's up? I thought we were buds?:1: You're right, sort of, I didn't see a big improvement in using the carbon over the others as far as the quality of the mark, maybe a little. The improvement I think I see was more in the crud department. My marker and my stencils seem to stay cleaner to me, even the felt is noticeably cleaner. I don't really think of the marker as being isolated either, the same current going through the felt is going through the brass or carbon. The pad is just a place to hold the etchant between the two conductors (blade and marker) during the process. I think when using copper, brass, ss, etc you're eating away at the markers base metal a little bit too during the process. The carbon seems to not have that issue.

Jason, I didn't buy a carbon marker, I made one out a DC motor brush I picked up on ebay. Got a 2 pack from China or $0.99 with free shipping. I just soldered my lead wire onto the brushes wire, and embedded in a handle.
 
When I first got Earnie's stencils, I burned one up pretty quick...not quite that bad, but pretty quick. He told me to hold for 3 seconds and let up for a few in reps of 10. AFter doing that, they turn out great and the stencils last a while. I use 2 9 volt batteries as a power source and it works well. It looks to me that you are either holding on the stencil too long, or you got way too much power running to it. I'm not an expert, it just seems the most likely thing I think to burn up a stencil that bad.
 
Anthony, what I wrote was NOT aimed at you by any means - If I came across wrong please accept my apologies. I want to stay friends :)

I like your explanation of benefit of carbon pad vs brass. Might be a good thing for me to try. I agree the metal of a brass pad does get "worn away", corroded or something. I usually sand to clean the brass pad from time to time. If this doesn't happen with carbon, a good reason to try it.

Ken
 
Guess I'm not so good at joking around with text and smiley faces. I was just giving you a hard time Ken.
 
Last edited:
I'd LOVE to hear someone who has a commercial unit chime in if his red lead is neg or positive.

Ken H>


I have the Personalizer (not the Plus)

This thread had me very curious so I just went and checked mine.


Etch Setting:

Red = +13VDC (Positive) and this is the lead that clips to the blade. On the Personalizer, the black lead is hard wired to the wand. You don't have a choice how to connect the leads.


Mark Setting:

Red/Black = 15VAC
 
etched blades.jpg

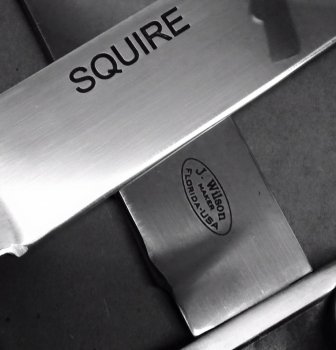
I use Ernie's stencils as well. (Ernie is FANTASTIC to deal with.) Don't tell him, but i use Windex (spray it on a towel and wipe it across the blade before laying the stencil down) and this picture is how it turns out. I haven't had any issue with stencil failure at all, and I cook the snot out of it to get a deep, dark mark.
 
John, thanks for the personalizer info - sounds like they are wired as they are "supposed" to be wired with red to positive. I just couldn't imagine it any other way, but somebody wrote/told me..... or maybe I just dreamed it?

You use the windex the way I use windex or alcohol as a cleaner to be sure the blade is degreased good. Your marks are good.

Anthony, I thought you were kidding, but I wanted to be sure I hadn't said/wrote something wrong. It's so easy sometimes when writing quickly for things to come out wrong.

I'm looking forward to Jason's next post to see how things are going with his etching.

Ken H>
 
Experiment around a little on scrap. I know there a lot of different info out the on this subject. Some use Windex to clean with, I like the rubbing alcohol 99%, clean well, clean well and then.

http://www.fullsource.com/first-aid-only-m314f/?gclid=ckwmytlzvmmcfxrk7aodiyyajq

Then I let it dry completely, and I found out a pad that is too wet is bad, blot it so it is damp. I burned up several before I got it right! Oh well it gave me a reason to change my logo and order some new stencils. I would be willing to be 1/3 of Ernie's business is due to some one burning up there stencils.
rotf.gif
rotf.gif
rotf.gif
Some days you got to laugh to keep from crying!!

Here is a link to an etching tutorial done by Boss. http://www.mickleyknives.com/html/etching_tutorial.html
 
Last edited:
View attachment 53390

I use Ernie's stencils as well. (Ernie is FANTASTIC to deal with.) Don't tell him, but i use Windex (spray it on a towel and wipe it across the blade before laying the stencil down) and this picture is how it turns out. I haven't had any issue with stencil failure at all, and I cook the snot out of it to get a deep, dark mark.

I've been messing with this stuff for six months and have probably marked 15 knives and I;ve never got one that good. Go figger.

Wallace
 
I practiced a lot on some scrap steel and I still wasn't happy with anything I was getting, either. Then I saw Boss Dog's video and also watched Butch Harner's video and it all came together.

I keep reading warnings about using too much electrolyte. Well, that's true- but nobody tells you that using too little is just as bad- and so is a dirty pad. That name on the blade in my pic "Squire" is the client's name. I did four of these knives and each one had the end customer's name on the side of the blade. SQUIRE was the third one I did without changing the pad and even though my pad was still damp (left wetness on the stencil when I touched it) half of the letters in SQUIRE had dark areas missing when I removed the stencil. You can still see some little bit missing in the R. Luckily I was able to get the stencil to lay right back down perfectly and I etched it again with a clean pad and enough electrolyte and what you see is the result.

The dirty pad causing issues makes a lot of sense considering the low amperage. It won't take much resistance to cause the electron flow to find an easier way around the higher resistance of the dirt, leaving gaps in the etch/mark. A lack of good liquid electrolyte added to it and there just isn't going to be a great electrical connection across the pad. A dry pad is, after all, pretty much a great insulator full of insulating air pockets.

I also botched up a maker's mark. I tried to lay the stencil on it just right to mark it again and let's just say I had to take that side of the blade back to 220 grit and work back to a mirror. Hey, what's an hour when you're trying to ship something out...today? And sanding the whole blade again is just so darn much fun with the handle and guard in place! Good times.
 
Last edited:
After you saw those videos what did you do different? I saw both of those videos and they must have over my head like an F-18 at 500 feet.

Wallace
 
two tiny little things.

1. The Windex. After watching Boss' video, I started misting a paper towel and running it down the blade before I lay my stencil down. Besides the obvious cleaning/degreasing the Windex provides (I was already cleaning my blades with carb/brake cleaner before etching) that little bit of moisture from the windex grabs that stencil tight and sucks it down on the blade. I used to to fight stencil movement during etching. I used tape and was really gentle with the etching wand. But having that stencil suck onto the blade like a vinyl decal (where you lay them on glass using liquid) really made a big difference.

2. Butch Harner's video showing him apply the wand, lift, apply the wand, rub the area a little, lift, apply the wand... repeat... When I started doing this my etches instantly got deeper, blacker, and sharper. The key to this is #1. I don't know how you could do all this on a stencil that wants to move even the slightest bit. Now when I'm etching I see vapor when I lift the wand, then I rub to clean the area, apply again...repeat.
 
Last edited:
OK, looks like the polarity was the big issue.
Here is a practice etch just using an electrical tape stencil.
etch test.jpg
I still need to figure out more exact etch times and intervals... this one was 8 intervals of 10 seconds each on the etch (DC) and 5 intervals of 10 seconds each to blacken (AC).
I think the pad got too dry at the end. I need to keep a closer eye on that!
 
Glad you got it going Jason - looks like a good deep etch. Some folks will allow stencil to soak in water a few minutes before etching. Helps the stencil to "grip" the blade, but the windex does that also.

Ken H
 
Back
Top