WIP The most EPIC kitchen knives ever! WIP

HHH Knives

Super Moderator
Whats up guys and gals. I hope you are felling blessed and doing well!!
happy0203.gif

We are getting ready to start on a project and I wanted to share it here on the forum with you KNIFE NUTS!
knife.gif
So, I imagine your thinking whats so EPIC about this knife Randy? Im gona tell ya.

A year or so ago I was contacted by one of our friends to make a couple of custom knives. You know. Some damascus blades. Ivory handles and HHH flare.. So your still thinking.,. Yea. So. you show pictures of stuff like that all the time.
scratchhead.gif


Heres is why I say these knives may be the most EPIC knives I ever make.......
The knives will be made using GOLD AND SILVER MOKUME fittings!!! Im thinking carved and scalloped. ferrule and butt caps!!!
sSc_eek.gif


Im gona take these knives it to a whole other level! And I plan to take you all along for the ride with lots of pictures and a full blown WIP of these!

So heres the PLAN. so far.
2 knives a 8" chef and a 6" petty

First, the making of the Mokume. combining the raw Gold and Silver with some copper and then forging it into workable size pieces of mokume. In all honesty. This is a first for me/us. And its only because of the help from my good buddy Del. That I think Jr and I will be able to pull this off!!
thumbsup.gif


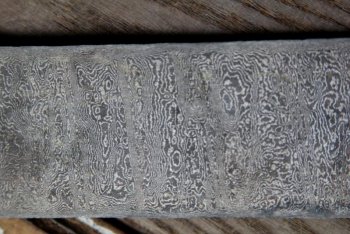
Next. Randy Jr. will forge out some amazing Stainless steel damascus and then Cad it over a Stainless steel core to make the blade steel.
viking.gif


and lastly. I will combine these materials with some amazing fossil walrus ivory and create what is sure to be the most amazing custom chef knife and petty chef knife I have ever made!
th_spitefulsmiley.gif


OK so if ya cant tell. Im pretty damn excited about this project and pleased as ever to be able to share the journey with my favorite knife Knuts!!!
bliss-smiley.gif


Stay tuned for more info and pictures!!!
God Bless YA
Randy
 
Last edited:
Awesome Dwane. Glad to have you here!


OK. So here are the first round of images. .


The first thing I had to do was to make a set of compression plates. These will be used in the process to hold everything together under pressure as its heated up.. Once at temp It has to soak for a while and that causes the 3 different metals to bond to one another and become one!


This is 1/2" thick steel plate. and I cut it to size and drilled to accept the bolts that will apply the pressure when the time is right!


A quick photo of the raw materials. We have 14k Gold, 925 sterling and jewelers grade copper.


I will alternate the materials to create different color layers.


and a side view


Thats as far as I was able to get on this today. :)
 
Hello guys! :knife: Today was great. Things were moving along good!!
Randy Jr started forging the Stainless damascus for this order. Im sorry I didnt get any images of the process. So you will have to use your imagination.. :punish:
First he Cut and cleaned up 100s of pieces of Stainless AEB-L and 304.
Then he stacked alternating layers of Aeb-l and 304 stainless in a steel can/box Which he made from steel. Then he welded the entire thing shut with another piece of steel to make a "can"
Then he welded a piece of steel rod onto the side of the can to give him a handle. To aid in moving and forging the billet.
Then the billet soaked in the forge until it was really hot. lol welding temp.. and at that point. He set the weld..
This makes the 100's of pieces... ONE!! :cool2: I never get tired of this and am still amazed at the process. Its magical. Even though I know the science behind it all. Its still magical! :2cents:
After he was satisfied that the billet was forge welded the can he so carefully made is removed. Its surface ground away to expose the damascus inside.
Hope you all can forgive me for missing the photos of this damascus being born. Ill try harder tomorrow to get some photos of the forging process to turn this big old block of SS damascus into workable size billets!


As all this was happening. I was working on the first of 3 Mokume billets that need to be made for this EPIC set of knives! As well as working on a few SPEC knives that I have been trying to find time to complete for a while now! :)


Again I gota say Thanks to Del for his help and time. teaching me and sharing hard earned knowledge with me. If you ever get a chance to talk to or meet Del. I am sure you will, like me. Find him to be a great guy with a God given gift of gab as well as teaching! lol


So its super important that everything be cleaned and all oxidation be removed from the metals. I cleaned and prepped all the materials. Gold, silver, and copper. You want and need to start with clean pieces. and in this case. its even more important that its oil free. So I used gloves and cleaned each piece in Acetone then scrubbed each piece with scotch bright pad to remove any oxidation. followed by another rinse in acetone. :cool2:


The pressure plates will be used to aid in the process. To keep these from fusing to the metals we are using. A coat of Whiteout was applied.. which helps to keep the metals from welding together. I dont know the science here, But it works :)


After everything is cleaned up. I built the stack. Here you can get creative in how you alternate the layers to get different looks. I then hold everything together with some painters tape.. This tape stays on the stack and will burn off in the process. Which aides in the oxygen free atmosphere we are wanting to achieve in the process. Everything is put together and the plates are bolted up tight :thumbsup:


Next I wrap the whole thing in a High heat SS foil to create a oxygen free environment. This keeps the oxidation to a minimum and ideally to zero! The tap I left on the stack burn up any oxygen in the bag.. At this point the whole thing goes into the oven to cook for many hours!


Now is a good time to Talk about how the metals become fused and change from many pieces to one piece of mixed materials. Its the combination of just the right amount of heat and time and enough pressure to keep all the mating surfaces tight together. while the magic happens.
Unlike damascus which we make in a forge. This will be soaked at a very precise temperature in my Heat treat oven/kiln. For many hours. and in a controlled atmosphere. And if everything works like Its suppose to. When I pull it out and remove the pressure plates. I will have a solid piece of Mokume. :) Fingers crossed.


More pictures when I pull it out of the oven later tonight


This same process could be used for a more standard stack of mokume. Say brass, copper and nickle silver. Etc.


Thanks for checking out the WIP. Comments and questions welcomed. Ill do my best to answer any questions.
 
SUCCESS!!!


Here is what it looked like right out of the pressure plates.


And after a little clean up we have this. :)


Goodnight and God Bless
Randy
 
Hello. Today I managed to get some images of the damascus being forged .


Jr started with the big ol block I described to ya yesterday. ;)


He welded a handle onto it and threw it into the forge to heat up to forging temps.


Then into the press to start the drawing process.


After a few draw heats the block is starting to look like a bar. :)


and after a hew more draw heats its turning into a rather large billet! And must be worked in sections.


Go Jr, GO!! Its almost to the desired thickness and is long enough for the 4 knives for this amazing order!!!


I took another picture of the billet of mokume that was finished yesterday. After sitting for a few hours the copper alreay started to patina a bit and you can now better see the layers and how I configured this first piece.


Did I mention that these are gona be the most EPIC set of knife EVER?


Thanks for looking. Stay tuned as this process is going to take a month or so to complete and I will be posting as I can.


God Bless
Randy
 
Ahh. I sorta figured that was what you were asking about. ALL in good time.. Ill share photos of the ivory and talk more about the plan as I move forward. Who knows I may change my mind and use another handle material.. or have a design change yea thats it. Between now and then.. Stay tuned!
 
Last edited:
Made some progress on the damascus blades today.
smile.gif
All are profiled and ready for Heat Treat.
smile.gif


The mokume is all made and now need to be rolled out to thickness. I have enlisted the help of my friend and teacher Del. He has the right tools and the experiance to get this stuff down to the desired thickness and sizes needed for this special project. Thanks Del.

So thats it for now. Im on hold for a minute while I wait for the Mokume to get back to me.

Here is a sneak peak at the Stainless damascus
 

Attachments

  • WIP stainless Prepmonster 005 (800x533).jpg
    WIP stainless Prepmonster 005 (800x533).jpg
    88.7 KB · Views: 109
Hello and Happy Thanksgiving to you all!

This one had been a challenge and I have a new respect for these materials and the guys who work with them. Yet after stepping away for a while to regroup We started working on this again. The first bar we made worked perfectly. The second and third did not. Beginners luck is all I can say, combined with Murphy law.
smile.gif
Hes always hanging around!


So after a break. I went at it again hard. and managed to get the mokume forged and finished to the sizes I need to make all 4 of these knives!

I did learn alot. and mainly that what works for one person. in there shop. with there tools . doesn't always work in my shop! Delbert. (the king of precious metal mokume) Was very kind and helpful sharing his experience with me. And Im sure that this really helped me out alot. in getting these pieces forged. So a shout out to Del! and a thank you sir for your help and time. That said. I had to do some stuff different then Del does to get the results and finished pieces!

Through this I had some choices to make. I have been given the control as to the design. construction style and materials on these knives. Meaning, when stuff got tough. and things didnt work out. I could of simplified the design and "made it work" and still fall within the parameters of the original order. That said. I also know if I was ordering this set. I would want some things on these handles. Mainly I would want to see as much of the mokume as possible. rather then just a small cap on the front and back. So Thats what I was going for and was not willing to settle for less. Although I did have to change up my original ideas. to suit the materials. and more so my ability currently to work the materials without them having catastrophic failures!!

So heres where I am at. The pieces of mokume are at this point. all solid and forged and cut to size to be the pieces for this project! I started on the hunter and rough shaped the guard and butt cap. cut the fossil walrus ivory. and drilled and fitted the guard and blade. I got started and worked for about 15 hours and forgot to take a single picture as we were forging or processing. But I did get a couple of images to share!

First of the 3 pieces. and one of the hunter where I stopped yesterday. and finally one of a piece that I am testing the idea of scalping the faces on the but caps as well as the fronts of the ferrules. Im not 100% sure on how or if I am going to do the fronts of the ferrules yet. But Im working it out in my head and will figure it out. Or just drop it from the equation. .

Sry to be all long winded and to leave this set for as long as I have. Yet happy to finally have progress and something to show!


Back
Top